I’ve spent the last several weekends in the fascinating world of “prompt engineering” and learning how vector databases like Elasticsearch® can supercharge large language models (LLMs) like ChatGPT by acting as long-term memory and a semantic knowledge store. However, one thing that has troubled me — and many other experienced data architects — is that so many of the tutorials and demos out there are wholly dependent on sending large web companies and cloud based AI companies your private data.
Private data comes in many forms and is protected for more than one reason. For startups and enterprise companies alike know their private data is sometimes their competitive advantage. Internal data and customer data often has personally identifiable information which has both legal and real world human consequences if not protected. In the Observability and Security domains, lack of caution utilizing third party services can be the source of data breaches. We’ve even heard allegations of cybersecurity breaches that have been tied to use of AI chat tools.
No design is risk free or fully private, even when working with companies like Elastic that have made strong commitments to privacy and security or making deployments that are in a true air gap. However, I’ve worked with enough sensitive data use cases to know there is very real value in enabling AI search with a privacy-first approach. I loved my colleague Jeff Vestal’s excellent walkthrough of using OpenAI tools with Elasticsearch, but this article will take a different approach.
I have two goals for the approach of this project:
- Private — When I say private, I mean it. While I’ll use cloud hosted Elasticsearch, should the use case demand it, I want this to work fully air-gapped. Let’s prove that we can get AI search working without sending our private knowledge to third parties.
- Fun — Also, let’s have some fun while we do it. We’ll use a scrape of Wookieepedia, a community Star Wars wiki popular in data science exercises, and make a private AI trivia helper. It was nearing May the 4th as I was writing this, and although we’re past that date now at the time of this post publishing, my fandom is year-round.
The easiest way to follow along and try it yourself is to spin up an Elasticsearch instance on Elastic Cloud and run through the provided Python notebook, which will implement the project at a small scale. If you’d like to run the full Wookieepedia scrape of 180K paragraphs of Star Wars knowledge and create a well versed Star Wars knowledge search, you can follow the code in the GitHub repository here.
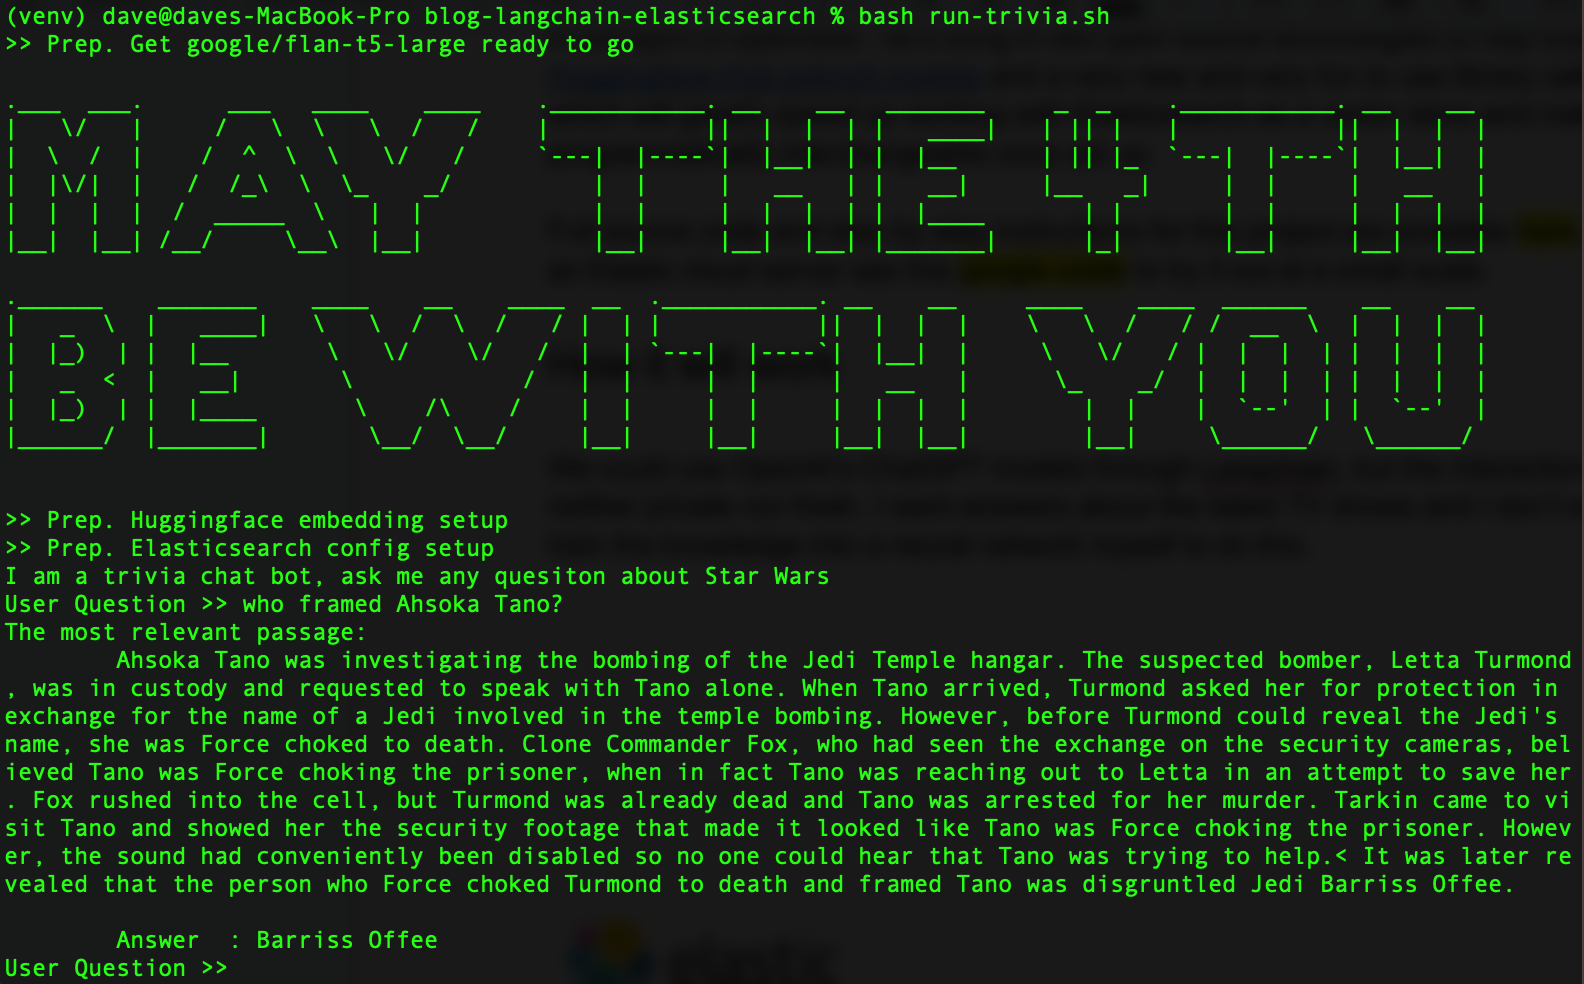
When it’s all done, it should look like this:
In the spirit of openness, let’s bring in two open source technologies to help Elasticsearch: Hugging Face transformers library and the new and fun to use Python library called LangChain, which will speed up working with Elasticsearch as a vector database. As a bonus, LangChain will make our LLMs programmatically interchangeable once they are set up, so that we’re free to experiment with various models.
How it will work
What is LangChain? LangChain is a Python and JavaScript framework for developing applications powered by large language models. LangChain will work with OpenAI’s APIs, but it also excels at abstracting away the differences between databases and AI tools.
On its own, ChatGPT is not bad at Star Wars trivia. However, its training data set is now several years old and we want answers about the latest TV shows and events in the Star Wars universe. Also remember that we are pretending this data is too private to share with a big LLM in the cloud. We could tune a large language model ourselves with more recent data, but there is a much easier way to get this done that also allows us to always use the freshest data available.
Today let’s bring in a smaller and easy to self-host LLM. I got good results with Google’s flan-t5-large model, which makes up for its lack of training with a good ability to parse out answers from injected context. We’ll use semantic search to retrieve our private knowledge and then inject that context with a question to our private LLM.
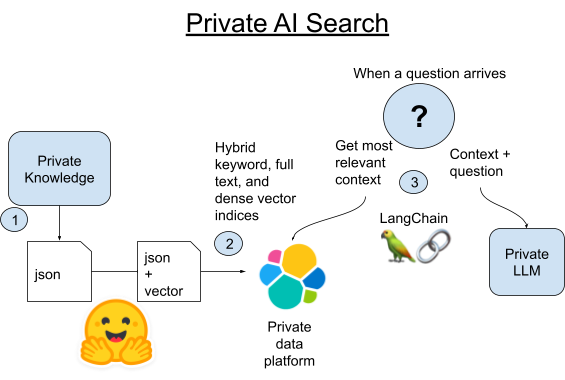
- Scrape all canon articles from Wookieepedia putting the data in staged Python Pickle files.
2A. Load each paragraph of those articles into Elasticsearch using LangChain’s built-in Vectorstore library.
2B. Alternatively, we can compare LangChain with the new way of hosting pytorch transformers in Elasticsearch itself. We’ll deploy the text embedding model to Elasticsearch to leverage distributed compute and speed up the process.
- When a question comes in, we’ll find the most semantically similar paragraph to the question using Elasticsearch’s vector search. We’ll then take that paragraph and add it to the prompt of a small, local LLM as context to the question and then leave it to the magic of generative AI to get a short answer to our trivia question.
Setting up the Python and Elasticsearch environment
Make sure you have Python 3.9 or similar on your machine. I use 3.9 for easier library compatibility with GPU acceleration, but that won’t be necessary for this project. Any recent 3.X version of Python will work.
python3 -m venv venv
source venv/bin/activate
pip install --upgrade pip
pip install beautifulsoup4 eland elasticsearch huggingface-hub langchain tqdm torch requests sentence_transformers
If you’ve downloaded the sample code, you can just pull the exact versions of the code I was using with the following pip install command instead.
pip install -r requirements.txtYou can set up an Elasticsearch cluster following instructions here. The free cloud trial is the easiest way to get started.
Make a .env file in the folder and load up your connection details for Elasticsearch.
export ES_SERVER="YOURDESSERVERNAME.es.us-central1.gcp.cloud.es.io"
export ES_USERNAME="YOUR READ WRITE AND INDEX CREATING USER"
export ES_PASSWORD="YOUR PASSWORD"
Step 1. Scraping the data
The code repo has a small data set at Dataset/starwars_small_sample_data.pickle. You can skip this step if you are okay working at a small scale.
The scraping code is adapted from Dennis Bakhuis’s excellent data science blog and project — check it out! He only pulls the first paragraph of each article, and I’ve changed the code to pull it all. He may have needed to keep the data at a size that fit in primary memory, but we don’t have that problem because we have Elasticsearch, which would enable this to scale well into the petabyte range.
You could also very easily plug in your own private data source here. LangChain has some excellent utility libraries for splitting up your text data into shorter chunks.
Scraping isn’t the focus of this article, so check out the Python notebook if you want to run it yourself at a small scale, or download the source code and run like this:
source .env
python3 step-1A-scrape-urls.py
python3 step-1B-scrape-content.py
When you are done, you should be able to go through the saved Pickle files like this to make sure it worked.
from pathlib import Path
import pickle


bookFilePath = "starwars_*_data*.pickle"
files = sorted(Path('./Dataset').glob(bookFilePath))
for fn in files:
   with open(fn,'rb') as f:
       part = pickle.load(f)
       for key, value in part.items():
           title = value['title'].strip()
           print(title)
If you skipped web scraping, just change the bookFilePath to “starwars_small_sample_data.pickle” to use the sample that I included in the GitHub repo.
Step 2A. Loading embeddings in Elasticsearch
The full code shows how I do this with just LangChain. The key part of the code is looping through the saved Pickle files like the above example and extracting out a list of strings that are the paragraphs, and then handing them to the from_texts() function of the LangChain Vectorstore.
from langchain.vectorstores import ElasticVectorSearch
from langchain.embeddings import HuggingFaceEmbeddings
from pathlib import Path
import pickle
import os
from tqdm import tqdm


model_name = "sentence-transformers/all-mpnet-base-v2"
hf = HuggingFaceEmbeddings(model_name=model_name)


index_name = "book_wookieepedia_mpnet"
endpoint = os.getenv('ES_SERVER', 'ERROR')
username = os.getenv('ES_USERNAME', 'ERROR')
password = os.getenv('ES_PASSWORD', 'ERROR')
url = f"https://{username}:{password}@{endpoint}:443"
db = ElasticVectorSearch(embedding=hf, elasticsearch_url=url, index_name=index_name)


batchtext = []
bookFilePath = "starwars_*_data*.pickle"
files = sorted(Path('./Dataset').glob(bookFilePath))
for fn in files:
    with open(fn,'rb') as f:
       part = pickle.load(f)
       for ix, (key, value) in tqdm(enumerate(part.items()), total=len(part)):
           paragraphs = value['paragraph']
           for p in paragraphs:
               batchtext.append(p)
       db.from_texts(batchtext,
                     embedding=hf,
                     elasticsearch_url=url,
                     index_name=index_name)
Step 2B. Saving time and money with Hosted Trained Models
I found that on my older Intel Macbook, creating embeddings would require many hours of processing. I’m being kind — it was looking like multiple days. I think I can do it faster and for less money using the dynamically scalable machine learning (ML) nodes of Elastic’s hosted service. The free trial clusters won’t let you scale that tier, so this step may make more sense for some than others.
The final result: this approach took 40 minutes on nodes that cost $5/hr to run in Elastic Cloud, which is much faster than what I can do locally and on par with the cost of processing embeddings with OpenAI’s current token charges. Doing this efficiently is a larger topic, but I’m impressed by how quickly I could get a parallel inference pipeline working in Elastic Cloud without having to learn new skills or hand my data to a non-private API.
For this step, we are going to offload embedding generation to the Elasticsearch cluster itself, which can host the embedding model and embed the paragraphs of text in a distributed fashion. To do this, we’ll have to load data and use ingest pipelines to make sure the final form matches the index mapping that LangChain uses. Run the following REST command in Kibana’s Dev Tools:
PUT /book_wookieepedia_mpnet
{
 "settings": {
   "number_of_shards": 4
 },
 "mappings": {
   "properties": {
     "metadata": {
       "type": "object"
     },
     "text": {
       "type": "text"
     },
     "vector": {
       "type": "dense_vector",
       "dims": 768
     }
   }
 }
}
Next, we’ll upload the embedding model to Elasticsearch using the eland Python library.
source .env
python3 step-3A-upload-model.py
Next let's go to the Elastic Cloud console and scale our ML tier to 64 total vCPUs (8x the power of my current laptop).

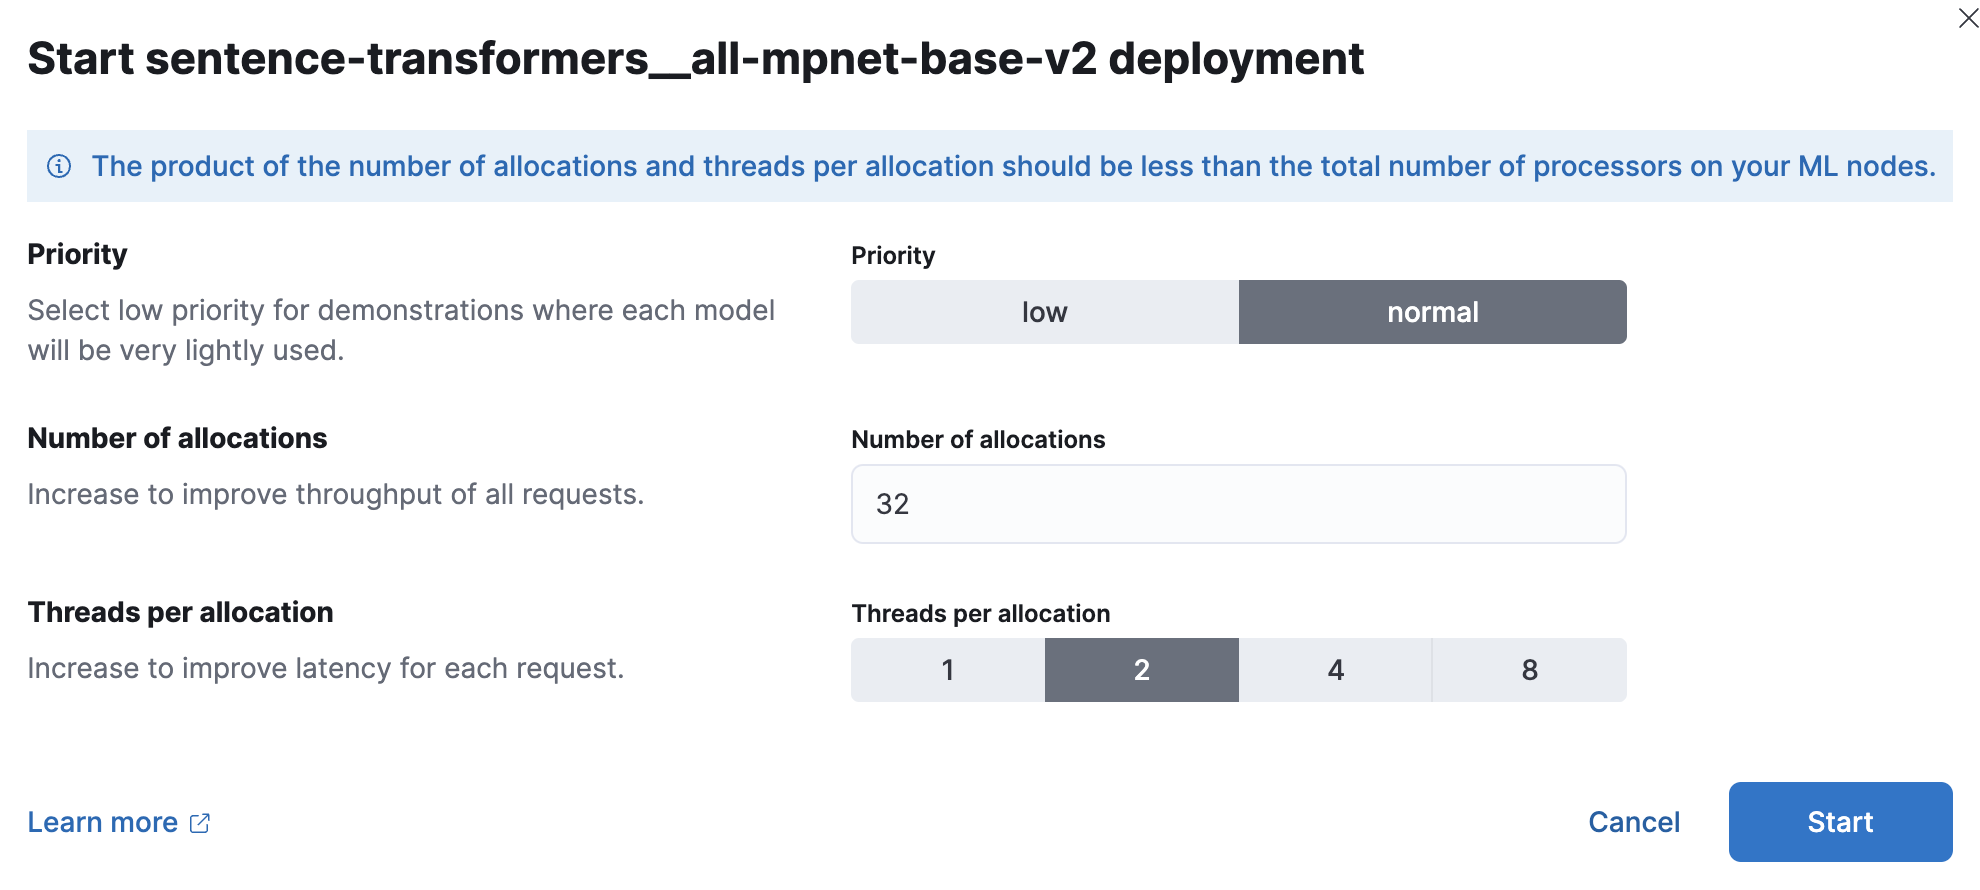
Now, in Kibana, we’ll deploy the trained ML model. At scale, performance testing has shown that users should start with 1 thread per model allocation and increase the number of allocations to increase throughput. The documentation and guidance can be found here. I experimented, and for this smaller set I got the best results with 32 instances at 2 threads each. To set this up, go to Stack Management > Machine Learning. Use the Synchronize saved objects feature to make Kibana see the model we pushed into Elasticsearch with the Python code. Then deploy the model in the menu that comes up when you click it.
Now let's use Dev Tools again to create a new index and ingest pipeline that processes the paragraph of text in a document, puts the result in a dense vector field called "vector," and copies the paragraph to the expected "text" field.
PUT /book_wookieepedia_mpnet
{
 "settings": {
   "number_of_shards": 4
 },
 "mappings": {
   "properties": {
     "metadata": {
       "type": "object"
     },
     "text": {
       "type": "text"
     },
     "vector": {
       "type": "dense_vector",
       "dims": 768
     }
   }
 }
}


PUT _ingest/pipeline/sw-embeddings
{
 "description": "Text embedding pipeline",
 "processors": [
   {
     "inference": {
       "model_id": "sentence-transformers__all-mpnet-base-v2",
       "target_field": "text_embedding",
       "field_map": {
         "text": "text_field"
       }
     }
   },
   {
     "set":{
       "field": "vector",
       "copy_from": "text_embedding.predicted_value"
     }
   },
   {
     "remove": {
       "field": "text_embedding"
     }
   }
 ],
 "on_failure": [
   {
     "set": {
       "description": "Index document to 'failed-<index>'",
       "field": "_index",
       "value": "failed-{{{_index}}}"
     }
   },
   {
     "set": {
       "description": "Set error message",
       "field": "ingest.failure",
       "value": "{{_ingest.on_failure_message}}"
     }
   }
 ]
}
Test the pipeline to make sure it's working.
POST _ingest/pipeline/sw-embeddings/_simulate
{
 "docs": [
   {
     "_source": {
       "text": "Lorem ipsum dolor sit amet, consectetur adipiscing elit, sed do eiusmod tempor incididunt ut labore et dolore magna aliqua. Ut enim ad minim veniam, quis nostrud exercitation ullamco laboris nisi ut aliquip ex ea commodo consequat. Duis aute irure dolor in reprehenderit in voluptate velit esse cillum dolore eu fugiat nulla pariatur. Excepteur sint occaecat cupidatat non proident, sunt in culpa qui officia deserunt mollit anim id est laborum.",
       "metadata": {
         "a": "b"
       }
     }
   }
 ]
}
Now we are ready to batch load data using the normal Python library for Elasticsearch, targeting our ingest pipeline to correctly create the vector embedding and transform our data to match LangChain’s expectations.
source .env
python3 step-3B-batch-hosted-vectorize.py
Success! The data is about 13M tokens in OpenAI terms, so processing this in the non-private and cloud would be around 5/hr.
With the data loaded, remember to scale your Cloud ML back down to zero or something more reasonable using the cloud console.
Step 3. Win at Star Wars trivia
Next let's play with the LLM and LangChain. I created a library file lib_llm.py to hold this code.
from langchain import PromptTemplate, HuggingFaceHub, LLMChain
from langchain.llms import HuggingFacePipeline
from transformers import AutoTokenizer, pipeline, AutoModelForSeq2SeqLM
from langchain.vectorstores import ElasticVectorSearch
from langchain.embeddings import HuggingFaceEmbeddings
import os


cache_dir = "./cache"
def getFlanLarge():

   model_id = 'google/flan-t5-large'
   print(f">> Prep. Get {model_id} ready to go")
   tokenizer = AutoTokenizer.from_pretrained(model_id)
   model = AutoModelForSeq2SeqLM.from_pretrained(model_id, cache_dir=cache_dir)

   pipe = pipeline(
       "text2text-generation",
       model=model,
       tokenizer=tokenizer,
       max_length=100
   )
   llm = HuggingFacePipeline(pipeline=pipe)
   return llm


local_llm = getFlanLarge()


def make_the_llm():
   template_informed = """
   I am a helpful AI that answers questions.
   When I don't know the answer I say I don't know.
   I know context: {context}
   when asked: {question}
   my response using only information in the context is: """
   prompt_informed = PromptTemplate(
       template=template_informed,
       input_variables=["context", "question"])
   return LLMChain(prompt=prompt_informed, llm=local_llm)


## continued below
The template_informed is the critical but also easy to understand part of this. All we are doing is formatting a prompt template, which will take our two parameters: the context and the question from the user.
With this final main code continued from above, it looks like the following:
## continued from above


topic = "Star Wars"
index_name = "book_wookieepedia_mpnet"


# Create the HuggingFace Transformer like before
model_name = "sentence-transformers/all-mpnet-base-v2"
hf = HuggingFaceEmbeddings(model_name=model_name)


## Elasticsearch as a vector db, just like before
endpoint = os.getenv('ES_SERVER', 'ERROR')
username = os.getenv('ES_USERNAME', 'ERROR')
password = os.getenv('ES_PASSWORD', 'ERROR')
url = f"https://{username}:{password}@{endpoint}:443"
db = ElasticVectorSearch(embedding=hf, elasticsearch_url=url, index_name=index_name)


## set up the conversational LLM
llm_chain_informed= make_the_llm()


def ask_a_question(question):
   ## get the relevant chunk from Elasticsearch for a question
   similar_docs = db.similarity_search(question)
   print(f'The most relevant passage: \n\t{similar_docs[0].page_content}')
   informed_context= similar_docs[0].page_content
   informed_response = llm_chain_informed.run(
       context=informed_context,
       question=question)
   return informed_response


# The conversational loop
print(f'I am a trivia chat bot, ask me any question about {topic}')
while True:
   command = input("User Question >> ")
   response= ask_a_question(command)
   print(f"\tAnswer  : {response}")
Conclusion
So with some data wrangling, we’ve now used AI without exposing our data to a 3rd party hosted LLM. The world of AI is changing quickly, but preserving the security and control of private data is something we should all be taking seriously for the regulatory, financial, and human consequences of data breaches. That is unlikely to change. We work with customers who use search to investigate fraud, defend their nation, and improve outcomes for vulnerable patient communities. Privacy matters. To learn more about how Elastic is used in these spaces, check out:
Have you fallen in love with LangChain as much as I have? As a wise old Jedi once said: “That's good. You have taken your first step into a larger world.” There are lots of directions to go from here. LangChain takes the complexity away from working with AI prompt engineering. I know Elasticsearch has many other roles to play here as long term memory for generative AI, so I am very excited to see what comes out of this quickly changing space.
In this blog post, we may have used third party generative AI tools, which are owned and operated by their respective owners. Elastic does not have any control over the third party tools and we have no responsibility or liability for their content, operation or use, nor for any loss or damage that may arise from your use of such tools. Please exercise caution when using AI tools with personal, sensitive or confidential information. Any data you submit may be used for AI training or other purposes. There is no guarantee that information you provide will be kept secure or confidential. You should familiarize yourself with the privacy practices and terms of use of any generative AI tools prior to use.
Elastic, Elasticsearch and associated marks are trademarks, logos or registered trademarks of Elasticsearch N.V. in the United States and other countries. All other company and product names are trademarks, logos or registered trademarks of their respective owners.

