Using Kibana with Shield
editUsing Kibana with Shield
editKibana users have to authenticate when your cluster has Shield installed. You configure Shield roles for your Kibana users to control what data those users can access. Kibana runs a webserver that makes requests to Elasticsearch on the client’s behalf, so you also need to configure credentials for the Kibana server so those requests can be authenticated. In addition, you can encrypt communications between the Kibana server and Elasticsearch.
If you are using Kibana 3, you must use Shield 1.3, which is compatible with Elasticsearch 1.5+. For more information, see Using Kibana 3 with Shield.
With Shield installed, if you load a Kibana dashboard that accesses data in an index that you are not authorized to view, you get an error that indicates the index does not exist. Kibana and Shield do not currently provide a way to control which users can load which dashboards.
To use Kibana with Shield:
-
Configure credentials for the Kibana server. The Kibana server needs access to the cluster monitoring APIs and the
.kibanaindex. The server does not need access to user indexes. The required privileges are specified in the kibana4_server role provided in the default Shieldroles.ymlfile.-
Create a user account for the Kibana server and assign it the
kibana4_serverrole. For example, if you’re using the defaultesusersrealm, you can create akibana-serveruser with theuseraddcommand:esusers useradd kibana4-server -r kibana4_server -p password
If you are using an LDAP, Active Directory, or PKI realm, you need to create a user for the Kibana server and map the user’s distinguished name to the
kibana4_serverrole in the Shield role mapping file. By default, role mappings are stored inconfig/shield/role_mapping.yml. For example, the following snippet assigns thekibana4_serverrole to an LDAP or Active Directory user namedkibana-server:kibana4_server: - "cn=kibana-server,cn=applications,dc=example,dc=com"
For PKI realms, you specify the user’s common name, organizational unit, and organization:
kibana4_server:
  - "cn=kibana-server,ou=example,o=com"
-
Specify the credentials for your Kibana server user in the Kibana configuration file,
/config/kibana.yml.elasticsearch.username: kibana4-server elasticsearch.password: password
-
-
Derive Kibana 4 user roles from the default
kibana4user role and add them toroles.ymlto control which indices your Kibana users can access. Kibana users need access to the indices that they will be working with and the.kibanaindex where their saved searches, visualizations, and dashboards are stored. The defaultkibana4role grants read access to all indices and full access to the.kibanaindex. Users also need access to the.kibana-devnullindex.We strongly recommend creating custom
kibana4user roles to limit access to specific indices according to your organization’s goals and policies. You can define as many different roles for your Kibana 4 users as you need.To constrain Kibana’s access to specific indices, explicitly specify the index names in your role. When configuring a role for a Kibana user and granting access to a specific index, at a minimum the user needs the following privileges on the index:
indices:admin/mappings/fields/get
indices:admin/validate/query
indices:data/read/search
indices:data/read/msearch
indices:data/read/field_stats
indices:admin/get
For example, the following
my_kibana_userrole only allows users to discover and visualize data in thelogstash-*indices.my_kibana_user: cluster: - cluster:monitor/nodes/info - cluster:monitor/health indices: 'logstash-*': - indices:admin/mappings/fields/get - indices:admin/validate/query - indices:data/read/search - indices:data/read/msearch - indices:data/read/field_stats - indices:admin/get '.kibana*': - indices:admin/create - indices:admin/exists - indices:admin/mapping/put - indices:admin/mappings/fields/get - indices:admin/refresh - indices:admin/validate/query - indices:data/read/get - indices:data/read/mget - indices:data/read/search - indices:data/read/msearch - indices:data/write/delete - indices:data/write/index - indices:data/write/update -
Assign the appropriate roles to your Kibana users or groups of users:
-
If you’re using the default
esusersrealm, you can assign roles when you add a user, or modify the role assignments with therolescommand. For example, the following command creates a user namedjacknichand assigns thekibana4_monitoringrole:esusers useradd jacknich -r kibana4_monitoring -p password
-
If you are using an LDAP or Active Directory realm, you can either assign roles on a per user basis, or assign roles to groups of users. By default, role mappings are stored in
config/shield/role_mapping.yml. For example, the following snippet assigns thekibana4_monitoringrole to the group namedadminsand the user named Jack Nicholson:kibana4_monitoring: - "cn=admins,dc=example,dc=com" - "cn=Jack Nicholson,dc=example,dc=com"
-
-
If you have enabled SSL encryption in Shield, configure Kibana 4 to connect to Elasticsearch via HTTPS. To do this:
-
Specify the HTTPS protocol in the
elasticsearch.urlsetting in the Kibana configuration file,kibana.yml:elasticsearch.url: "https://<your_elasticsearch_host>.com:9200"
-
If you are using your own CA to sign certificates for Elasticsearch, set the
elasticsearch.ssl.casetting inkibana.ymlto specify the location of the PEM file.elasticsearch.ssl.ca: /path/to/your/cacert.pem
-
-
Configure Kibana 4 to encrypt communications between the browser and the Kibana server. To do this, configure the
server.ssl.keyandserver.ssl.certproperties inkibana.yml:server.ssl.key: /path/to/your/server.key server.ssl.cert: /path/to/your/server.crt
Once you enable SSL encryption between the browser and the Kibana server, access Kibana via HTTPS. For example,
https://localhost:5601.Enabling browser encryption is required to prevent passing user credentials in the clear.
-
Install the Shield plugin into Kibana. The Shield plugin secures user sessions and enables users to log in and out of Kibana. To install the Shield plugin:
-
Run the following command in your Kibana installation directory to install the Shield plugin.
bin/kibana plugin --install kibana/shield/2.2.1
To perform an offline install, download the Shield plugin from
http://download.elastic.co/kibana/shield/shield-2.2.1.tar.gz(sha1) and runbin/kibana plugin --install shield --url file:///path/to/file/shield-2.2.1.tar.gz. -
Set the
shield.encryptionKeyproperty in thekibana.ymlconfiguration file. You can use any text string as the encryption key.shield.encryptionKey: "something_secret"
-
To change the default session duration, set the
shield.sessionTimeoutproperty in thekibana.ymlconfiguration file. By default, sessions expire after 30 minutes. The timeout is specified in milliseconds. For example, set the timeout to 600000 to expire sessions after 10 minutes:shield.sessionTimeout: 600000
-
-
Restart Kibana and verify that you can sign in as a user. If you are running Kibana locally, go to
https://localhost:5601and enter the credentials for a user you’ve assigned a Kibana user role. For example, you could log in as thejacknichuser created in step 3.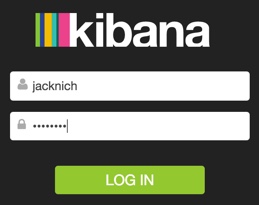
This must be a user who has been assigned a role derived from the default
kibana4user role. Kibana server credentials should only be used internally by the Kibana server. Thekibana4_serverrole doesn’t grant permission to create the.kibanaindex or access user indices.
Default Roles for Kibana
editDefault roles for Kibana 4 are provided in roles.yml.
The default user role grants read access to all indices. We strongly recommend deriving custom roles for your Kibana users that limit access to specific indices according to your organization’s goals and policies.
kibana4:
  cluster:
      - cluster:monitor/nodes/info
      - cluster:monitor/health
  indices:
    '*':
      - indices:admin/mappings/fields/get
      - indices:admin/validate/query
      - indices:data/read/search
      - indices:data/read/msearch
      - indices:admin/get
   '.kibana*':
      - indices:admin/create
      - indices:admin/exists
      - indices:admin/mapping/put
      - indices:admin/mappings/fields/get
      - indices:admin/refresh
      - indices:admin/validate/query
      - indices:data/read/get
      - indices:data/read/mget
      - indices:data/read/search
      - indices:data/read/msearch
      - indices:data/write/delete
      - indices:data/write/index
      - indices:data/write/update
kibana4_server:
  cluster:
      - cluster:monitor/nodes/info
      - cluster:monitor/health
  indices:
    '.kibana':
      - indices:admin/create
      - indices:admin/exists
      - indices:admin/mapping/put
      - indices:admin/mappings/fields/get
      - indices:admin/refresh
      - indices:admin/validate/query
      - indices:data/read/get
      - indices:data/read/mget
      - indices:data/read/search
      - indices:data/write/delete
      - indices:data/write/index
      - indices:data/write/update