Enable Full Disk Access for the Endgame sensor
editEnable Full Disk Access for the Endgame sensor
editIf your solution includes Elastic Endgame, it requires Full Disk Access to protect you from malware and other cybersecurity threats. Full Disk Access permissions is a new privacy feature introduced in macOS Mojave (10.14) that controls which applications can access your data. This means you need to manually enable Full Disk Access permission for the Endgame sensor to access these protected areas of your Mac.
macOS permissions
editThe behavior of the Endgame sensor differs based on your macOS version. MDM/Jamf users can pre-approve all Full Disk Access without granting permission to the sensor. However, depending on the macOS version and sensor type, non-MDM/Jamf users may be prompted to enable Full Disk Access for required security files.
Here are the following Full Disk Access requirements for specific versions of macOS:
-
10.13, 10.14, 10.15: You cannot install the sensor without allowing it to load a kernel extension. During installation, you’ll be prompted to go to System Preferences and approve it. Upon approval, installation proceeds. -
11.0,12.0: You cannot install the sensor without allowing it to load a system extension. During installation, you’ll be prompted to go to System Preferences and approve it. Upon approval, a second prompt appears to enable Network Filtering. Approve this final prompt to proceed.You must also grant Full Disk Access to
com.endgame.systemextension. -
10.14.6+, 10.15, 11.0, 12.0: Grant the esensor file Full Disk Access.
The following instructions apply to the Endgame sensor only. To see requirements for the Elastic Endpoint, refer to Install Elastic Endpoint manually.
Approve the kernel extension for the Endgame sensor
editFor endpoints running macOS Mojave (10.14) and earlier, the Endgame sensor will attempt to load a kernel extension (as opposed to a system extension) during installation. This kernel extension is required to provide insight into system events such as process events, file system events, and network events. The following prompt appears during installation:
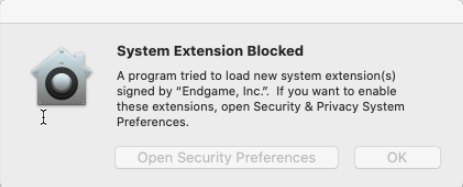
To approve the extension:
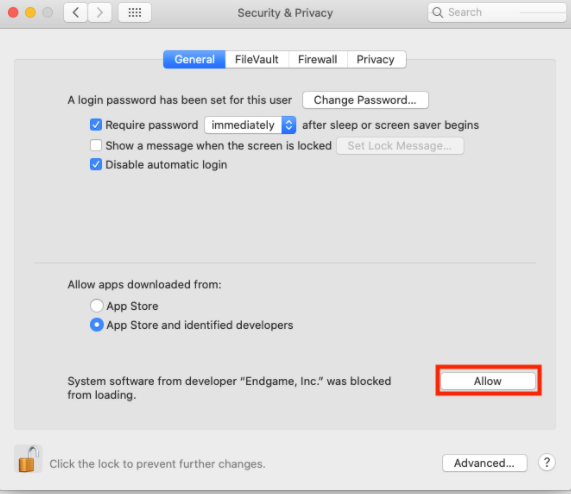
- Click Open Security Preferences.
- In the lower-left corner of the pane, click the Lock button, then enter your credentials to authenticate.
-
Click Allow to load the kernel extension.
If the prompt does not appear, enable the extension by doing the following:
- Open a Terminal application.
-
Enter
kextload /Library/Extension/kendpoint.kext. Prepend the command withsudoif necessary. You should receive an output similar to149 0 0xffffff7f82e7b000 0x21000 0x21000 co.elastic.kendpoint (7.11.0) BD152A57-ABD3-370A-BBE8-D15A0FCBD19A <6 5 2 1>. If you receive this output, the kernel extension is enabled.
Approve the system extension for the Endgame sensor
editTo fully protect endpoints from malware and other cybersecurity threats when using Elastic Endgame with system extensions, you must enable Full Disk Access for the system extension during installation on macOS Big Sur (11.0) and later.
When you receive the prompt to approve loading the system extension:
- Open the System Preferences application.
-
Select Security and Privacy.

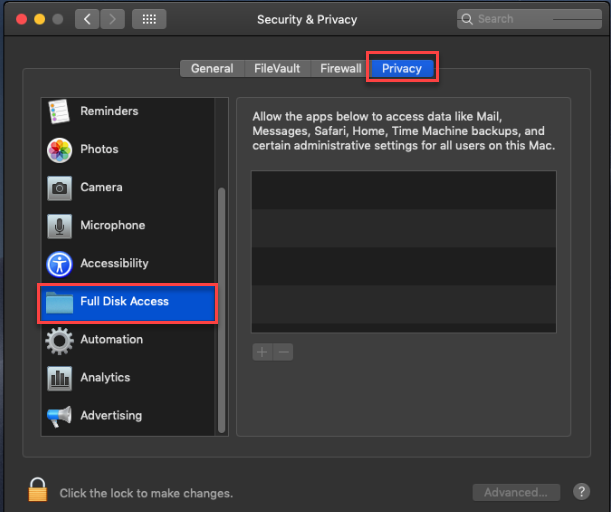
- On the Security and Privacy pane, select the Privacy tab.
-
From the left pane, select Full Disk Access.
- In the lower-left corner of the pane, click the Lock button, then enter your credentials to authenticate.
-
Click the + button to view Finder. Find
com.endgame.systemextensionand select it. - Continue below to enable Full Disk Access for the Endgame sensor.
Enable Full Disk Access for the Endgame sensor
editFor the Endgame sensor to detect events from a macOS host, you must enable Full Disk Access for the esensor file, which appears once you’ve downloaded the sensor on your host.
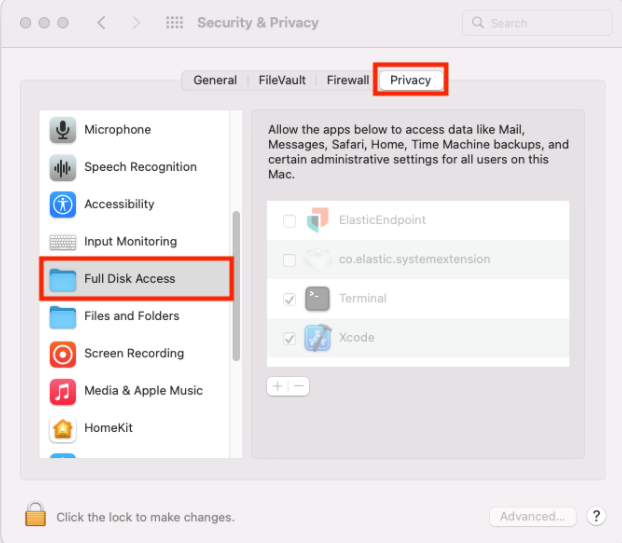
- Open the System Preferences application.
- Click Security and Privacy.
- On the Security and Privacy pane, select the Privacy tab.
-
From the left pane, select Full Disk Access.
-
In the lower-left corner of the pane, click the Lock button, then enter your credentials to authenticate. You can now add the
elastic-endpointoresensorfile. - Click the + button to view Finder.
-
Navigate to
/Library/Endgame, then select theesensorfile. - Click Open.
-
In the Privacy tab, confirm that the
elastic-agentoresensorfile appears in the list of applications with Full Disk Access permissions.
The Endgame sensor now has the access required to fully protect your system.