Create a synthetic monitor
editCreate a synthetic monitor
editThis functionality is in beta and is subject to change. The design and code is less mature than official GA features and is being provided as-is with no warranties. Beta features are not subject to the support SLA of official GA features.
Once you’ve written a synthetic test, you can create a monitor to run the test at a regular interval.
Choose an approach
editThere are three ways to create a browser monitor: project monitors, Heartbeat, and Elastic Agent.
Heartbeat
editUse Heartbeat to configure and create browser monitors similar to how you would set up any other type of monitor.
Read more about the benefits of this approach in the setup guide’s Heartbeat section.
When using this approach to create multiple monitors from a project, all monitors will use a single configuration.
Project monitors
editUse the @elastic/synthetics library’s push command to create monitors.
Pushing your project creates a new browser monitor in Kibana for each journey in the project. Using the push command allows you to manage all browser monitors using a GitOps workflow.
Alternatively, you could keep monitors in sync directly from your local development environment.
We recommend users adopt a GitOps workflow when using project monitors because it allows teams to keep their monitors in sync with their project’s main branch.
Besides saving time through automation, a GitOps workflow allows users to take advantage of PR reviews and checks that could validate journeys even before they are merged.
Project monitors also allow teams to configure individual monitors through code. Instead of using Kibana to update a monitor’s schedule, for example, you can set a schedule directly in your journey. That schedule will be used when pushing the journey to Kibana.
To configure default settings, you can use a global Synthetics configuration file.
Unlike the other approaches, this method can only be used to create browser monitors.
Elastic Agent
editUse Elastic Agent to configure and create browser monitors similarly to how you would set up any other type of monitor.
Read more about the benefits of this approach in the setup guide’s Elastic Agent section.
When using this approach to create multiple monitors from a project, all monitors will use a single configuration.
Configure monitor
editWhen you’re ready to create a browser monitor to run your tests, you’ll need to set a few configuration options:
- Give your monitor a name. Provide a human readable name and a unique ID for the monitor. This will appear in Kibana where you can view and manage monitors after they’re created.
- Set the schedule. Specify the interval at which your tests will run.
- Specify where to find the tests. This will vary based on the method you use to create a monitor.
- Set other options as needed. There are several other options you can set to customize your implementation including params, tags, screenshot options, throttling options, and more.
If you used Heartbeat to set up monitors, configure the monitor in heartbeat.yml. Use source to specify where to find the tests you want to run. For example:
- name: Todos
  id: todos
  type: browser
  schedule: "@every 1m"
  params:
    target_url: "https://elastic.github.io/synthetics-demo/"
  source:
    zip_url:
      url: "https://github.com/elastic/synthetics-demo/archive/refs/heads/main.zip"
      folder: "todos/synthetics-tests"
      username: ""
      password: ""
|
The |
|
|
In this example, our library of synthetic tests is downloaded from the
remote zip endpoint for our |
|
|
Note that the |
|
|
Folder refers to the relative path where the synthetic journey files are located. Heartbeat will invoke the synthetics library on this folder. |
|
|
Username and password are blank here, but if provided, will be sent as HTTP Basic Authentication headers to the remote zip endpoint. |
For a list of all available configuration options, see Browser options in the Heartbeat documentation.
[beta]
This functionality is in beta and is subject to change. The design and code is less mature than official GA features and is being provided as-is with no warranties. Beta features are not subject to the support SLA of official GA features.
Configure each monitor directly in your test code using monitor.use.
The monitor API allows you to set unique options for each journey’s monitor directly through code.
For example:
import { journey, step, monitor, expect } from '@elastic/synthetics';

journey('Ensure placeholder is correct', ({ page, params }) => {
  monitor.use({
    id: 'example-monitor',
    schedule: 10,
    throttling: {
      download: 10,
      upload: 5,
      latency: 100,
    },
  });
  step('Load the demo page', async () => {
    await page.goto('https://elastic.github.io/synthetics-demo/');
  });
  step('Assert placeholder text', async () => {
    const placeholderValue = await page.getAttribute(
      'input.new-todo',
      'placeholder'
    );
    expect(placeholderValue).toBe('What needs to be done?');
  });
});
For each journey, you can specify its schedule and the locations in which it runs.
When those options are not set, Synthetics will use the default values in the global configuration file.
For more details, see Synthetic tests configuration.
Here are all the available monitor configuration options:
-
id(string) - A unique identifier for this monitor.
-
name(string) - A human readable name for the monitor.
-
tags(Array<string>) - A list of tags that will be sent with the monitor event. Tags are displayed in the Uptime app and allow you to search monitors by tag.
-
schedule(number) - At which interval to run the test in seconds.
-
enabled(boolean) - Enable or disable the monitor from running without deleting and recreating it.
-
locations(Array<SyntheticsLocationsType>) - Where to deploy the monitor. Monitors can be deployed in multiple locations so that you can detect differences in availability and response times across those locations.
-
throttling(ThrottlingOptions) - Control the monitor’s download speeds, upload speeds, and latency to simulate your application’s behavior on slower or laggier networks.
-
screenshot(ScreenshotOptions) -
Control whether or not to capture screenshots. Options include
'on','off', or'only-on-failure'.
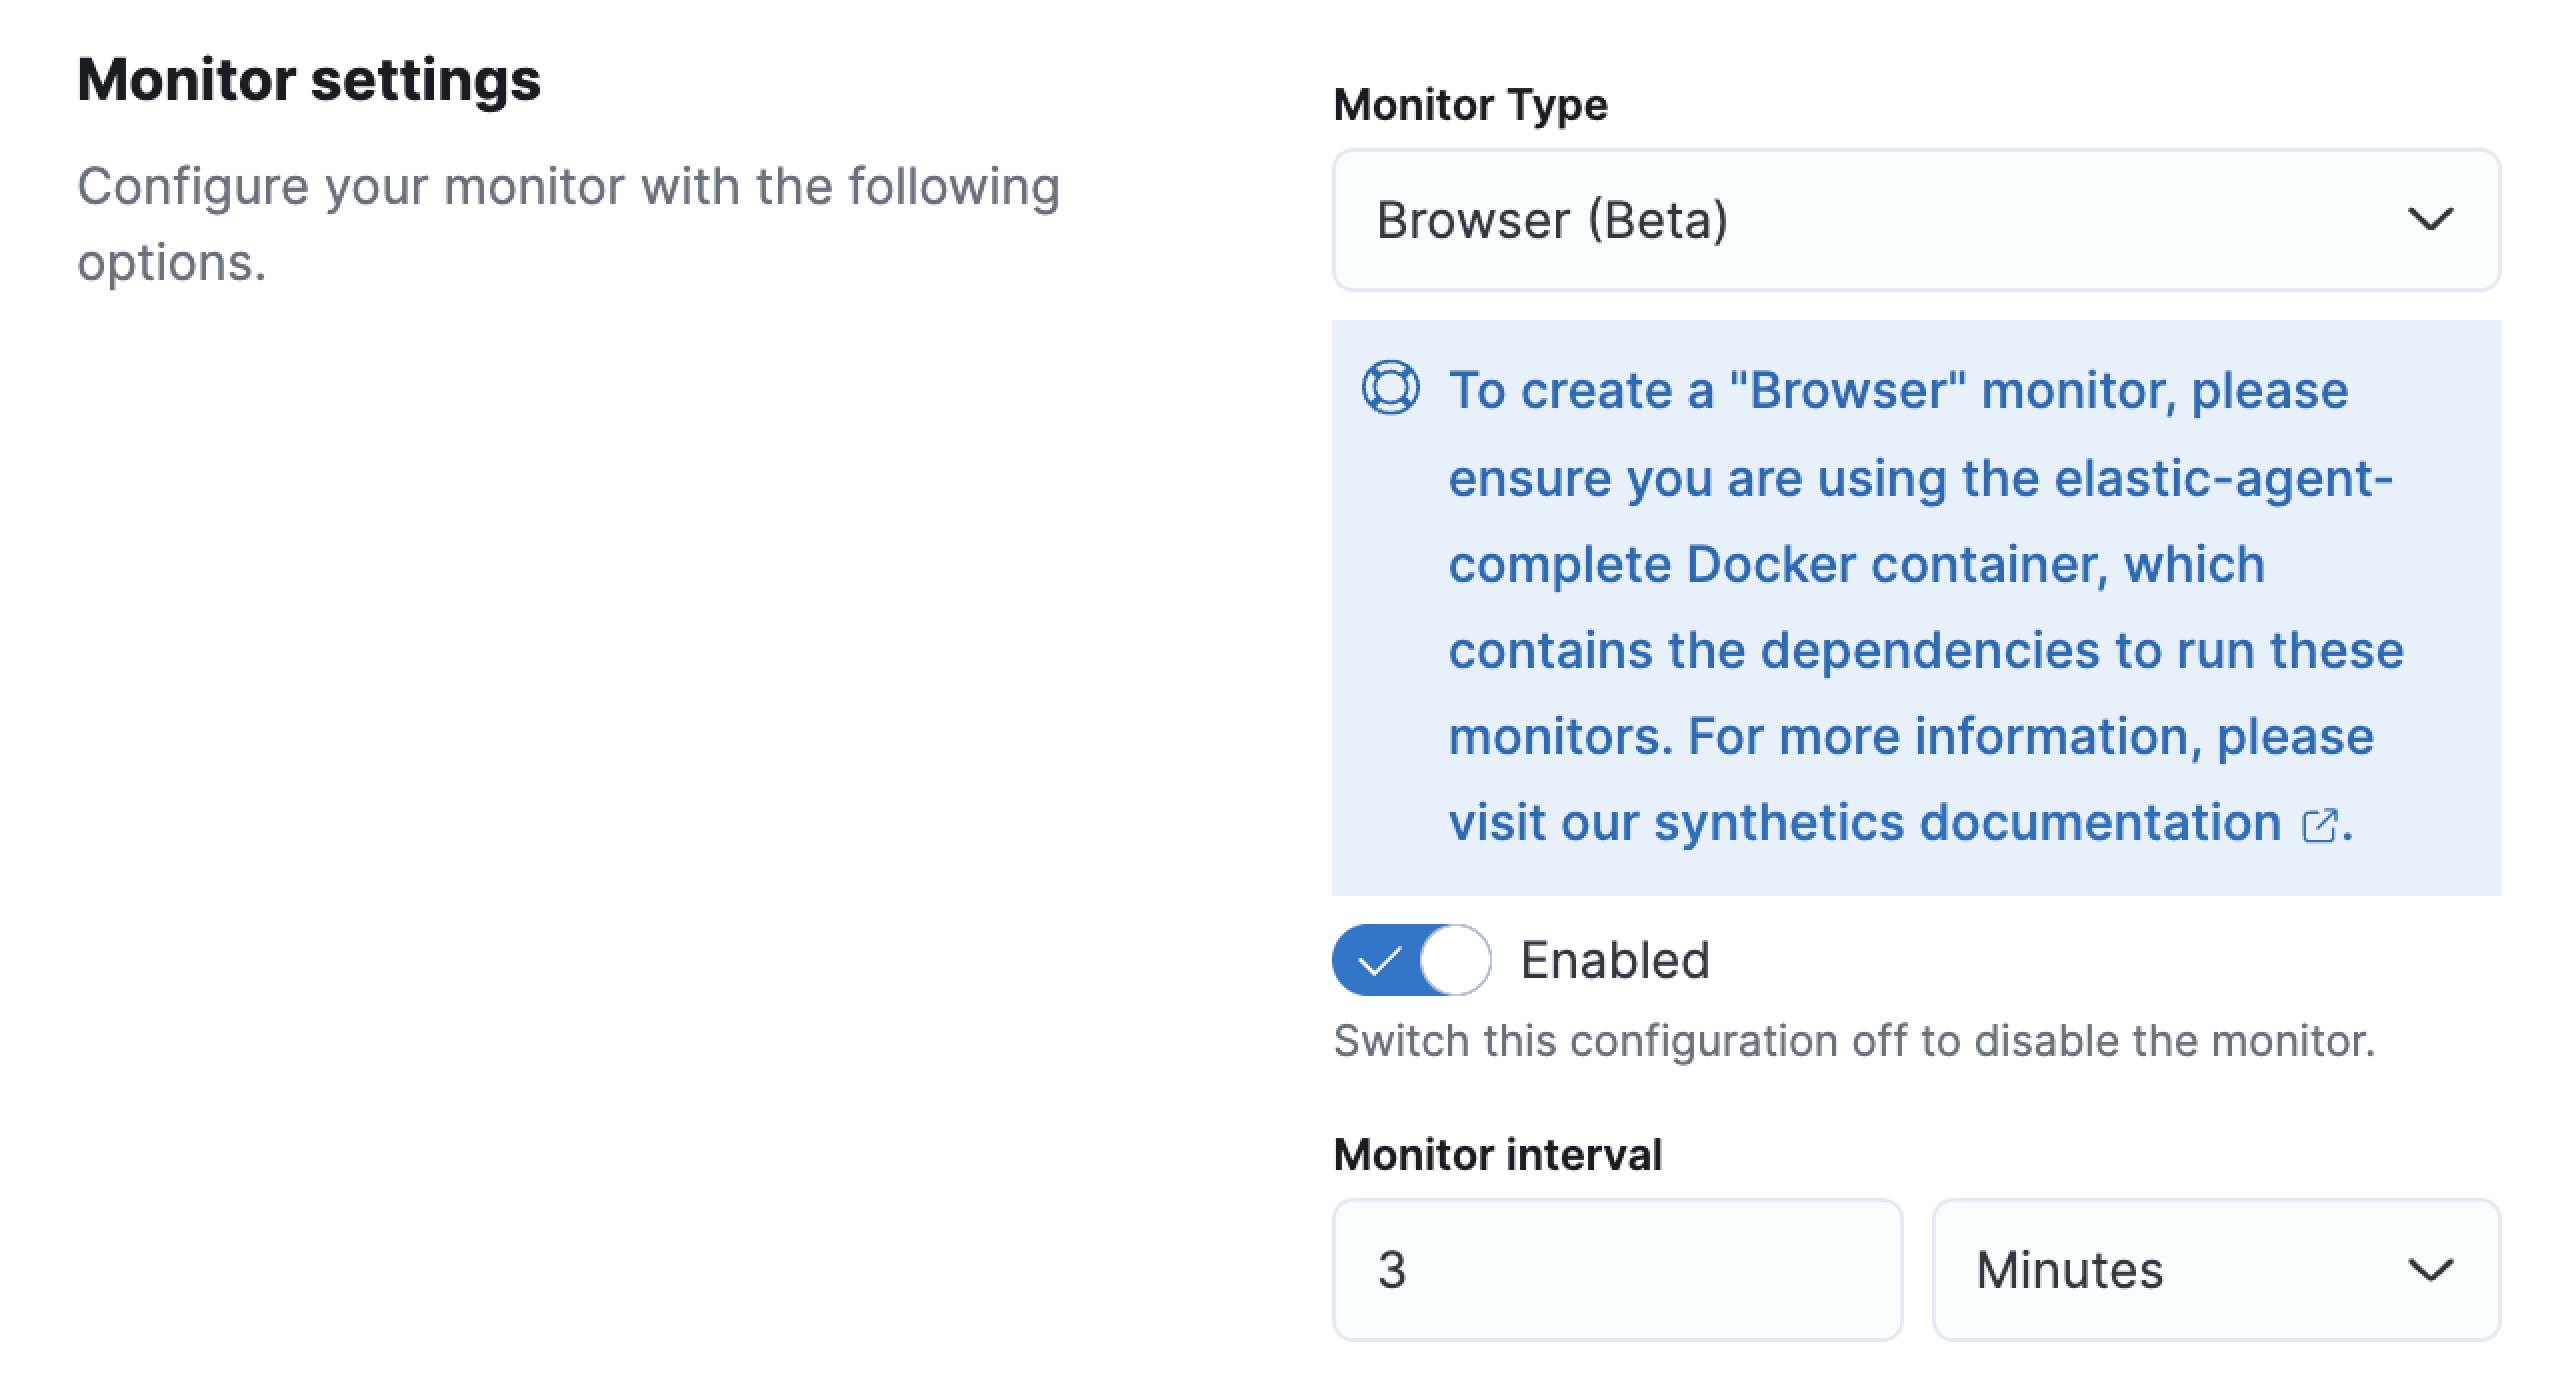
[beta] This functionality is in beta and is subject to change. The design and code is less mature than official GA features and is being provided as-is with no warranties. Beta features are not subject to the support SLA of official GA features. If you used Elastic Agent to set up monitors, add a project when configuring the Elastic Synthetics integration In Monitor settings, use the Monitor Type Browser.
Using the Source Type Zip URL, the fields should be set as follows:
- Zip URL: URL pointing to a zip file containing the test project.
- Folder: The folder within the zip file containing synthetics tests. This will be the working directory in which the synthetics agent runs. Heartbeat will invoke the synthetics library in this folder.
- Params: JSON formatted dynamic values that may be required by your specific tests. See Working with parameters and secrets for more information.
- Zip URL Username and Zip URL Password: HTTP Basic Authentication headers for the remote zip endpoint.
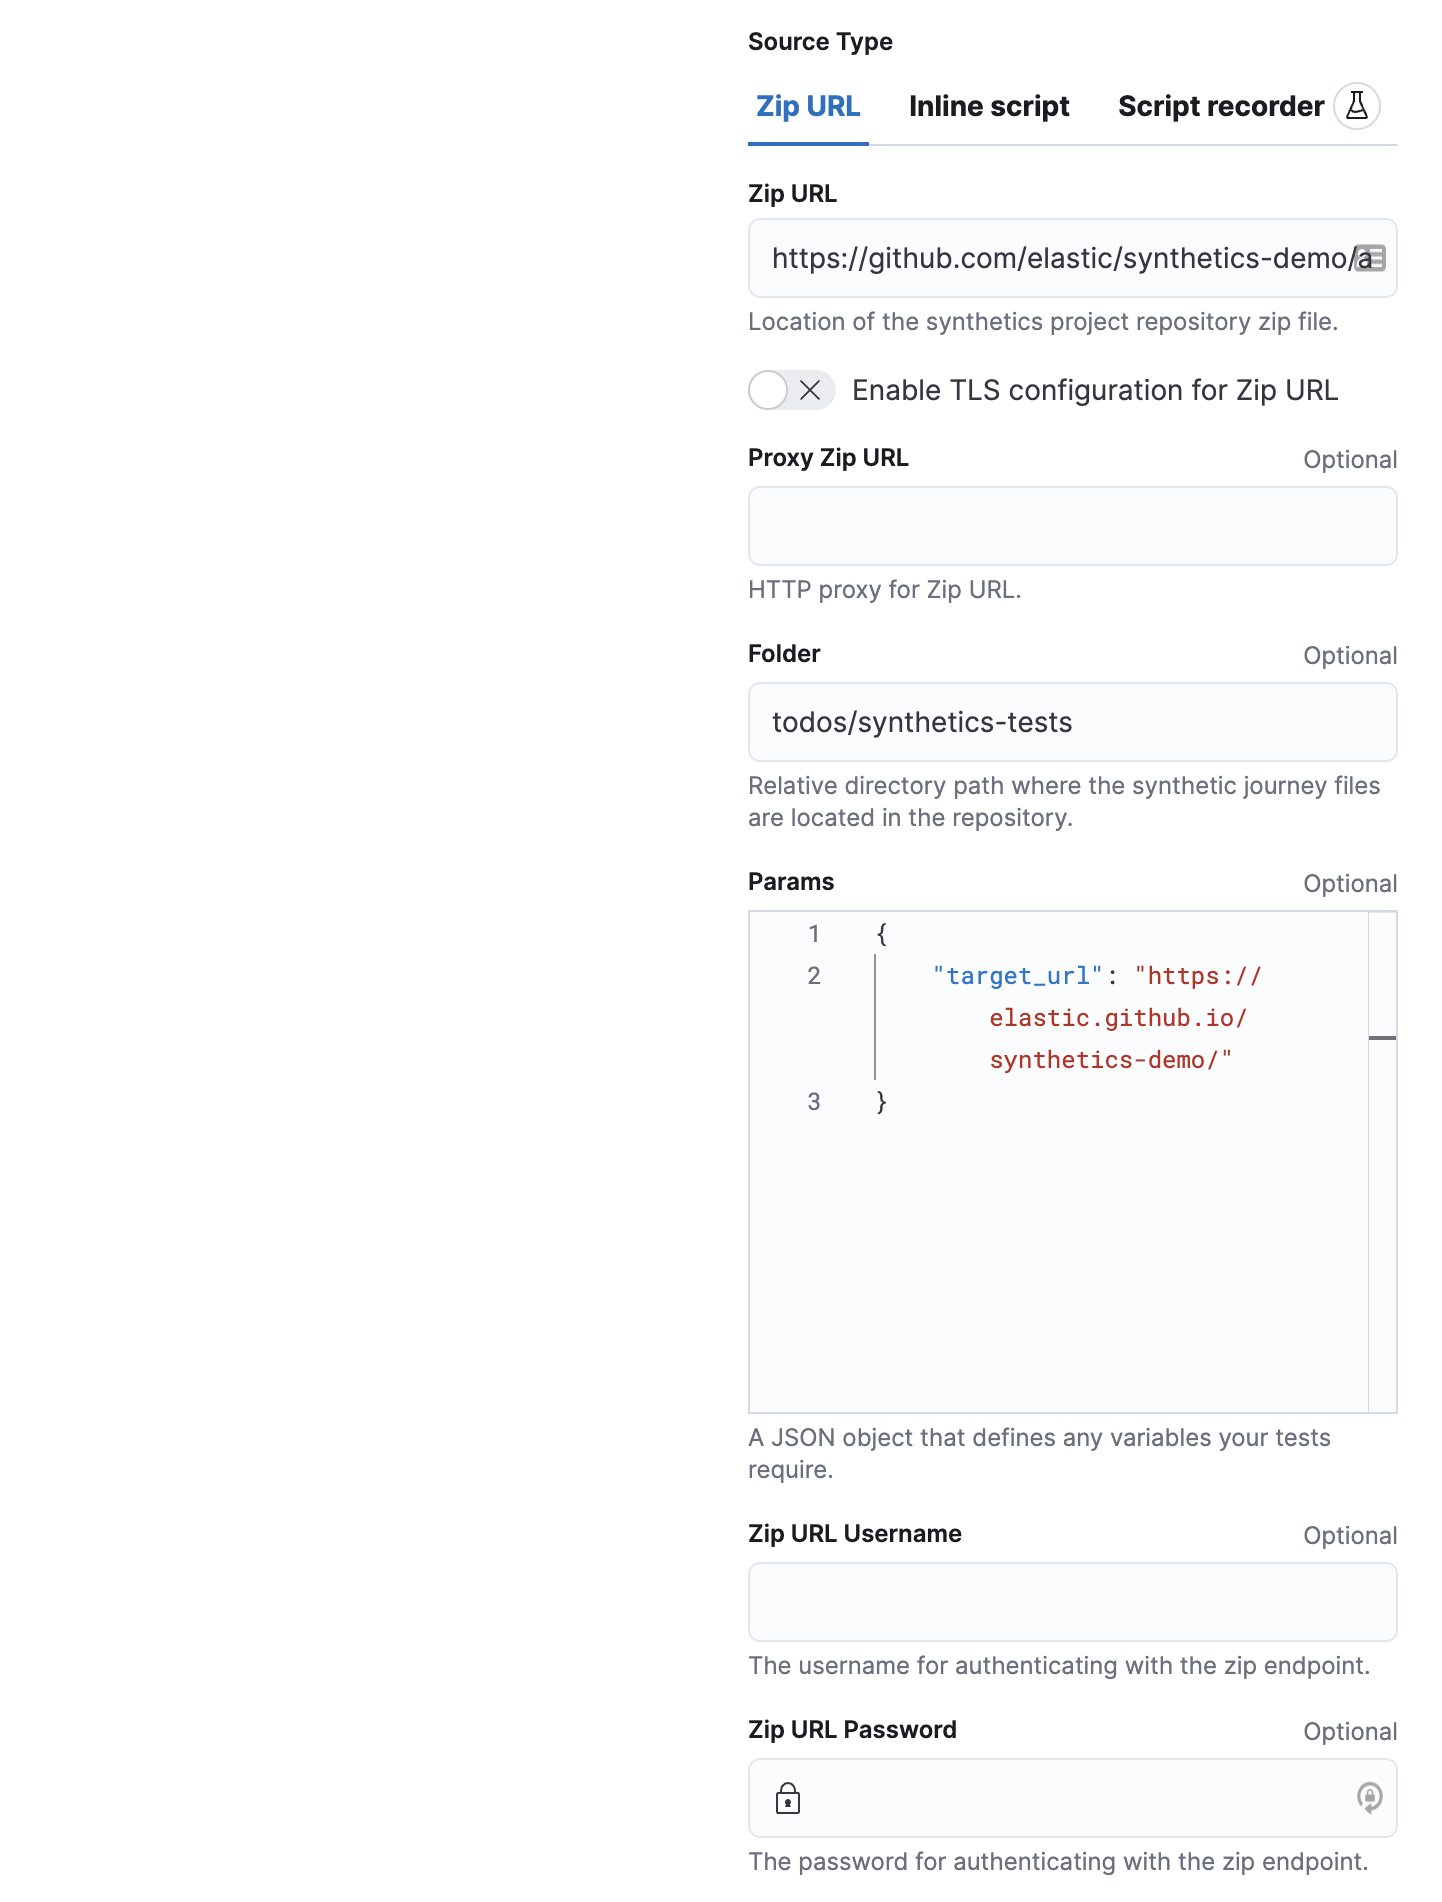
The example above downloads a library of synthetic tests from the remote zip endpoint for the git repository for our todos example.
By using a git repository for synthetics journeys, you can benefit from a GitOps workflow, where your team would use git for deploying changes to synthetic monitors.
Others could, for example, update monitors through pull requests or use git revert to revert changes which broke a monitor.
Such a workflow allows you to manage tests more effectively.
Click Advanced Browser options to see more ways to configure your monitor.
- Use the Synthetics agent options to provide fine-tuned configuration for the synthetics agent. Read more about available options in Command reference.
- Use Throttling options to control the monitor’s network speed. You can control the monitor’s download and upload speeds and its latency to simulate your application’s behavior on slower or laggier networks.
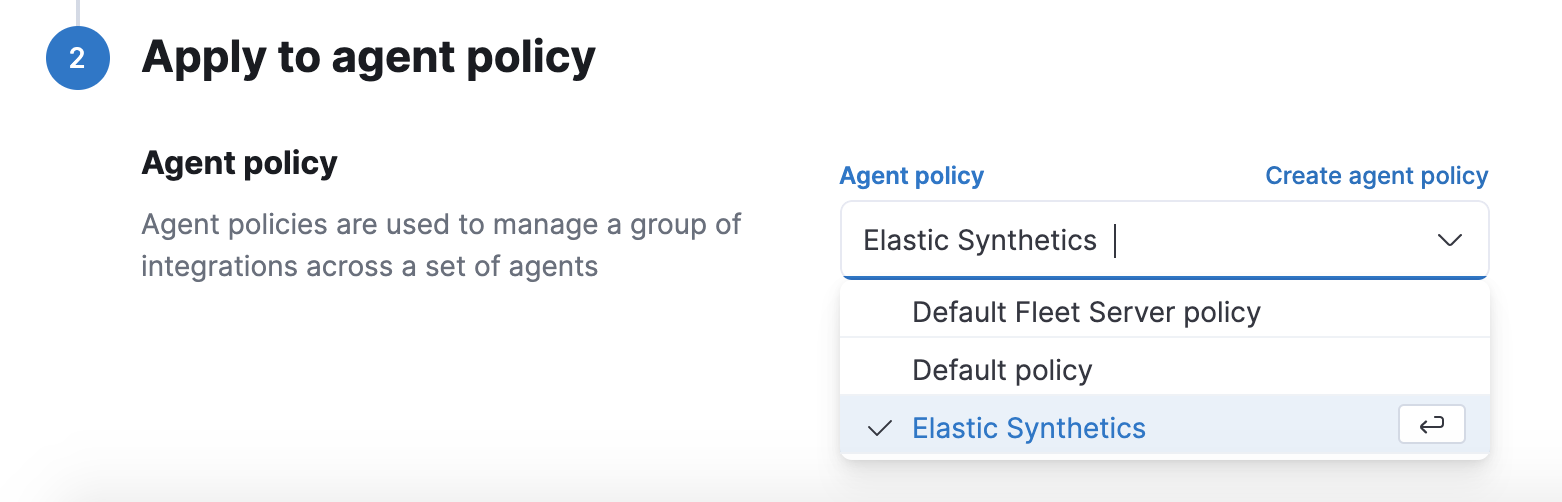
When applying the integration policy to an Elastic Agent policy, make sure to select your dedicated synthetics agent policy.
Create monitor in Kibana
editAfter you’ve decided how you want to configure your monitor, you’re ready to create the monitor and start collecting data. Push the monitors to Kibana using one of the following methods:
If you used Heartbeat to set up monitors, save changes to your heartbeat.yml file and make sure you’ve completed Connect to the Elastic Stack.
[beta]
This functionality is in beta and is subject to change. The design and code is less mature than official GA features and is being provided as-is with no warranties. Beta features are not subject to the support SLA of official GA features.
After setting configuration options, use the push command to create monitors.
The push command will create a monitor in Kibana for each local journey
so you manage all the browser monitors from your local environment.
Push journeys to Kibana using:
npx @elastic/synthetics push --auth <api-key> --url <kibana-url> --project <id|name>
For more details on using the push command, see elastic-synthetics push.
One monitor will appear on the Monitor management page for each journey.
[beta] This functionality is in beta and is subject to change. The design and code is less mature than official GA features and is being provided as-is with no warranties. Beta features are not subject to the support SLA of official GA features. If you used Elastic Agent to set up monitors, click Save and continue in the integration UI after inputting all configurations options to create your monitor.
Run on CI
editYou can also run a synthetic project on your CI environment. Elastic’s synthetics runner can output results in a few different formats, including JSON and JUnit (the standard format supported by most CI platforms).
If any of your journeys fail, the synthetics agent it will yield a non-zero exit code, which most CI systems pick up as a failure by default.
You can see an example using GitHub Actions in the elastic/synthetics-demo repository. This example sets up a job that executes the synthetics runner and tells the runner to yield results in a JUnit format.
Create an inline monitor
editAlternatively, you can create an inline monitor.
An inline monitor is a single journey that you manage individually. Inline monitors can be quick to set up, but can also be more difficult to manage. Each inline monitor can contain only one journey, which must be maintained directly in Kibana or in your Heartbeat configuration file.
If you depend on external packages, have your journeys next to your code repository, or wish to embed and manage more than one journey from a single monitor configuration, see Configure monitor instead.
When writing an inline monitor, the journey keyword isn’t required, and variables like page and params will be part of your script’s scope. To create an inline monitor, copy the steps from inside a journey and paste them into your Elastic Synthetics integration or heartbeat.yml depending on the approach you chose to set up.
Copy and paste your test steps into heartbeat.yml.
Heartbeat spawns a separate Node.js process, schedules your tests, and runs them on a Chromium browser.
For a full list of configuration options, see Browser options in the Heartbeat documentation.
- type: browser
  id: elastic-website
  name: Elastic website
  schedule: "@every 1m"
  source:
    inline:
      script: |-
      step("load homepage", async () => {
        await page.goto('https://www.elastic.co');
      });
      step("hover over products menu", async () => {
        await page.hover('css=[data-nav-item=products]');
      });
|
Each |
|
|
In this example, a synthetic journey is defined inline. This is a two-step script that first loads a homepage and then hovers over a product menu. See Write a synthetic test for more information. |
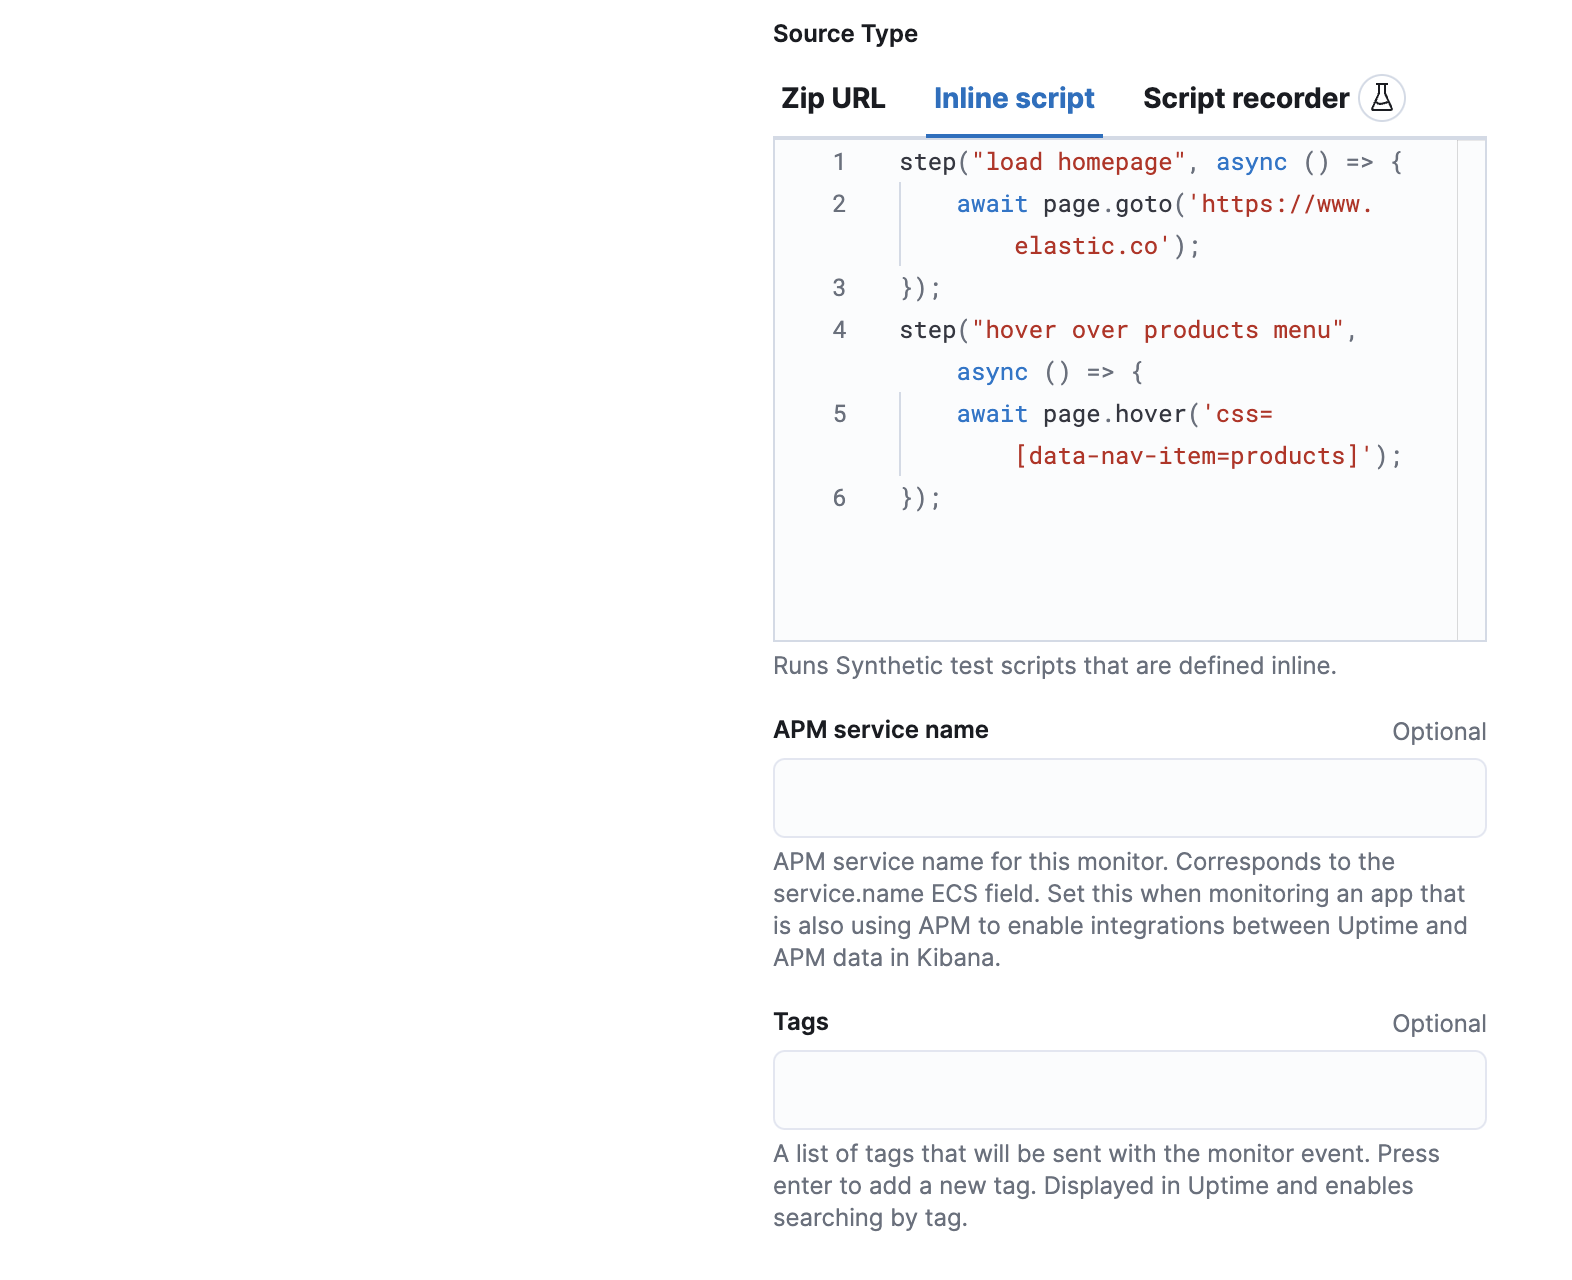
[beta] This functionality is in beta and is subject to change. The design and code is less mature than official GA features and is being provided as-is with no warranties. Beta features are not subject to the support SLA of official GA features. Add an inline monitor when configuring the Elastic Synthetics integration. In Monitor settings, use the Monitor Type Browser.
Then switch the Source Type to Inline script.
Add steps to the code block directly.
The journey keyword isn’t required, and variables like page and params will be part of your script’s scope.
You cannot import any dependencies when using inline monitors.
Click Advanced Browser options to see more ways to configure your monitor.
- Use the Synthetics agent options to provide fine-tuned configuration for the synthetics agent. Read more about available options in Command reference.
- Use Throttling options to control the monitor’s network speed. You can control the monitor’s download and upload speeds and its latency to simulate your application’s behavior on slower or laggier networks.
When applying the integration policy to an Elastic Agent policy, make sure to select your dedicated synthetics agent policy.