Run synthetic tests
editRun synthetic tests
editThere are two ways to run synthetic tests:
- If you have more than one journey, rely on dependencies, or your tests need to live with your application code, use a test suite.
- If you want to create a single journey and manage it individually, use an inline monitor.
Use a test suite
editA test suite can contain any number of journeys in any number of files using the file extensions .journey.ts or .journey.js.
You can use the @elastic/synthetics package as a library to run a test suite.
To test a test suite locally, start by writing your tests:
- Create a new NPM/Node.js project.
-
Create a
javascriptortypescriptfile that imports your tests (using the.journey.tsor.journey.jsfile extension). -
Make sure any dependencies are defined with an
importoutside of thejourneyobject. - Compile everything together.
See an example of a test suite in the elastic/synthetics-demo repository.
The examples below show how to test that repository’s todo directory locally.
Clone the repository, change into the directory containing the synthetics test suite,
and install the necessary dependencies including @elastic/synthetics:
# Check out the synthetics repo and included examples
git clone git@github.com:elastic/synthetics-demo.git &&\
cd synthetics-demo/todos/ &&\
# Install all required dependencies for the todos example
npm install
If you want to test your own suite locally, be sure to install the @elastic/synthetics package:
npm install -g @elastic/synthetics
From inside the directory containing the synthetics test suite, run the provided tests.
By default, the elastic-synthetics runner will only run files matching the filename *.journey.(ts|js)*.
# Run tests on the current directory. The dot `.` indicates
# that it should run all tests in the current directory.
npx @elastic/synthetics .
Send to Elastic Stack
editAfter testing locally, you can run the test suite using the Elastic Synthetics integration or Heartbeat depending on the approach you chose to set up.
Copy and paste the path to your zip file into heartbeat.yml.
For a full list of configuration options, see Browser options in the Heartbeat documentation.
- name: Todos
  id: todos
  type: browser
  schedule: "@every 1m"
  params:
    target_url: "https://elastic.github.io/synthetics-demo/"
  source:
    zip_url:
      url: "https://github.com/elastic/synthetics-demo/archive/refs/heads/main.zip"
      folder: "todos/synthetics-tests"
      username: ""
      password: ""
|
The |
|
|
In this example, our library of synthetic tests is downloaded from the
remote zip endpoint for our |
|
|
Note that the |
|
|
Folder refers to the relative path where the synthetic journey files are located. Heartbeat will invoke the synthetics library on this folder. |
|
|
Username and password are blank here, but if provided, will be sent as HTTP Basic Authentication headers to the remote zip endpoint. |
[beta] This functionality is in beta and is subject to change. The design and code is less mature than official GA features and is being provided as-is with no warranties. Beta features are not subject to the support SLA of official GA features. Add a test suite when configuring the Elastic Synthetics integration. In Monitor settings, use the Monitor Type Browser.

Using the Source Type Zip URL, the fields should be set as follows:
- Zip URL: URL pointing to a zip file containing the test project.
- Folder: The folder within the zip file containing synthetics tests. This will be the working directory in which the synthetics agent runs. Heartbeat will invoke the synthetics library in this folder.
- Params: JSON formatted dynamic values that may be required by your specific tests. See Working with parameters and secrets for more information.
- Zip URL Username and Zip URL Password: HTTP Basic Authentication headers for the remote zip endpoint.
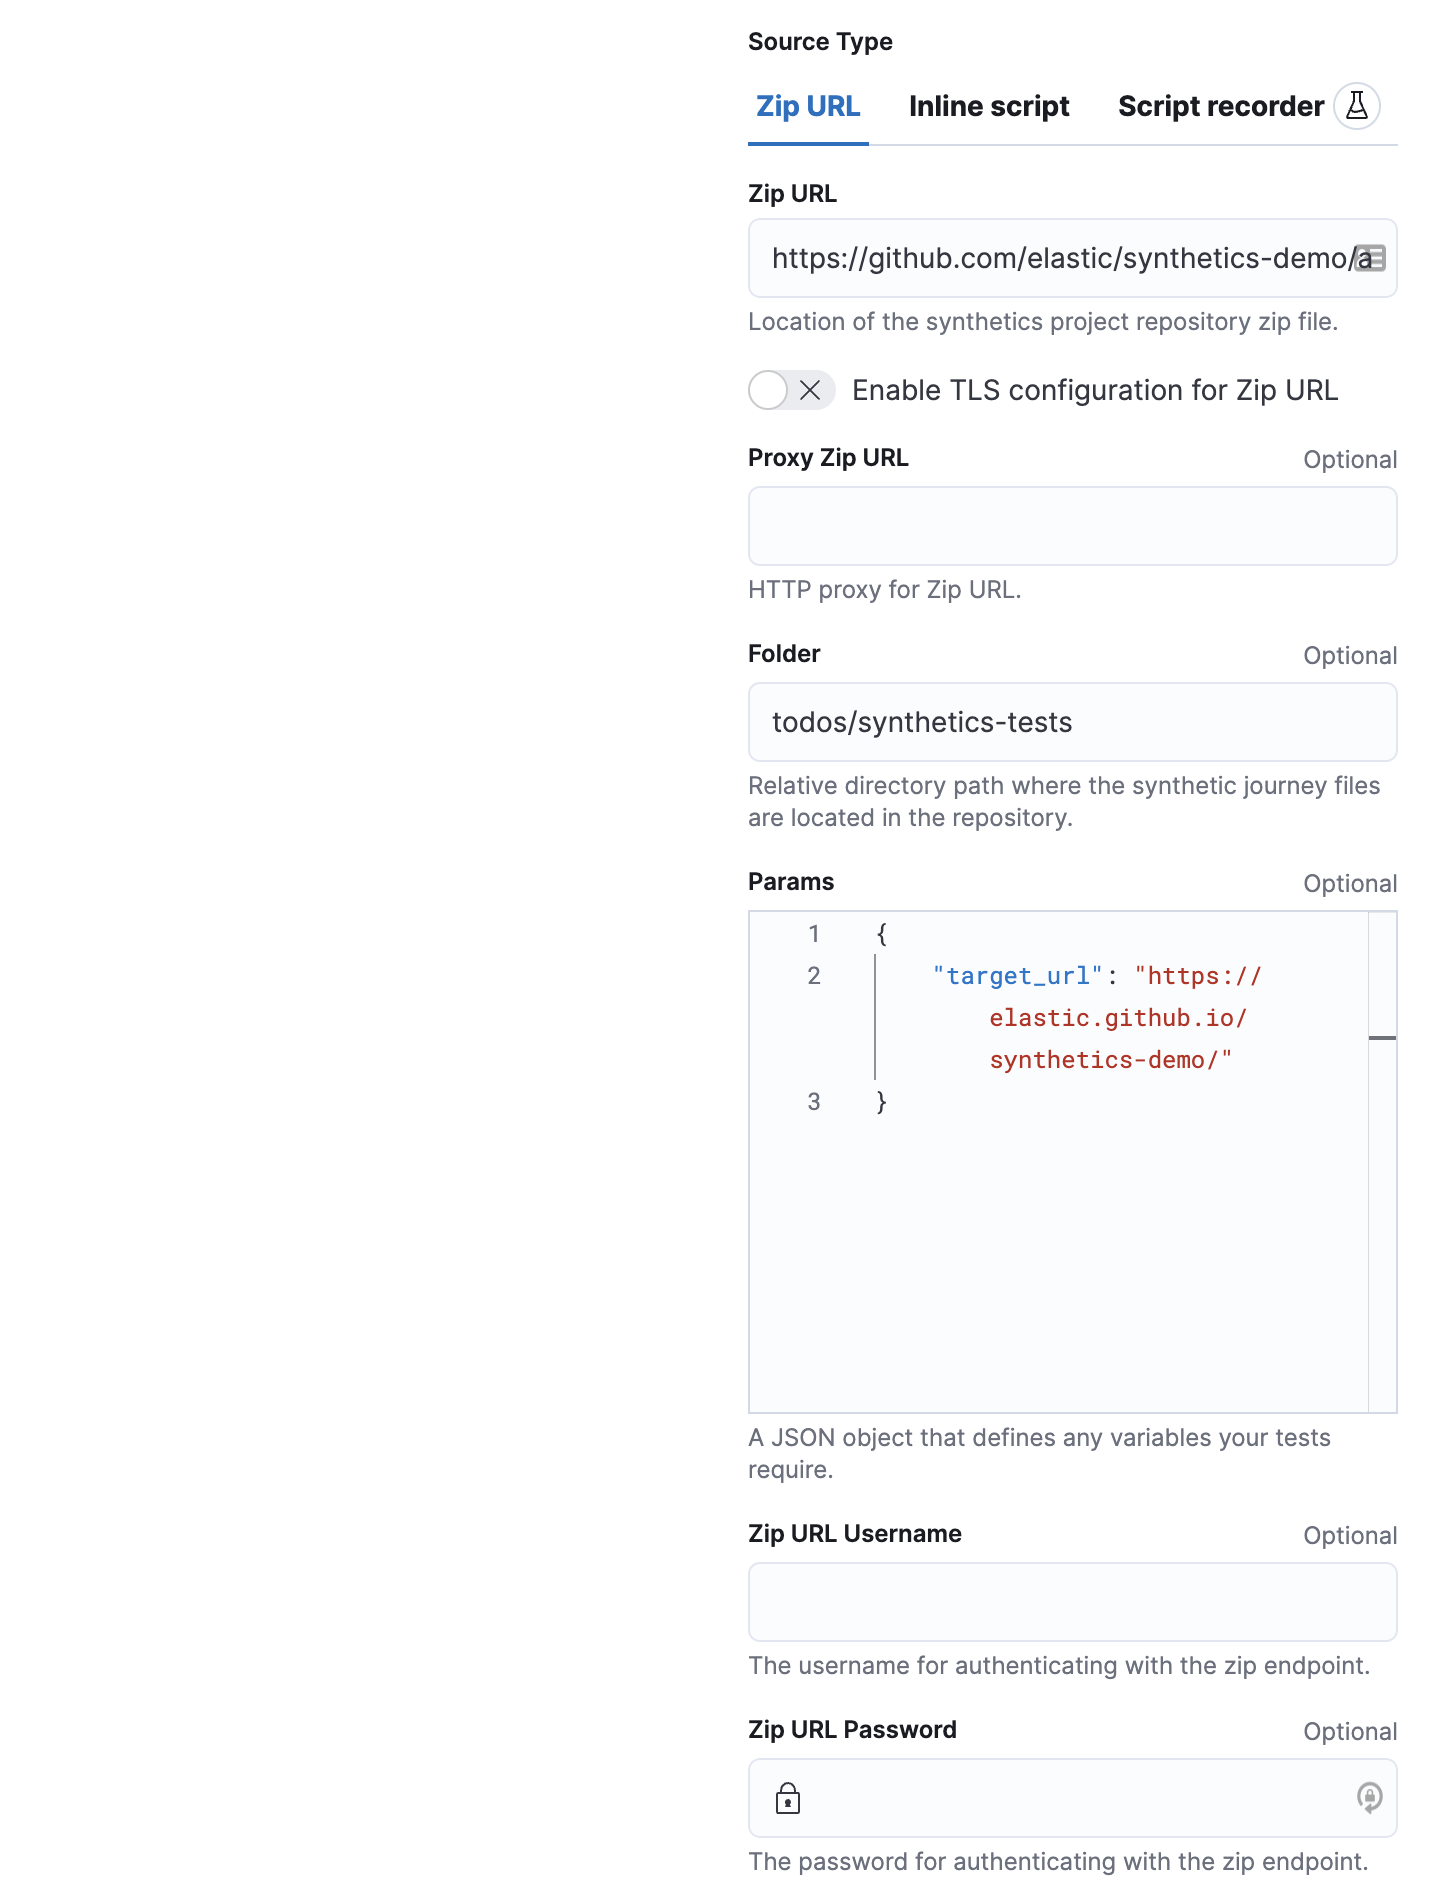
The example above downloads a library of synthetic tests from the remote zip endpoint for the git repository for our todos example.
By using a git repository for synthetics journeys, you can benefit from a GitOps workflow, where your team would use git for deploying changes to synthetic monitors.
Others could, for example, update monitors through pull requests or use git revert to revert changes which broke a monitor.
Such a workflow allows you to manage tests more effectively.
Click Advanced Browser options to see more ways to configure your monitor.
- Use the Selective tests options to run a subset of all the tests in your suite. Filter by journey names matching a pattern or filter by tags.
- Use the Synthetics agent options to provide fine-tuned configuration for the synthetics agent. Read more about available options in Command reference.
- Use Throttling options to control the monitor’s network speed. You can control the monitor’s download and upload speeds and its latency to simulate your application’s behavior on slower or laggier networks.
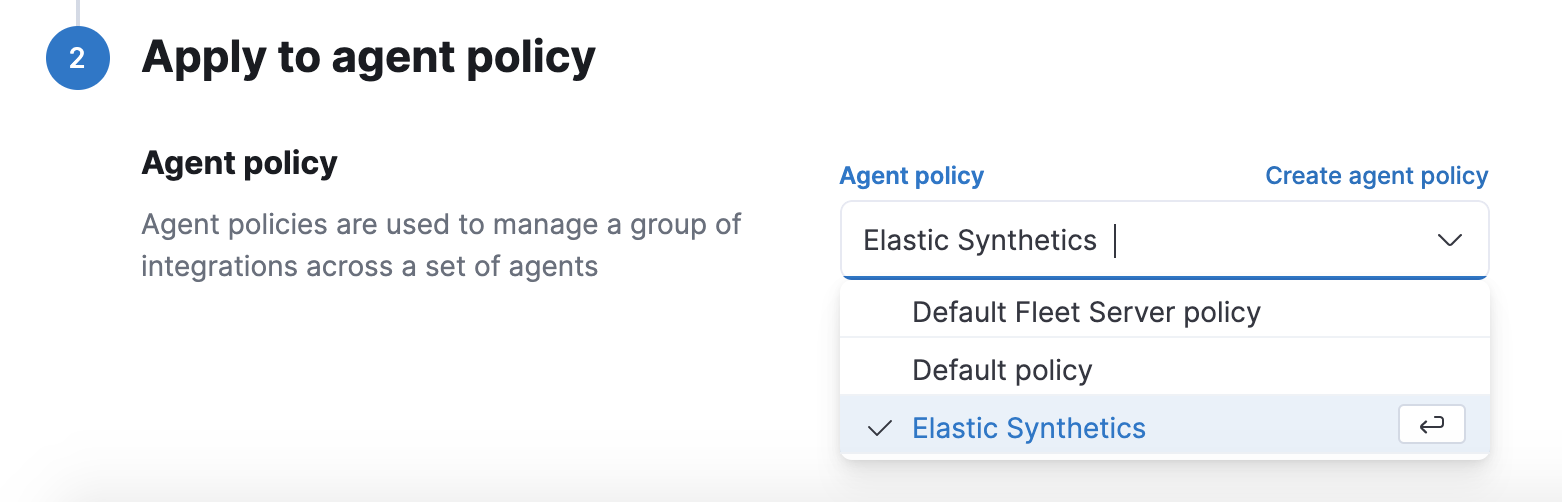
When applying the integration policy to an Elastic Agent policy, make sure to select your dedicated synthetics agent policy.
Use an inline monitor
editAn inline monitor is a single journey that you manage individually.
When writing an inline monitor, the journey keyword isn’t required, and variables like page and params will be part of your script’s scope.
To create an inline monitor, copy the steps from inside a journey and paste it into Kibana or your Heartbeat configuration.
Inline monitors can be quick to set up, but can also be more difficult to manage. Each inline monitor can contain only one journey, which must be maintained directly in Kibana or in your Heartbeat configuration file.
If you depend on external packages, have your journeys next to your code repository, or wish to embed and manage more than one journey from a single monitor configuration use a test suite.
Test locally
editTo test the inline monitor’s journey locally, change into your test’s directory
and pipe the journey’s contents to the npx @elastic/synthetics command.
Assume, for example, that your inline monitor includes the following code:
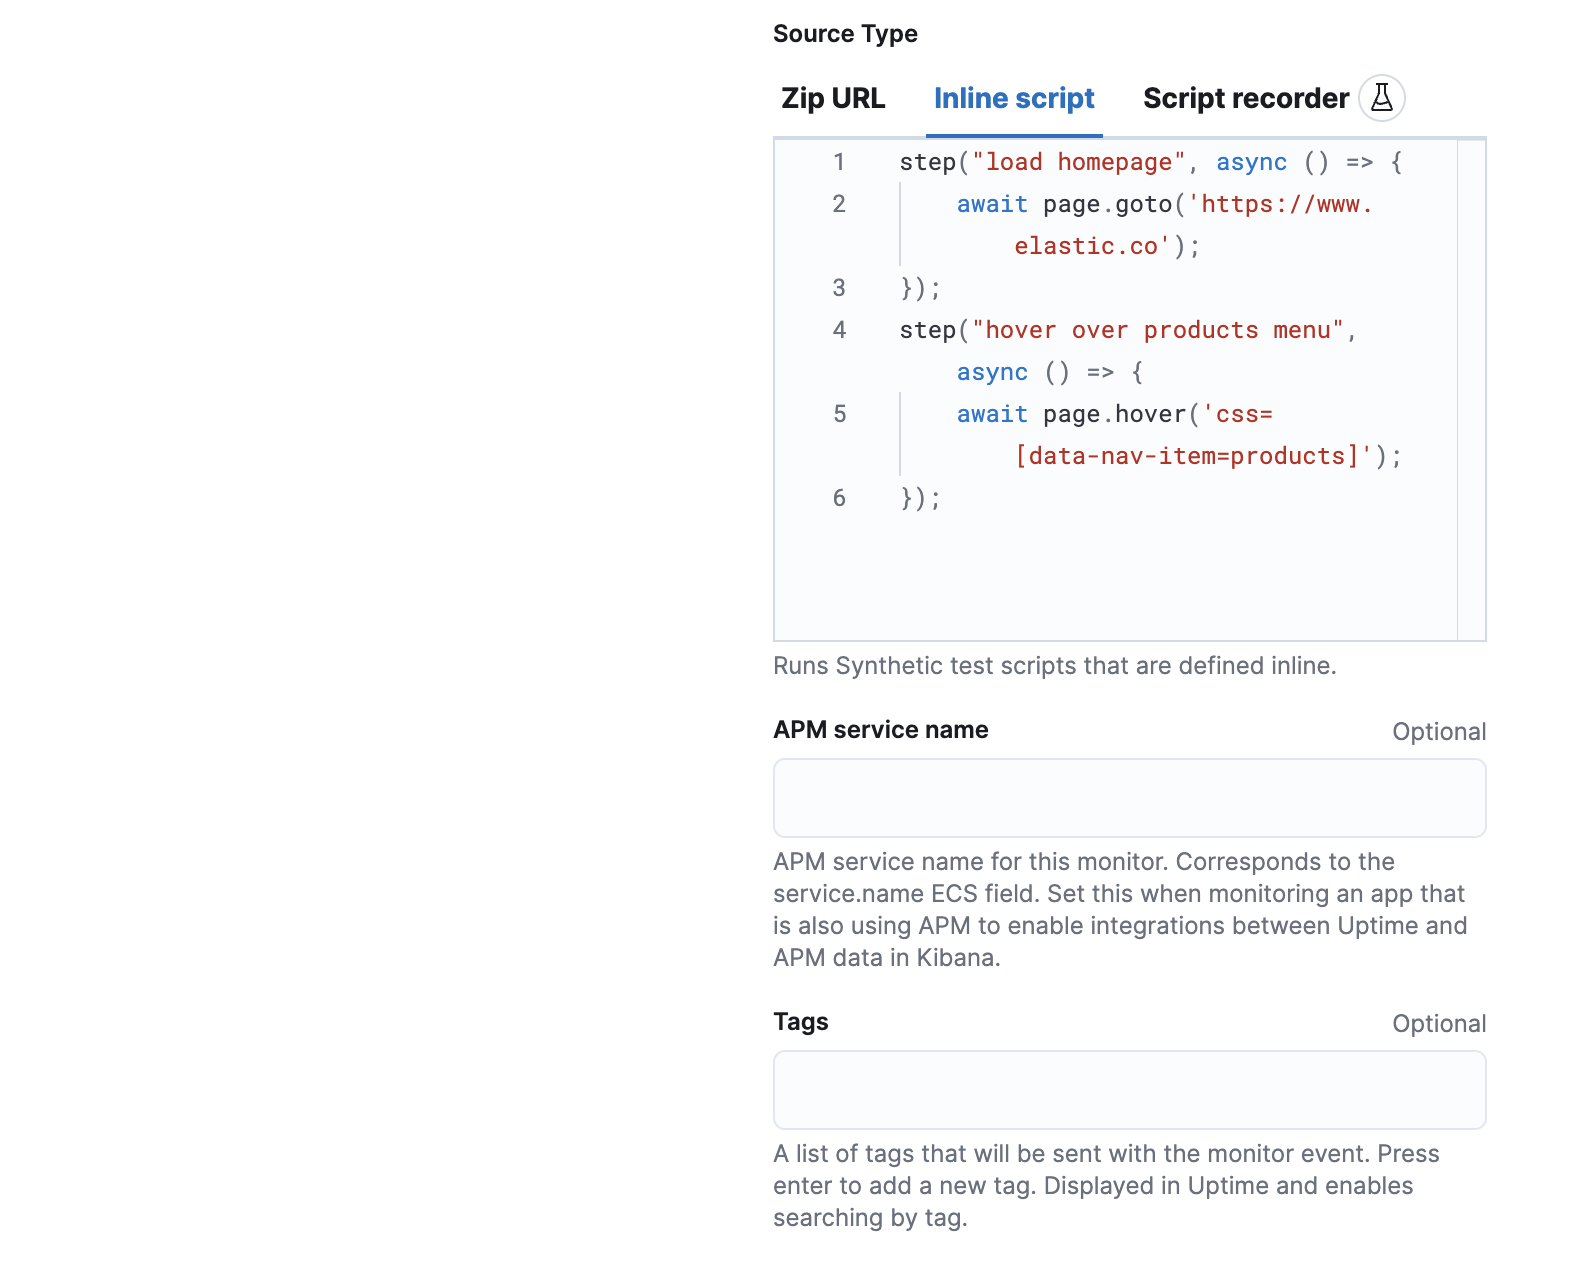
step('load homepage', async () => {
    await page.goto('https://www.elastic.co');
});
step('hover over products menu', async () => {
    await page.hover('css=[data-nav-item=products]');
});
To run that journey locally, you can save that code to a file and pipe the file’s contents into @elastic-synthetics:
cat path/to/sample.js | npx @elastic/synthetics --inline
And you’ll get a response like the following:
Journey: inline
   ✓  Step: 'load homepage' succeeded (1831 ms)
   ✓  Step: 'hover over products menu' succeeded (97 ms)

 2 passed (2511 ms)
Send to Elastic Stack
editAfter testing locally, you can copy the script into your Elastic Synthetics integration or heartbeat.yml
depending on the approach you chose to set up.
Copy and paste your test steps into heartbeat.yml.
Heartbeat spawns a separate Node.js process, schedules your tests, and runs them on a Chromium browser.
For a full list of configuration options, see Browser options in the Heartbeat documentation.
- type: browser
  id: elastic-website
  name: Elastic website
  schedule: "@every 1m"
  source:
    inline:
      script: |-
      step("load homepage", async () => {
        await page.goto('https://www.elastic.co');
      });
      step("hover over products menu", async () => {
        await page.hover('css=[data-nav-item=products]');
      });
|
Each |
|
|
In this example, a synthetic journey is defined inline. This is a two-step script that first loads a homepage and then hovers over a product menu. See Write a synthetic test for more information. |
[beta] This functionality is in beta and is subject to change. The design and code is less mature than official GA features and is being provided as-is with no warranties. Beta features are not subject to the support SLA of official GA features. Add an inline monitor when configuring the Elastic Synthetics integration. In Monitor settings, use the Monitor Type Browser.
Then switch the Source Type to Inline script.
Add steps to the code block directly.
The journey keyword isn’t required, and variables like page and params will be part of your script’s scope.
You cannot import any dependencies when using inline monitors.
Click Advanced Browser options to see more ways to configure your monitor.
- Use the Synthetics agent options to provide fine-tuned configuration for the synthetics agent. Read more about available options in Command reference.
- Use Throttling options to control the monitor’s network speed. You can control the monitor’s download and upload speeds and its latency to simulate your application’s behavior on slower or laggier networks.
When applying the integration policy to an Elastic Agent policy, make sure to select your dedicated synthetics agent policy.
Run on CI
editYou can also run a synthetic test suite on your CI environment. Elastic’s synthetics runner can output results in a few different formats, including JSON and JUnit (the standard format supported by most CI platforms).
If any of your journeys fail, the synthetics agent it will yield a non-zero exit code, which most CI systems pick up as a failure by default.
You can see an example using GitHub Actions in the elastic/synthetics-demo repository. This example sets up a job that executes the synthetics runner and tells the runner to yield results in a JUnit format.