Configure reporting in Kibana
editConfigure reporting in Kibana
editFor security, you grant users access to the reporting features and secure the reporting endpoints with TLS/SSL encryption. Additionally, you can install graphical packages into the operating system to enable the Kibana server to have screenshotting capabilities.
Install the reporting packages
editMake sure the Kibana server operating system has the appropriate packages installed for the distribution.
If you are using CentOS/RHEL systems, install the following packages:
-
ipa-gothic-fonts -
xorg-x11-fonts-100dpi -
xorg-x11-fonts-75dpi -
xorg-x11-utils -
xorg-x11-fonts-cyrillic -
xorg-x11-fonts-Type1 -
xorg-x11-fonts-misc -
fontconfig -
freetype
If you are using Ubuntu/Debian systems, install the following packages:
-
fonts-liberation -
libfontconfig1
If the system is missing dependencies, a screenshot report job may fail in a non-deterministic way. Kibana runs a self-test at server startup, and
if it encounters errors, logs them in the Console. The error message does not include
information about why Chromium failed to run. The most common error message is Error: connect ECONNREFUSED, which indicates
that Kibana could not connect to the Chromium process.
To troubleshoot the problem, start the Kibana server with environment variables that tell Chromium to print verbose logs. For more information, refer to Puppeteer debug logs.
Grant users access to reporting
editWhen security is enabled, you grant users access to generate reports with Kibana application privileges, which allow you to create custom roles that control the spaces and applications where users generate reports.
-
Enable application privileges in Reporting. To enable, turn off the default user access control features in
kibana.yml:xpack.reporting.roles.enabled: false
If you use the default settings, you can still create a custom role that grants reporting privileges. The default role is
reporting_user. This behavior is being deprecated and does not allow application-level access controls for reporting features, and does not allow API keys or authentication tokens to authorize report generation. Refer to reporting security settings for information and caveats about the deprecated access control features. -
Create the reporting role.
- Open the main menu, then click Stack Management.
- Click Roles > Create role.
-
Specify the role settings.
-
Enter the Role name. For example,
custom_reporting_user. -
Specify the Indices and Privileges.
Access to data is an index-level privilege. For each index that contains the data you want to include in reports, add a line, then give each index
readandview_index_metadataprivileges.For more information, refer to Security privileges.
-
Enter the Role name. For example,
-
Add the Kibana privileges.
- Click Add Kibana privilege.
- Select one or more Spaces.
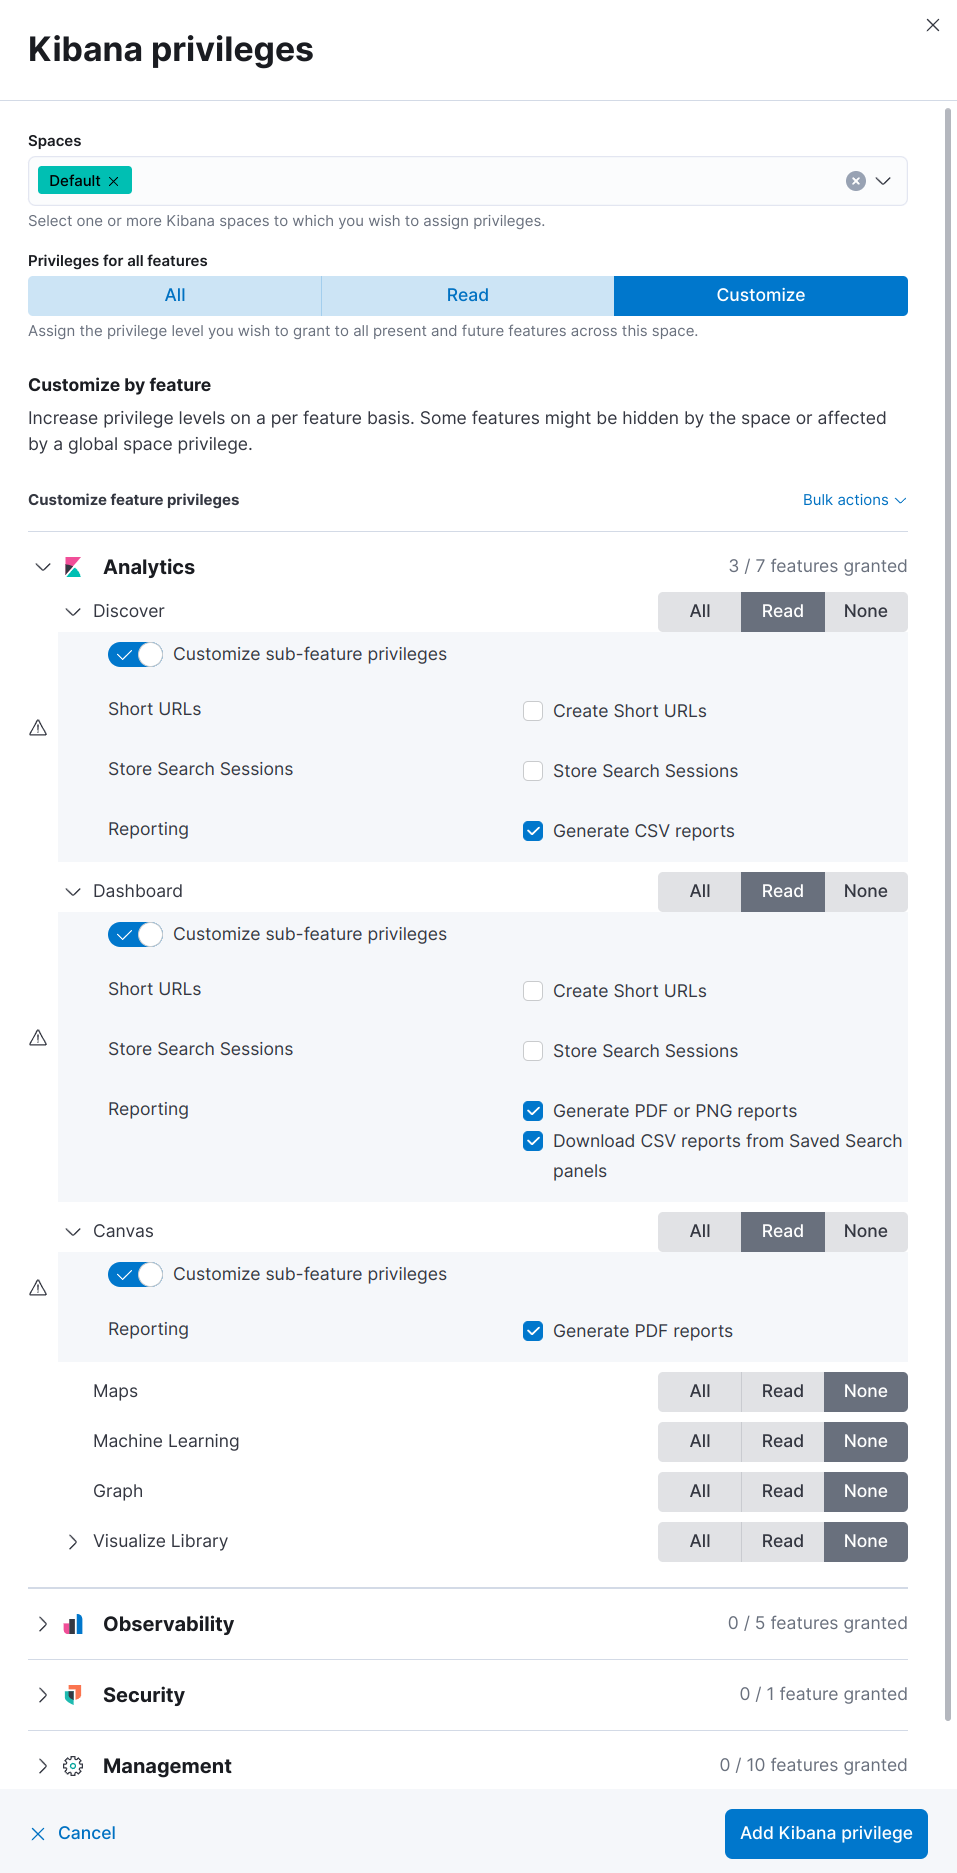
- Click Customize, then click Analytics.
-
For each application, select All, or to customize the privileges, select Read and Customize sub-feature privileges.
If you have a Basic license, sub-feature privileges are unavailable. For details, check out Grant users access with a Basic license.
If the Reporting options for application features are unavailable, and the cluster license is higher than Basic, contact your administrator, or check that
xpack.reporting.roles.enabledis set tofalsein kibana.yml. - Click Add Kibana privilege.
- Click Create role.
-
Assign the reporting role to a user.
- Open the main menu, then click Stack Management.
- Click Users, then click the user you want to assign the reporting role to.
- From the Roles dropdown, select custom_reporting_user.
- Click Update user.
Granting the privilege to generate reports also grants the user the privilege to view their reports in Stack Management > Reporting. Users can only access their own reports.
Grant access with the role API
editWith Kibana application privileges enabled in Reporting, you can also use the role API to grant access to the reporting features, using All privileges, or sub-feature privileges.
this [API request](https://www.elastic.co/guide/en/kibana/current/role-management-api-put.html) needs to be executed against the Kibana API endpoint
POST <kibana host>:<port>/api/_security/role/custom_reporting_user
{
	"elasticsearch": {
		"cluster": [],
		"indices": [],
		"run_as": []
	},
	"kibana": [{
		"spaces": ["*"],
		"base": [],
		"feature": {
			"dashboard": ["generate_report",
      "download_csv_report"],
      "discover": ["generate_report"],
			"canvas": ["generate_report"],
			"visualize": ["generate_report"]
		}
	}]
}
|
Grants access to generate PNG and PDF reports in Dashboard. |
|
|
Grants access to download CSV files from saved search panels in Dashboard. |
|
|
Grants access to generate CSV reports from saved searches in Discover. |
|
|
Grants access to generate PDF reports in Canvas. |
|
|
Grants access to generate PNG and PDF reports in Visualize Library. |
Grant users access with a Basic license
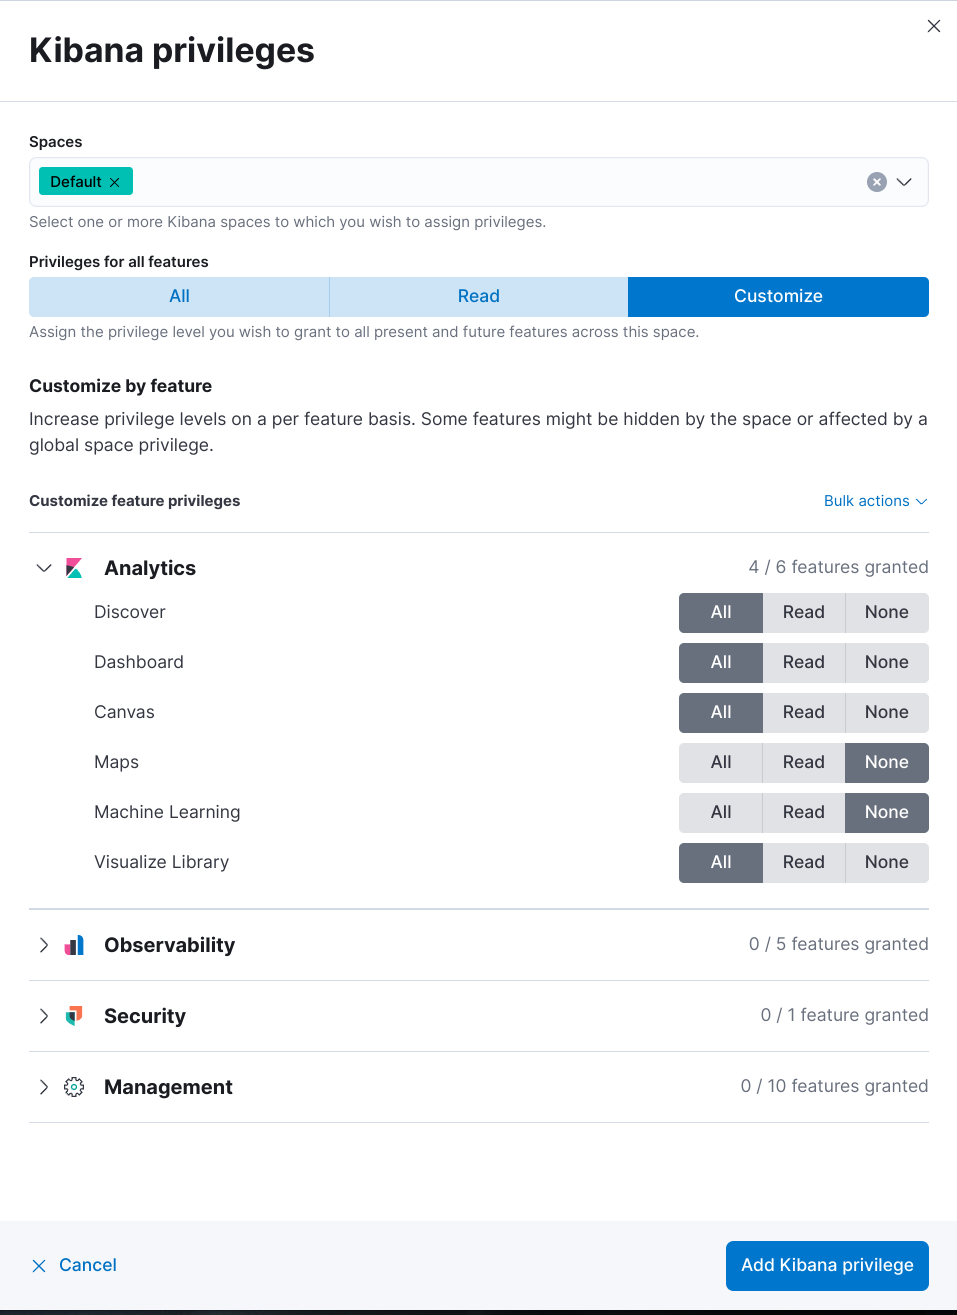
editWith a Basic license, you can grant users access with custom roles to reporting features with Kibana application privileges. However, with a Basic license, sub-feature privileges are unavailable. Create a role, then select All privileges for the applications where users can create reports.
With a Basic license, sub-feature application privileges are unavailable, but you can use the role API to grant access to CSV reporting features:
PUT localhost:5601/api/security/role/custom_reporting_user
{
  "elasticsearch": { "cluster": [], "indices": [], "run_as": [] },
  "kibana": [
    {
      "base": [],
      "feature": {
        "dashboard": [ "all" ],
        "discover": [ "all" ],
      },
      "spaces": [ "*" ]
    }
  ],
  "metadata": {} // optional
}
|
Grants access to generate CSV reports from saved searches in Discover. |
|
|
Grants access to download CSV reports from saved search panels in Dashboard. |
Grant access using an external provider
editIf you are using an external identity provider, such as LDAP or Active Directory, you can assign roles to individual users or groups of users. Role mappings are configured in config/role_mapping.yml.
For example, assign the kibana_admin and reporting_user roles to the Bill Murray user:
kibana_admin:
  - "cn=Bill Murray,dc=example,dc=com"
reporting_user:
  - "cn=Bill Murray,dc=example,dc=com"
Grant access with a custom index
editIf you are using a custom index, the xpack.reporting.index setting must begin with .reporting-*. The default Kibana system user has all privileges against the .reporting-* pattern of indices.
If you use a different pattern for the xpack.reporting.index setting, you must create a custom kibana_system user with appropriate access to the index.
In the next major version of Kibana, granting access with a custom index is unsupported.
-
Create the reporting role.
- Open the main menu, then click Stack Management.
- Click Roles > Create role.
-
Specify the role settings.
-
Enter the Role name. For example,
custom-reporting-user. - From the Indices dropdown, select the custom index.
- From the Privileges dropdown, select all.
- Click Add Kibana privilege.
- Select one or more Spaces that you want to grant reporting privileges to.
- Click Customize, then click Analytics.
- Next to each application you want to grant reporting privileges to, click All.
- Click Add Kibana privilege, then click Create role.
-
Enter the Role name. For example,
-
Assign the reporting role to a user.
- Open the main menu, then click Stack Management.
- Click Users, then click the user you want to assign the reporting role to.
- From the Roles dropdown, select kibana_system and custom-reporting-user.
- Click Update user.
-
Configure Kibana to use the new account.
elasticsearch.username: 'custom_kibana_system'
Secure the reporting endpoints
editTo automatically generate reports with Watcher, you must configure Watcher to trust the Kibana server certificate.
- Enable Elastic Stack security features on your Elasticsearch cluster. For more information, see Getting started with security.
- Configure TLS/SSL encryption for the Kibana server. For more information, see Encrypt TLS communications in Kibana.
-
Specify the Kibana server CA certificate chain in
elasticsearch.yml:If you are using your own CA to sign the Kibana server certificate, then you need to specify the CA certificate chain in Elasticsearch to properly establish trust in TLS connections between Watcher and Kibana. If your CA certificate chain is contained in a PKCS #12 trust store, specify it like so:
xpack.http.ssl.truststore.path: "/path/to/your/truststore.p12"
xpack.http.ssl.truststore.type: "PKCS12"
xpack.http.ssl.truststore.password: "optional decryption password"
Otherwise, if your CA certificate chain is in PEM format, specify it like so:
xpack.http.ssl.certificate_authorities: ["/path/to/your/cacert1.pem", "/path/to/your/cacert2.pem"]
For more information, see the Watcher HTTP TLS/SSL Settings.
-
Add one or more users who have access to the reporting features.
Once you’ve enabled SSL for Kibana, all requests to the reporting endpoints must include valid credentials.