Edit workpads
editEdit workpads
editTo create the look and feel that you want, apply format settings to the entire workpad, or individual elements.
Create variables
editWhen you frequently use copy and paste, create variables to easily reuse strings and patterns. For example, when you clone a large workpad and need to connect your elements to a new index, use variables to update each element instead of updating them manually.
-
Create the variables.
- Click Add a variable.
- Specify the variable options, then click Save changes.
-
Apply the variable.
- Copy the variable.
- Select the element you want to change, then open the expression editor.
- Paste the variable.
For example, to change the index pattern for a set of charts:
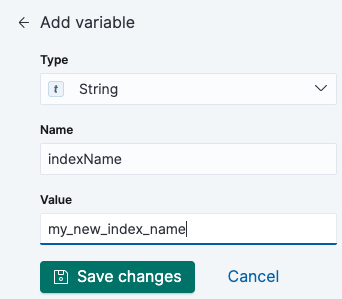
Specify the variable options.
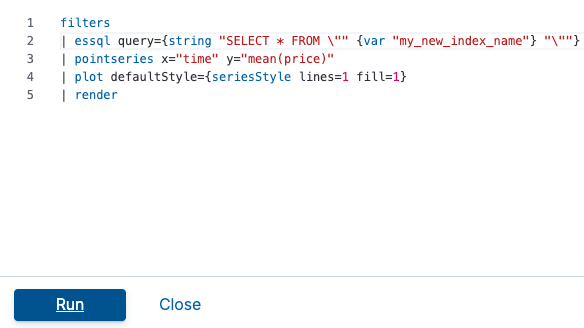
Copy the variable, then apply it to each element you want to update in the Expression editor.
Apply changes to the entire workpad
editWith stylesheets, you can change the look of the entire workpad, including fonts, colors, layout, and more.
To get started, enter the changes you want to make in the Global CSS overrides text editor, then click Apply stylesheet.
For example, to change the background for the entire workpad, enter:
.canvasPage {
background-color: #3990e6;
}
Change the element settings
editElement settings enable you to change the display options at the element level. For example, use the element settings to change the dimensions, style, or location of an element.
Change the display options
editChoose the display options for your elements. The options available depend on the element you select.
To change the element display options, click Display, then make your changes in the editor.
To use CSS overrides:
- Click + next to Element style, then select CSS.
- In the CSS text editor, enter the changes you want to make, then click Apply stylesheet.
For example, to center an element, enter:
.canvasRenderEl h1 {
text.align: center;
}
Clone elements
editTo use an element with the same functionality and appearance in multiple places, clone the element.
Select the element, then click Edit > Clone.
Move and resize elements
editCanvas provides you with many options to move and resize the elements on your workpad.
- To move elements, click and hold the element, then drag to the new location.
- To move elements by 1 pixel, select the element, press and hold Shift, then use your arrow keys.
- To move elements by 10 pixels, select the element, then use your arrow keys.
- To resize elements, click and drag the resize handles to the new dimensions.
Edit elements
editThe element editing options allow you to arrange and organize the elements on your workpad page.
To align two or more elements:
- Press and hold Shift, then select the elements you want to align.
- Click Edit > Alignment, then select the alignment option.
To distribute three or more elements:
- Press and hold Shift, then select the elements you want to distribute.
- Click Edit > Distribution, then select the distribution option.
To reorder elements:
- Select the element you want to reorder.
- Click Edit > Order, then select the order option.
Delete elements
editWhen you no longer need an element, delete it from your workpad.
- Select the element you want to delete.
- Click Edit > Delete.