NOTE: You are looking at documentation for an older release. For the latest information, see the current release documentation.
Localization for plugins
editLocalization for plugins
editTo introduce localization for your plugin, use our i18n tool to create IDs and default messages. You can then extract these IDs with respective default messages into localization JSON files for Kibana to use when running your plugin.
Adding localization to your plugin
editYou must add a translations directory at the root of your plugin. This directory will contain the translation files that Kibana uses.
.
├── translations
│   ├── en.json
│   └── zh-CN.json
└── .i18nrc.json
Using Kibana i18n tooling
editTo simplify the localization process, Kibana provides tools for the following functions:
- Verify all translations have translatable strings and extract default messages from templates
- Verify translation files and integrate them into Kibana
To use Kibana i18n tooling, create a .i18nrc.json file with the following configs:
-
paths. The directory from which the i18n translation IDs are extracted. -
exclude. The list of files to exclude while parsing paths. -
translations. The list of translations where JSON localizations are found.
{
  "paths": {
    "myPlugin": "src/ui",
  },
  "exclude": [
  ],
  "translations": [
    "translations/zh-CN.json"
  ]
}
An example Kibana .i18nrc.json is {kib-repo}blob/6.8/.i18nrc.json[here].
Full documentation about i18n tooling is {kib-repo}blob/6.8/src/dev/i18n/README.md[here].
Extracting default messages
editTo extract the default messages from your plugin, run the following command:
node scripts/i18n_extract --output-dir ./translations --include-config ../kibana-extra/myPlugin/.i18nrc.json
This outputs a en.json file inside the translations directory. To localize other languages, clone the file and translate each string.
Checking i18n messages
editChecking i18n does the following:
- Checks all existing labels for violations.
-
Takes translations from
.i18nrc.jsonand compares them to the messages extracted and validated at the step above and:- Checks for unused translations. If you remove a label that has a corresponding translation, you must also remove the label from the translations file.
- Checks for incompatible translations. If you add or remove a new parameter from an existing string, you must also remove the label from the translations file.
To check your i18n translations, run the following command:
node scripts/i18n_check --fix --include-config ../kibana-extra/myPlugin/.i18nrc.json
Implementing i18n in the UI
editKibana relies on several UI frameworks (ReactJS and AngularJS) and requires localization in different environments (browser and NodeJS). The internationalization engine is framework agnostic and consumable in all parts of Kibana (ReactJS, AngularJS and NodeJS).
To simplify
internationalization in UI frameworks, additional abstractions are
built around the I18n engine: react-intl for React and custom
components for AngularJS. React-intl
is built around intl-messageformat,
so both React and AngularJS frameworks use the same engine and the same
message syntax.
i18n for vanilla JavaScript
editimport { i18n } from '@kbn/i18n';
export const HELLO_WORLD = i18n.translate('hello.wonderful.world', {
defaultMessage: 'Greetings, planet Earth!',
});
<<<<<<< HEAD Full details are {repo}tree/6.7/packages/kbn-i18n#vanilla-js[here].
Full details are here. >>>>>>> d26cbef389… [DOCS] Adds kibana-pull attribute for release docs (#69554)
i18n for React
editTo localize strings in React, use either FormattedMessage or i18n.translate.
import { i18n } from '@kbn/i18n';
import { FormattedMessage } from '@kbn/i18n/react';

export const Component = () => {
  return (
    <div>
      {i18n.translate('xpack.someText', { defaultMessage: 'Some text' })}
      <FormattedMessage id="xpack.someOtherText" defaultMessage="Some other text">
      </FormattedMessage>
    </div>
  );
};
<<<<<<< HEAD Full details are {repo}tree/6.7/packages/kbn-i18n#react[here].
Full details are here. >>>>>>> d26cbef389… [DOCS] Adds kibana-pull attribute for release docs (#69554)
i18n for Angular
editAngularJS wrapper has 4 entities: translation provider, service, directive and filter. Both the directive and the filter use the translation service with i18n engine under the hood.
The translation directive has the following syntax:
<ANY
  i18n-id="{string}"
  i18n-default-message="{string}"
  [i18n-values="{object}"]
  [i18n-description="{string}"]
></ANY>
<<<<<<< HEAD Full details are {repo}tree/6.7/packages/kbn-i18n#angularjs[here].
Full details are here. >>>>>>> d26cbef389… [DOCS] Adds kibana-pull attribute for release docs (#69554)
Resources
editTo learn more about i18n tooling, see {kib-repo}blob/6.8/src/dev/i18n/README.md[i18n dev tooling].
To learn more about implementing i18n in the UI, follow the links below:
- {kib-repo}blob/6.8/packages/kbn-i18n/README.md[i18n plugin]
- {kib-repo}blob/6.8/packages/kbn-i18n/GUIDELINE.md[i18n guidelines]
Kibana Visualizations are the easiest way to add additional functionality to Kibana. This part of documentation is split into two parts. The first part tells you all you need to know on how to embed existing Kibana Visualizations in your plugin. The second step explains how to create your own custom visualization.
These pages document internal APIs and are not guaranteed to be supported across future versions of Kibana. However, these docs will be kept up-to-date to reflect the current implementation of Visualization plugins in Kibana.
To embed visualization use the VisualizeLoader.
==== VisualizeLoader
The VisualizeLoader class is the easiest way to embed a visualization into your plugin.
It will take care of loading the data and rendering the visualization.
To get an instance of the loader, do the following:
import { getVisualizeLoader } from 'ui/visualize/loader';

getVisualizeLoader().then((loader) => {
  // You now have access to the loader
});
The loader exposes the following methods:
-
getVisualizationList(): which returns promise which gets resolved with a list of saved visualizations -
embedVisualizationWithId(container, savedId, params): which embeds visualization by id -
embedVisualizationWithSavedObject(container, savedObject, params): which embeds visualization from saved object
Depending on which embed method you are using, you either pass in the id of the
saved object for the visualization, or a savedObject, that you can retrieve via
the savedVisualizations Angular service by its id. The savedObject give you access
to the filter and query logic and allows you to attach listeners to the visualizations.
For a more complex use-case you usually want to use that method.
container should be a DOM element (jQuery wrapped or regular DOM element) into which the visualization should be embedded
params is a parameter object specifying several parameters, that influence rendering.
You will find a detailed description of all the parameters in the inline docs in the {repo}blob/6.8/src/ui/public/visualize/loader/types.ts[loader source code].
Both methods return an EmbeddedVisualizeHandler, that gives you some access
to the visualization. The embedVisualizationWithSavedObject method will return
the handler immediately from the method call, whereas the embedVisualizationWithId
will return a promise, that resolves with the handler, as soon as the id could be
found. It will reject, if the id is invalid.
The returned EmbeddedVisualizeHandler itself has the following methods and properties:
-
destroy(): destroys the embedded visualization. You MUST call that method when navigating away or destroying the DOM node you have embedded into. -
getElement(): a reference to the jQuery wrapped DOM element, that renders the visualization -
whenFirstRenderComplete(): will return a promise, that resolves as soon as the visualization has finished rendering for the first time -
addRenderCompleteListener(listener): will register a listener to be called whenever a rendering of this visualization finished (not just the first one) -
removeRenderCompleteListener(listener): removes an event listener from the handler again
You can find the detailed EmbeddedVisualizeHandler documentation in its
{repo}blob/6.8/src/ui/public/visualize/loader/embedded_visualize_handler.ts[source code].
<<<<<<< HEAD
This is a short description of functions and interfaces provided. For more information you should check the kibana source code and the existing visualizations provided with it.
Use the VisualizationFactory to create a new visualization.
The creation-methods create a new visualization tied to the underlying rendering technology.
You should also register the visualization with VisTypesRegistryProvider.
import { VisFactoryProvider } from 'ui/vis/vis_factory';
import { VisTypesRegistryProvider } from 'ui/registry/vis_types';

const MyNewVisType = (Private) => {
  const VisFactory = Private(VisFactoryProvider);

  return  VisFactory.createBaseVisualization({
    name: 'my_new_vis',
    title: 'My New Vis',
    icon: 'my_icon',
    description: 'Cool new chart',
    ...
  });
}

VisTypesRegistryProvider.register(MyNewVisType);
The list of common parameters:
- name: unique visualization name, only lowercase letters and underscore
- title: title of your visualization as displayed in kibana
- icon: <string> the EUI icon type to use for this visualization
- image: instead of an icon you can provide a SVG image (imported)
- legacyIcon: (DEPRECATED) <string> provide a class name (e.g. for a font awesome icon)
- description: description of your visualization as shown in kibana
- hidden: <bool> if set to true, will hide the type from showing up in the visualization wizard
- visConfig: object holding visualization parameters
- visConfig.defaults: object holding default visualization configuration
- visualization: A constructor function for a Visualization.
- requestHandler: <string> one of the available request handlers or a <function> for a custom request handler
- responseHandler: <string> one of the available response handlers or a <function> for a custom response handler
- editor: <string> one of the available editors or Editor class for custom one
- editorConfig: object holding editor parameters
- options.showTimePicker: <bool> show or hide time picker (defaults to true)
- options.showQueryBar: <bool> show or hide query bar (defaults to true)
- options.showFilterBar: <bool> show or hide filter bar (defaults to true)
- options.showIndexSelection: <bool> show or hide index selection (defaults to true)
- stage: <string> Set this to "experimental" to mark your visualization as experimental. Experimental visualizations can also be disabled from the advanced settings. (defaults to "production")
- feedbackMessage: <string> You can provide a message (which can contain HTML), that will be appended to the experimental notification in visualize, if your visualization is experimental or in lab mode.
Each of the factories have some of the custom parameters, which will be described below.
==== Base Visualization Type The base visualization type does not make any assumptions about the rendering technology you are going to use and works with pure JavaScript. It is the visualization type we recommend to use.
You need to provide a type with a constructor function, a render method which will be called every time options or data change, and a destroy method which will be called to cleanup.
The render function receives the data object and status object which tells what actually changed. Render function needs to return a promise, which should be resolved once the visualization is done rendering.
The status object provides information about changes since the previous render call.
Due to performance reasons you need to opt-in for each status change, that you want
to be informed about by Kibana. This is done by using the requiresUpdateStatus key
in your visualization registration object. You pass it an array, that contains all
the status updates you want to receive. By default none of it will be calculated.
The following snippet shows explain all available status updates. You should only
activate those changes, that you actually use in your render method.
import { Status } from 'ui/vis/update_status';

// ...
return  VisFactory.createBaseVisualization({
  // ...
  requiresUpdateStatus: [
    // Check for changes in the aggregation configuration for the visualization
    Status.AGGS,
    // Check for changes in the actual data returned from Elasticsearch
    Status.DATA,
    // Check for changes in the parameters (configuration) for the visualization
    Status.PARAMS,
    // Check if the visualization has changes its size
    Status.RESIZE,
    // Check if the time range for the visualization has been changed
    Status.TIME,
    // Check if the UI state of the visualization has been changed
    Status.UI_STATE
  ]
});
If you activate any of these status updates, the status object passed as second
parameter to the render method will contain a key for that status (e.g. status[Status.DATA]),
that is either true if a change has been detected or false otherwise.
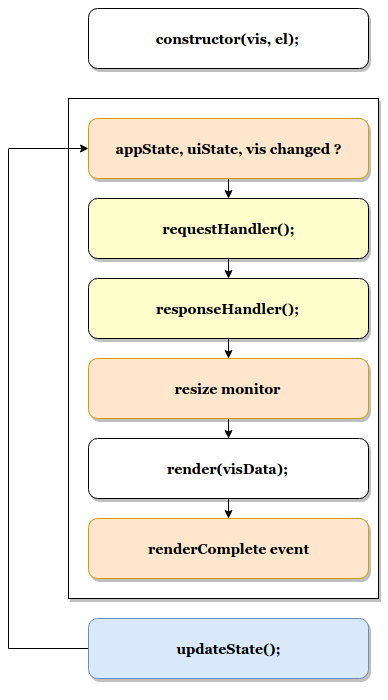
-
Your visualizations constructor will get called with
visobject and the DOM-element to which it should render. At this point you should prepare everything for rendering, but not render yet -
<visualize>component monitorsappState,uiStateandvisfor changes -
on changes the
<visualize>-directive will call yourrequestHandler. Implementing a request handler is optional, as you might use one of the provided ones. -
response from
requestHandlerwill get passed toresponseHandler. It should convert raw data to something that can be consumed by visualization. ImplementingresponseHandleris optional, as you might use of of the provided ones. -
On new data from the
responseHandleror on when the size of the surrounding DOM-element has changed, your visualizationrender-method gets called. It needs to return a promise which resolves once the visualization is done rendering. -
the visualization should call
vis.updateState()any time something has changed that requires to re-render or fetch new data.
import { VisFactoryProvider } from 'ui/vis/vis_factory';
import { VisTypesRegistryProvider } from 'ui/registry/vis_types';

class MyVisualization {
   constructor(el, vis) {
      this.el = el;
      this.vis = vis;
   }
   async render(visData, status) {
      ...
      return 'done rendering';
   }
   destroy() {
      console.log('destroying');
   }
}

const MyNewVisType = (Private) => {
  const VisFactory = Private(VisFactoryProvider);

  return VisFactory.createBaseVisualization({
    name: 'my_new_vis',
    title: 'My New Vis',
    icon: 'my_icon',
    description: 'Cool new chart',
    visualization: MyVisualization
  });
}

VisTypesRegistryProvider.register(MyNewVisType);
==== React Visualization Type
React visualization type assumes you are using React as your rendering technology.
Just pass in a React component to visConfig.component.
The visualization will receive vis, appState, updateStatus and visData as props.
It also has a renderComplete property, which needs to be called once the rendering has completed.
import { ReactComponent } from './my_react_component';

const MyNewVisType = (Private) => {
  const VisFactory = Private(VisFactoryProvider);

  return VisFactory.createReactVisualization({
    name: 'my_new_vis',
    title: 'My New Vis',
    icon: 'my_icon',
    description: 'Cool new chart',
    visConfig: {
       component: ReactComponent
    }
  });
}
=== Visualization Editors
By default, visualizations will use the default editor.
This is the sidebar editor you see in many of the Kibana visualizations. You can also write your own editor.
==== default editor controller
The default editor controller receives an optionsTemplate or optionsTabs parameter.
These can be either an AngularJS template or React component.
{
    name: 'my_new_vis',
    title: 'My New Vis',
    icon: 'my_icon',
    description: 'Cool new chart',
    editor: 'default',
    editorConfig: {
       optionsTemplate: '<my-custom-options-directive></my-custom-options-directive>' // or
       optionsTemplate: MyReactComponent // or if multiple tabs are required:
       optionsTabs: [
           { title: 'tab 1', template: '<div>....</div> },
           { title: 'tab 2', template: '<my-custom-options-directive></my-custom-options-directive>' },
           { title: 'tab 3', template: MyReactComponent }
       ]
    }
  }
==== custom editor controller You can create a custom editor controller. To do so pass an Editor object (the same format as VisController class). You can make your controller take extra configuration which is passed to the editorConfig property.
import { VisFactoryProvider } from 'ui/vis/vis_factory';

class MyEditorController {
    constructor(el, vis) {
      this.el = el;
      this.vis = vis;
      this.config = vis.type.editorConfig;
   }
   async render(visData) {
      console.log(this.config.my);
      ...
      return 'done rendering';
   }
   destroy() {
      console.log('destroying');
   }
}

const MyNewVisType = (Private) => {
  const VisFactory = Private(VisFactoryProvider);

  return VisFactory.createAngularVisualization({
    name: 'my_new_vis',
    title: 'My New Vis',
    icon: 'my_icon',
    description: 'Cool new chart',
    editor: MyEditorController,
    editorConfig: { my: 'custom config' }
  });
}

VisTypesRegistryProvider.register(MyNewVisType);
=== Visualization Request Handlers
Request handler gets called when one of the following keys on AppState change:
vis, query, filters or uiState and when timepicker is updated. On top
of that it will also get called on force refresh.
By default visualizations will use the courier request handler. They can also choose to use any of the other provided
request handlers. It is also possible to define your own request handler
(which you can then register to be used by other visualizations).
==== courier request handler courier is the default request handler which works with the default side bar editor.
==== none request handler
Using none as your request handles means your visualization does not require any data to be requested.
==== custom request handler
You can define your custom request handler by providing a function with the following signature:
function (vis, { uiState, appState, timeRange }) { ... }
The timeRange will be an object with a from and to key, that can contain
datemath expressions, like now-7d. You can use the datemath library to parse
them.
This function must return a promise, which should get resolved with new data that will be passed to responseHandler.
It’s up to function to decide when it wants to issue a new request or return previous data (if none of the objects relevant to the request handler changed).
import { VisFactoryProvider } from 'ui/vis/vis_factory';

const myRequestHandler = async (vis, { appState, uiState, timeRange }) => {
  const data = ... parse ...
  return data;
};

const MyNewVisType = (Private) => {
  const VisFactory = Private(VisFactoryProvider);

  return VisFactory.createAngularVisualization({
    name: 'my_new_vis',
    title: 'My New Vis',
    icon: 'my_icon',
    description: 'Cool new chart',
    requestHandler: myRequestHandler
  });
}

VisTypesRegistryProvider.register(MyNewVisType);
=== Visualization Response Handlers The response handler is a function that receives the data from a request handler, as well as an instance of Vis object. Its job is to convert the data to a format visualization can use. By default default request handler is used which produces a table representation of the data. The data object will then be passed to visualization. This response matches the visData property of the <visualization> directive.
==== default response handler The default response handler converts pure elasticsearch responses into a tabular format. It is the recommended responseHandler. The response object contains a table property, which is an array of all the tables in the response. Each of the table objects has two properties:
-
columns: array of column objects, where each column object has a title property and an aggConfig property -
rows: array of rows, where each row is an array of non formatted cell values
Here is an example of a response with 1 table, 3 columns and 2 rows:
{
  tables: [{
    columns: [{
      title: 'column1',
      aggConfig: ...
    },{
      title: 'column2',
      aggConfig: ...
    },{
      title: 'column3',
      aggConfig: ...
    }],
    rows: [
      [ '404', 1262, 12.5 ]
      [ '200', 343546, 60.1 ]
    ]
  }];
}
==== none response handler None response handler is an identity function, which will return the same data it receives.
==== custom response handler You can define your custom response handler by providing a function with the following definition: function (vis, response) { … }.
Function should return the transformed data object that visualization can consume.
import { VisFactoryProvider } from 'ui/vis/vis_factory';

const myResponseHandler = (vis, response) => {
   // transform the response (based on vis object?)
   const response = ... transform data ...;
   return response;
};

const MyNewVisType(Private) => {
  const VisFactory = Private(VisFactoryProvider);

  return VisFactory.createAngularVisualization({
    name: 'my_new_vis',
    title: 'My New Vis',
    icon: 'my_icon',
    description: 'Cool new chart',
    responseHandler: myResponseHandler
  });
}

VisTypesRegistryProvider.register(MyNewVisType);
=== Vis object
The vis object holds the visualization state and is the window into kibana:
- vis.params: holds the visualization parameters
- vis.indexPattern: selected index pattern object
- vis.getState(): gets current visualization state
-
vis.updateState(): updates current state with values from
vis.params -
vis.resetState(): resets
vis.paramsto the values in the current state - vis.forceReload(): forces whole cycle (request handler gets called)
- vis.getUiState(): gets UI state of visualization
- vis.uiStateVal(name, val): updates a property in UI state
- vis.isEditorMode(): returns true if in editor mode
- vis.API.timeFilter: allows you to access time picker
- vis.API.queryFilter: gives you access to queryFilter
- vis.API.events.click: default click handler
- vis.API.events.brush: default brush handler
The visualization gets all its parameters in vis.params, which are default values merged with the current state.
If the visualization needs to update the current state, it should update the vis.params and call vis.updateState()
which will inform <visualize> about the change, which will call request and response handler and then your
visualization’s render method.
For the parameters that should not be saved with the visualization you should use the UI state. These hold viewer-specific state, such as popup open/closed, custom colors applied to the series etc.
You can access filter bar and time picker through the objects defined on vis.API
Update the timefilter time values and call update() method on it to update time picker
   timefilter.time.from = moment(ranges.xaxis.from);
   timefilter.time.to = moment(ranges.xaxis.to);
   timefilter.time.mode = 'absolute';
   timefilter.update();
The AggConfig object represents an aggregation search to Elasticsearch, plus some additional functionality to manage data-values that belong to this aggregation. This is primarily used internally in Kibana, but you may find you have a need for it when writing your own visualization. Here we provide short description of some of the methods on it, however the best reference would be to actually check the source code.
- fieldFormatter(<type>) : returns a function which will format your value according to field formatters defined on the field. The type can be either text or html.
- makeLabel() : gets the label for the aggregation
- isFilterable() : return true if aggregation is filterable (you can then call createFilter)
- createFilter(bucketKey) : creates a filter for specific bucket key
- getValue(bucket) : gets value for a specific bucket
- getField() : gets the field used for this aggregation
- getFieldDisplayName() : gets field display name
- getAggParams() : gets the arguments to the aggregation
- The breaking changes documentation, where we try to capture any changes to the APIs as they occur across minors.
- Meta issue which is tracking the move of the plugin to the new Kibana platform
- Our Elastic Stack workspace on Slack.
- The source code, which will continue to be the most accurate source of information. >>>>>>> d26cbef389… [DOCS] Adds kibana-pull attribute for release docs (#69554)