Add an Elastic Agent integration to a policy
editAdd an Elastic Agent integration to a policy
editPolicies consist of one or more integrations. To add a new integration to a policy:
-
In Kibana, go to Management → Integrations.
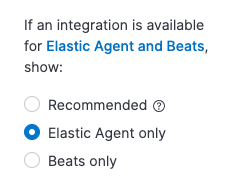
Notice that the Integrations page shows Elastic Agent integrations along with other types, such as Beats.
-
Scroll down and select Elastic Agent only so the view shows integrations that work with Elastic Agent.
- Search for and select an integration.
- Click Add <Integration>.
-
Name the integration and add any required configuration variables.
Integration policy names must be globally unique across all agent policies.
- Choose the agent policy you want to add the integration to. You can choose an existing agent policy or create a new one.
-
Save the integration policy:
- To use the UI, click Save integration.
- [beta] This functionality is in beta and is subject to change. The design and code is less mature than official GA features and is being provided as-is with no warranties. Beta features are not subject to the support SLA of official GA features. To use the Fleet API, click Preview API request and run the request.
This action installs the integration (if it’s not already installed) and saves the integration policy as a part of the larger Elastic Agent policy. Fleet distributes this new policy to all Elastic Agents that are enrolled in the agent policy.
If you haven’t deployed any Elastic Agents yet or set up agent policies, start with one of our quick start guides: