Use a proxy server with Elastic Agent and Fleet
editUse a proxy server with Elastic Agent and Fleet
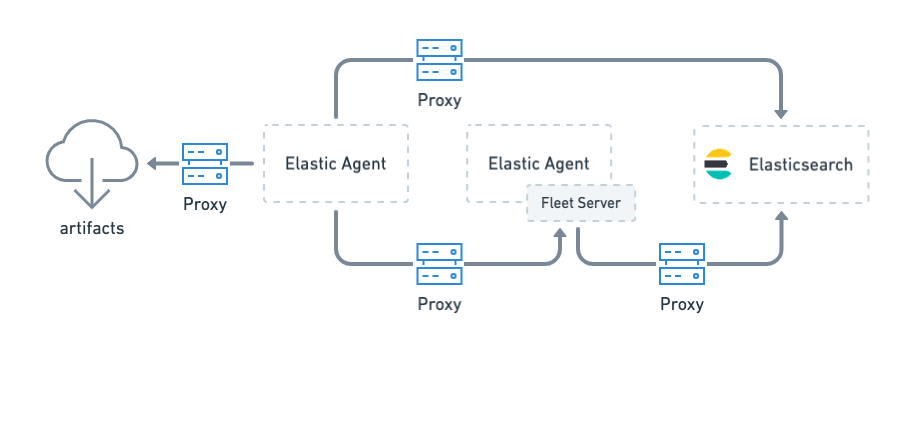
editYour organization’s security strategy and other considerations may require you to use a proxy server between some components in your deployment. For example, you may have a firewall rule that prevents endpoints from connecting directly to Elasticsearch. In this scenario, you can set up the Elastic Agent to connect to a proxy, then the proxy can connect to Elasticsearch through the firewall.
Support is available in Elastic Agent and Fleet for connections through HTTP Connect (HTTP 1 only) and SOCKS5 proxy servers.
This guide describes where a proxy server is allowed in your deployment and how to configure proxy settings for Elastic Agent and Fleet. The steps for deploying the proxy server itself are beyond the scope of this article.
Some environments require users to authenticate with the proxy. There are no explicit settings for proxy authentication in Elastic Agent or Fleet, except the ability to pass credentials in the URL or as keys/tokens in headers, as described later.
When to configure proxy settings
editConfigure proxy settings for Elastic Agent when it must connect through a proxy server to:
-
Download artifacts from
artifacts.elastic.cofor subprocesses or binary upgrades - Send data to Elasticsearch
- Retrieve agent policies from Fleet Server
- Retrieve agent policies from Elasticsearch (only needed for agents running Fleet Server)
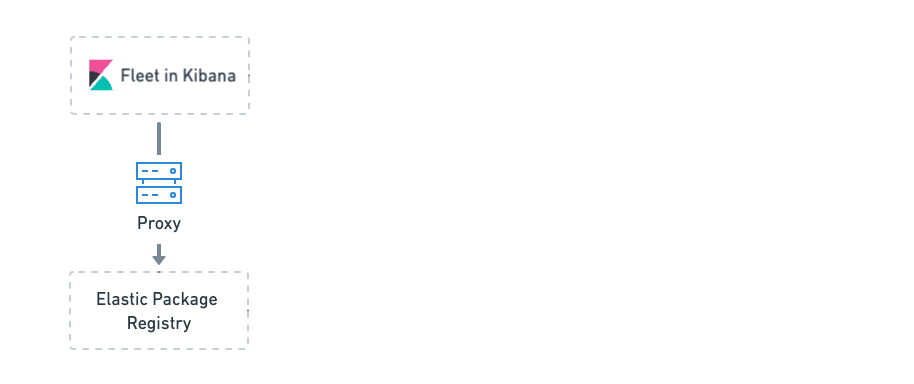
If Fleet is unable to access the Elastic Package Registry because Kibana is behind a proxy server, you may also need to set the registry proxy URL in the Kibana configuration.
Set default proxy settings in host environment variables
editSet environment variables on the host to configure default proxy settings. The Elastic Agent uses host environment settings by default if no proxy settings are specified elsewhere. You can override host proxy settings later when you configure the Elastic Agent and Fleet settings. The following environment variables are available on the host:
| Variable | Description |
|---|---|
|
URL of the proxy server for HTTP traffic. |
|
URL of the proxy server for HTTPS traffic. |
|
IP addresses or domain names that should not use the proxy. Supports patterns. |
The proxy URL can be a complete URL or host[:port], in which case the http
scheme is assumed. An error is returned if the value is a different form.
Where to set proxy environment variables
editThe location where you set these environment variables is platform-specific and based on the system manager you’re using. Here are some examples to get you started. For more information about setting environment variables, refer to the documentation for your operating system.
-
For Windows services, set environment variables for the service in the Windows registry.
This PowerShell command sets the
HKLM\SYSTEM\CurrentControlSet\Services\Elastic Agent\Environmentregistry key, then restarts Elastic Agent:$environment = [string[]]@( "HTTPS_PROXY=https://proxy-hostname:proxy-port", "HTTP_PROXY=http://proxy-hostname:proxy-port" ) Set-ItemProperty "HKLM:SYSTEM\CurrentControlSet\Services\Elastic Agent" -Name Environment -Value $environment Restart-Service "Elastic Agent"
-
For Linux services, the location depends on the distribution you’re using. For example, you can set environment variables in:
-
/etc/systemd/system/elastic-agent.servicefor systems that usesystemdto manage the service. To edit the file, run:sudo systemctl edit --full elastic-agent.service
Then add the environment variables under
[Service][Service] Environment="HTTPS_PROXY=https://my.proxy:8443" Environment="HTTP_PROXY=http://my.proxy:8080"
-
/etc/sysconfig/elastic-agentfor Red Hat-like distributions that don’t usesystemd. -
/etc/default/elastic-agentfor Debian and Ubuntu distributions that don’t usesystemd.For example:
HTTPS_PROXY=https://my.proxy:8443
HTTP_PROXY=http://my.proxy:8080
-
After adding environment variables, restart the service.
Set Elastic Agent proxy settings in a standalone agent policy
editProxy settings in the Elastic Agent policy override proxy settings specified by environment variables. This means you can specify proxy settings for Elastic Agent that are different from host or system-level environment settings. Currently, we only offer a way to modify these for standalone agents. The ability to set these for Fleet-managed agents is under consideration.
The following proxy settings are valid in the agent policy:
| Setting | Description |
|---|---|
|
(string) URL of the proxy server. If set, the configured URL is used as a
proxy for all connection attempts by the component. The value may be either a
complete URL or a |
|
(string) Additional headers to send to the proxy during CONNECT requests. You can use this setting to pass keys/tokens required for authenticating with the proxy. |
|
(boolean) If set to |
Set the proxy for communicating with Elasticsearch
editTo set the proxy for communicating with Elasticsearch, specify proxy settings under
outputs in the agent policy. The procedure for doing this depends on
whether you’re running Fleet-managed or standalone agents:
-
For Fleet-managed agents, specify proxy settings in the Kibana UI:
- In Kibana, open the main menu, then click Management > Fleet > Settings.
- Under Outputs, search for the default output, then click the Edit icon in the Action column.
-
Under Advanced YAML configuration, specify proxy settings for connecting to Elasticsearch. For example:

The proxy settings you specify here are applied to all Elastic Agents enrolled in Fleet.
-
For standalone agents, specify proxy settings the
elastic-agent.ymlfile. For example:outputs: default: api_key: API-KEY hosts: - https://10.0.1.2:9200 proxy_url: http://10.0.1.7:3128 type: elasticsearchFor more information, refer to Configure standalone Elastic Agents.
Set the proxy for retrieving agent policies from Fleet
editIf there is a proxy between Elastic Agent and Fleet, specify proxy settings on the
command line when you install Elastic Agent and enroll in Fleet. The settings you
specify at the command line are added to the fleet.yml file installed on the
system where the Elastic Agent is running.
If Kibana is behind a proxy server, you’ll still need to configure Kibana settings to access the package registry.
The enroll and install commands accept the following flags:
| CLI flag | Description |
|---|---|
|
URL of the proxy server. The value may be either a complete URL or a
|
|
If specified, all proxy settings, including the |
|
Additional header to send to the proxy during CONNECT requests. Use the
|
For example:
elastic-agent install -f --url="https://10.0.1.6:8220" --enrollment-token=TOKEN --proxy-url="http://10.0.1.7:3128" --fleet-server-es-ca="/usr/local/share/ca-certificates/es-ca.crt" --certificate-authorities="/usr/local/share/ca-certificates/fleet-ca.crt"
The command in the previous example adds the following settings to the
fleet.yml policy on the host where Elastic Agent is installed:
fleet:
  enabled: true
  access_api_key: API-KEY
  hosts:
  - https://10.0.1.6:8220
  ssl:
    verification_mode: ""
    certificate_authorities:
    - /usr/local/share/ca-certificates/es-ca.crt
    renegotiation: never
  timeout: 10m0s
  proxy_url: http://10.0.1.7:3128
  reporting:
    threshold: 10000
    check_frequency_sec: 30
  agent:
    id: ""
When Elastic Agent runs, the fleet.yml file gets encrypted and renamed to fleet.enc.
Set the proxy URL of the Elastic Package Registry
editFleet might be unable to access the Elastic Package Registry because Kibana is behind a proxy server.
Also your organization might have network traffic restrictions that prevent Kibana
from reaching the public Elastic Package Registry (EPR) endpoints, like
epr.elastic.co, to download package metadata and
content. You can route traffic to the public endpoint of EPR through a network
gateway, then configure proxy settings in the
Kibana configuration file, kibana.yml. For
example:
xpack.fleet.registryProxyUrl: your-nat-gateway.corp.net