Deploy on-premises and self-managed
editDeploy on-premises and self-managed
editTo use Fleet for central management, a Fleet Server must be running and accessible to your hosts. Deploying Fleet Server on-premises to work with Elasticsearch running on-premises is one of several approaches to setting up Fleet Server.
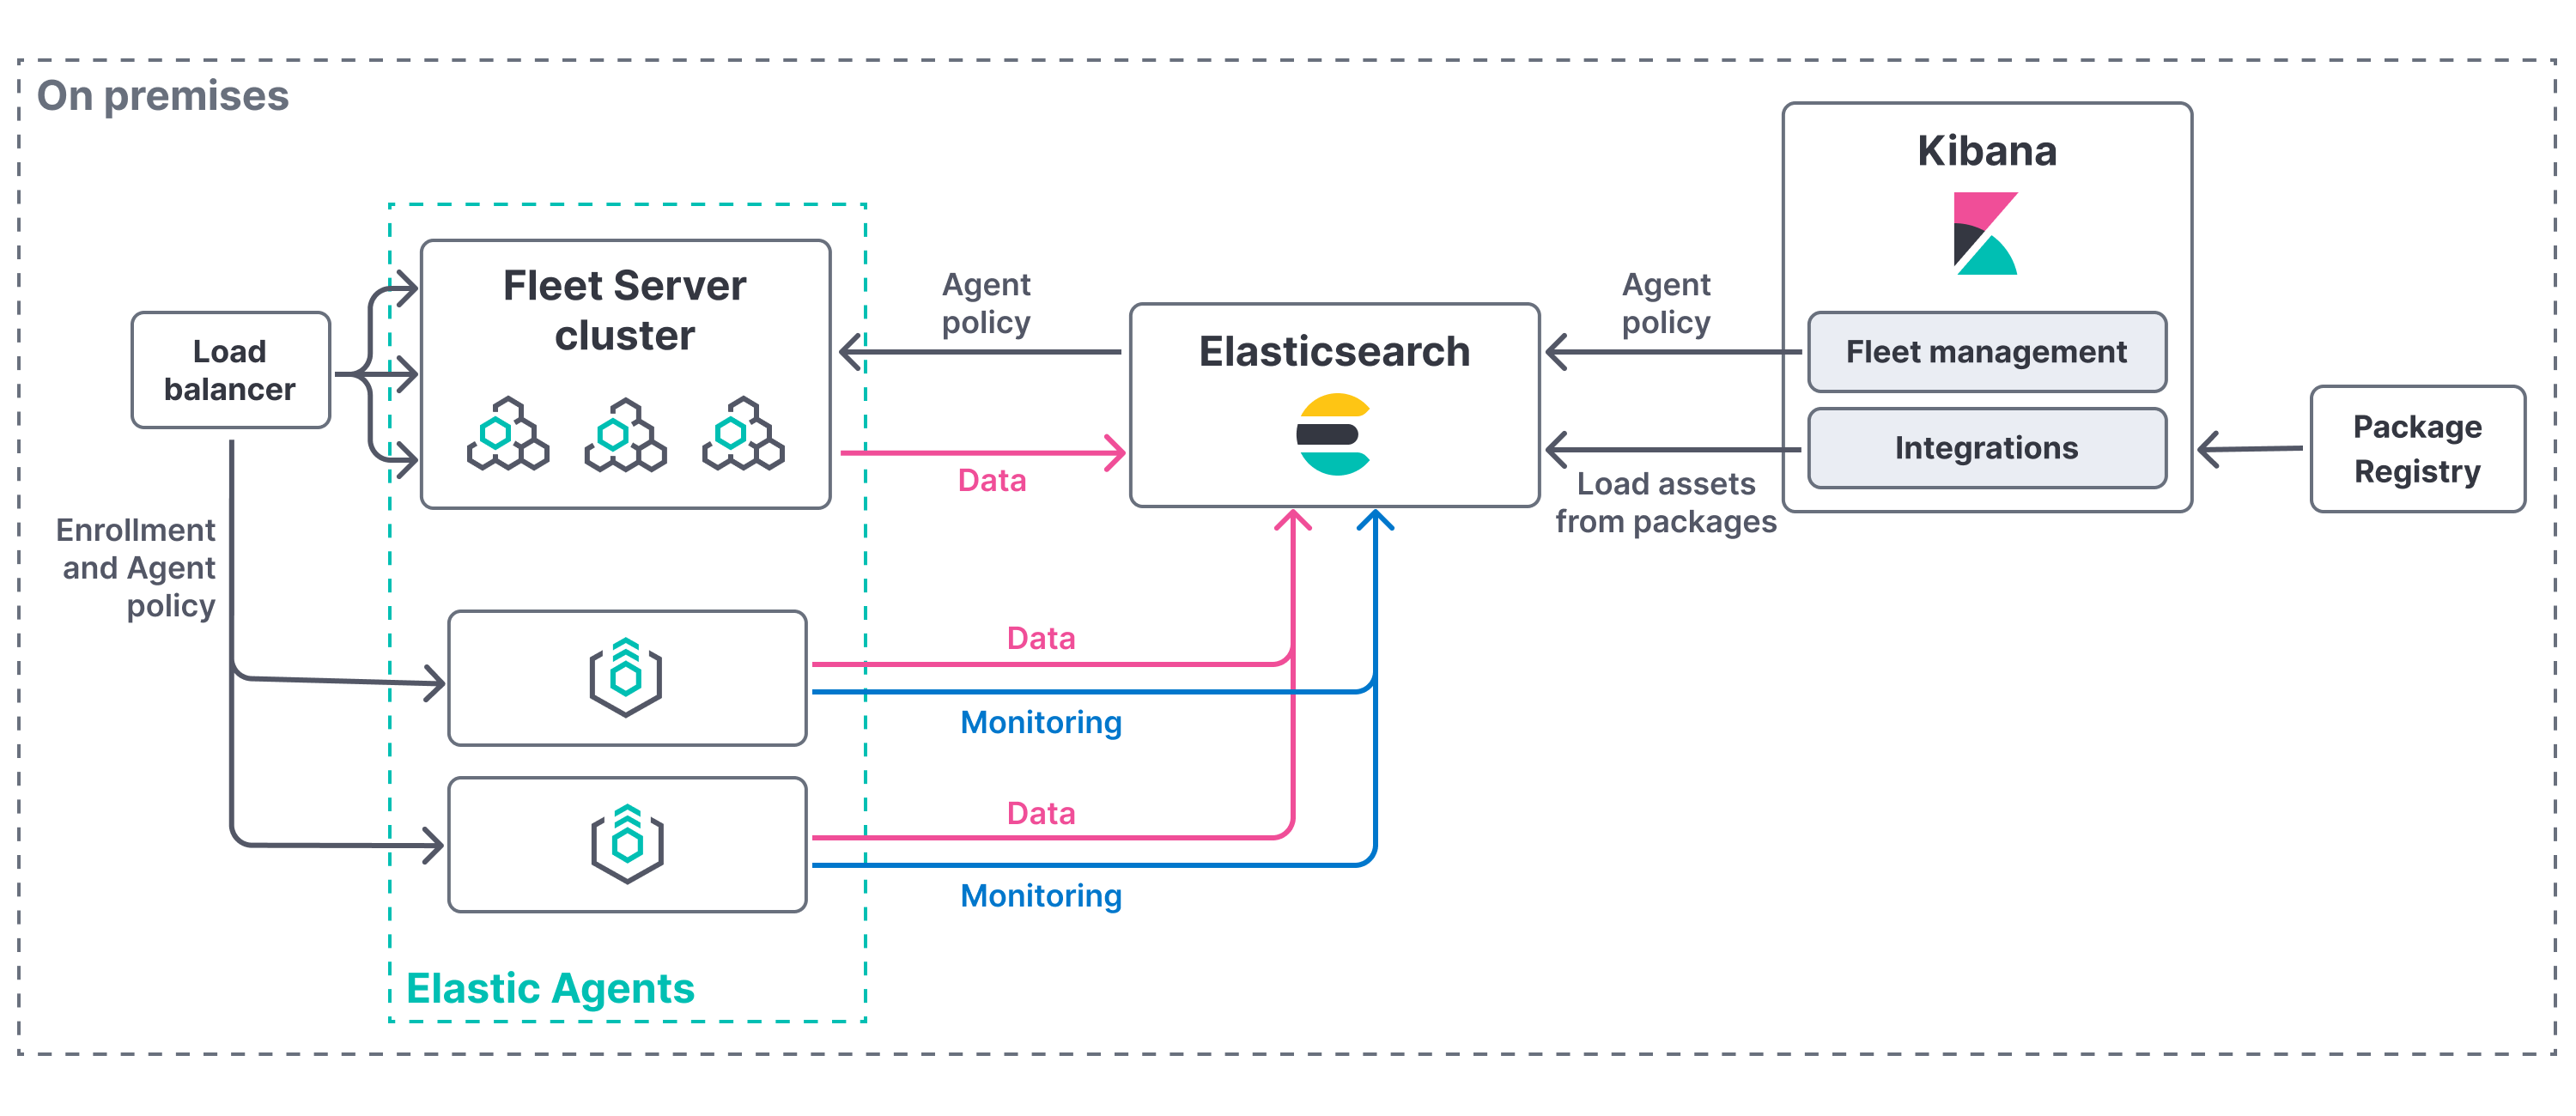
To deploy a self-managed Fleet Server, you need to:
- Satisfy all compatibility requirements and prerequisites
- Add hosts including Fleet Server hosts and Elasticsearch hosts
- Add Fleet Server by installing an Elastic Agent and enrolling it in an agent policy containing the Fleet Server integration
You can install only a single Elastic Agent per host, which means you cannot run Fleet Server and another Elastic Agent on the same host unless you deploy a containerized Fleet Server.
Compatibility
editFleet Server is compatible with the following Elastic products:
-
Elastic Stack 7.13 or later.
- For version compatibility: Elasticsearch >= Fleet Server >= Elastic Agent (except for bugfix releases)
- Kibana should be on the same minor version as Elasticsearch.
-
Elastic Cloud Enterprise 2.9 or later
-
Requires additional wildcard domains and certificates (which normally only
cover
*.cname, not*.*.cname). This enables us to provide the URL for Fleet Server ofhttps://.fleet.. - The deployment template must contain an Integrations Server node.
For more information about hosting Fleet Server on Elastic Cloud Enterprise, refer to Manage your Integrations Server.
-
Requires additional wildcard domains and certificates (which normally only
cover
Prerequisites
editBefore setting up Fleet Server using this approach, you will need a Certificate Authority (CA) certificate to configure Transport Layer Security (TLS) to encrypt traffic between the Fleet Servers and the Elastic Stack.
If your organization already uses the Elastic Stack, you may already have a CA certificate. If you do not have a CA certificate, you can read more about generating one in Configure SSL/TLS for self-managed Fleet Servers.
This is not required when testing and iterating using the Quick start option, but should always be used for production deployments.
Add Fleet Server hosts
editStart by adding one or more Fleet Server hosts. A Fleet Server host is a URL your Elastic Agents will use to connect to a Fleet Server.
Fleet Server hosts should meet the following requirements:
- All agents can connect to the host.
- The host also has a route to the Elasticsearch you plan to use.
- The host meets the minimum compute resource requirements based on the maximum number of agents you plan to support in your deployment.
To add a Fleet Server host:
- In Kibana, go to Management → Fleet → Settings. For more information about these settings, see Fleet settings.
-
Under Fleet Server hosts, click Edit hosts and specify one or more host URLs your Elastic Agents will use to connect to Fleet Server. For example,
https://192.0.2.1:8220, where192.0.2.1is the host IP where you will install Fleet Server. Save and apply your settings.If the Edit hosts option is grayed out, Fleet Server hosts are configured outside of Fleet. For more information, refer to Fleet settings in Kibana.
To update Elasticsearch hosts:
-
In the Outputs table:
- Find the default row where the Type is set to Elasticsearch.
- Click the pencil icon in the Actions column.
-
Update the Hosts field to specify one or more Elasticsearch URLs where Elastic Agents will send data. For example,
https://192.0.2.0:9200.Skip this step if you’ve started the Elastic Stack with security enabled (you cannot change this setting because it’s managed outside of Fleet).
- Save and apply the settings.
Add Fleet Server
editA Fleet Server is an Elastic Agent that is enrolled in a Fleet Server policy. The policy configures the agent to operate in a special mode to serve as a Fleet Server in your deployment.
To add a Fleet Server:
- Click the Agents tab.
- Click Add Fleet Server.
-
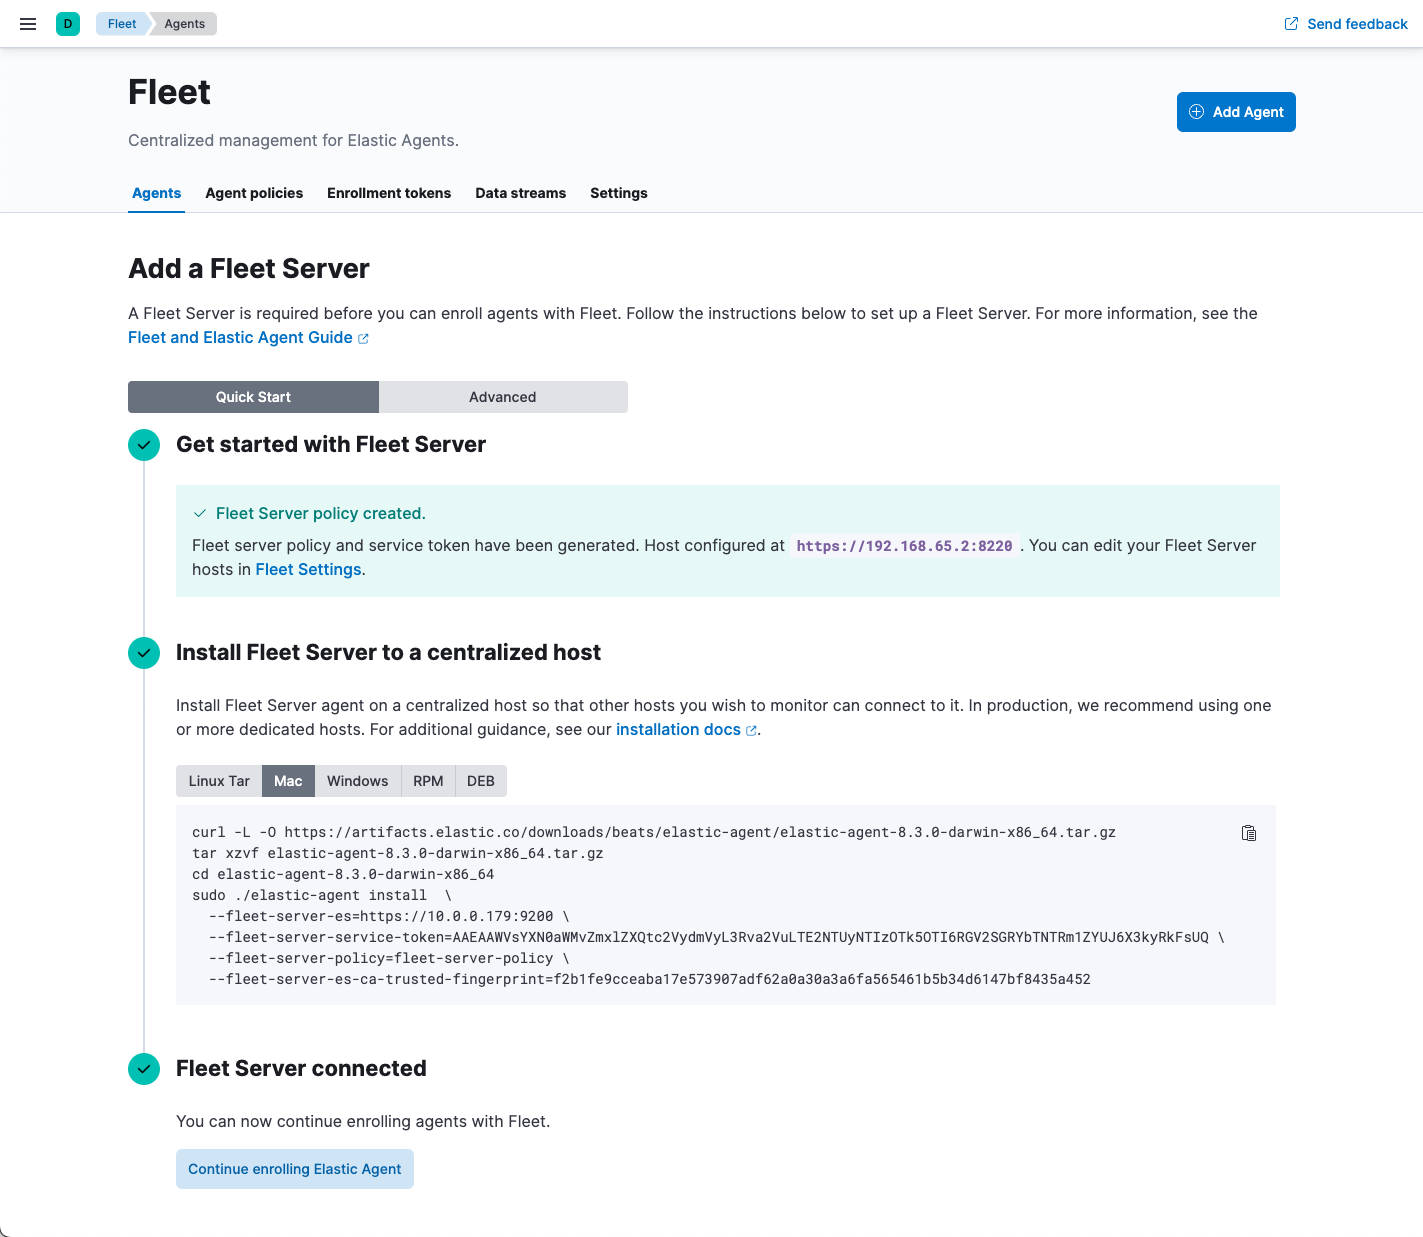
This will open in-product instructions to add a Fleet Server using one of two options: Quick Start or Advanced.
-
Use Quick Start if you want Fleet to generate a Fleet Server policy and enrollment token for you. The Fleet Server policy will include a Fleet Server integration plus a system integration for monitoring Elastic Agent. This option generates self-signed certificates and is not recommended for production use cases.
-
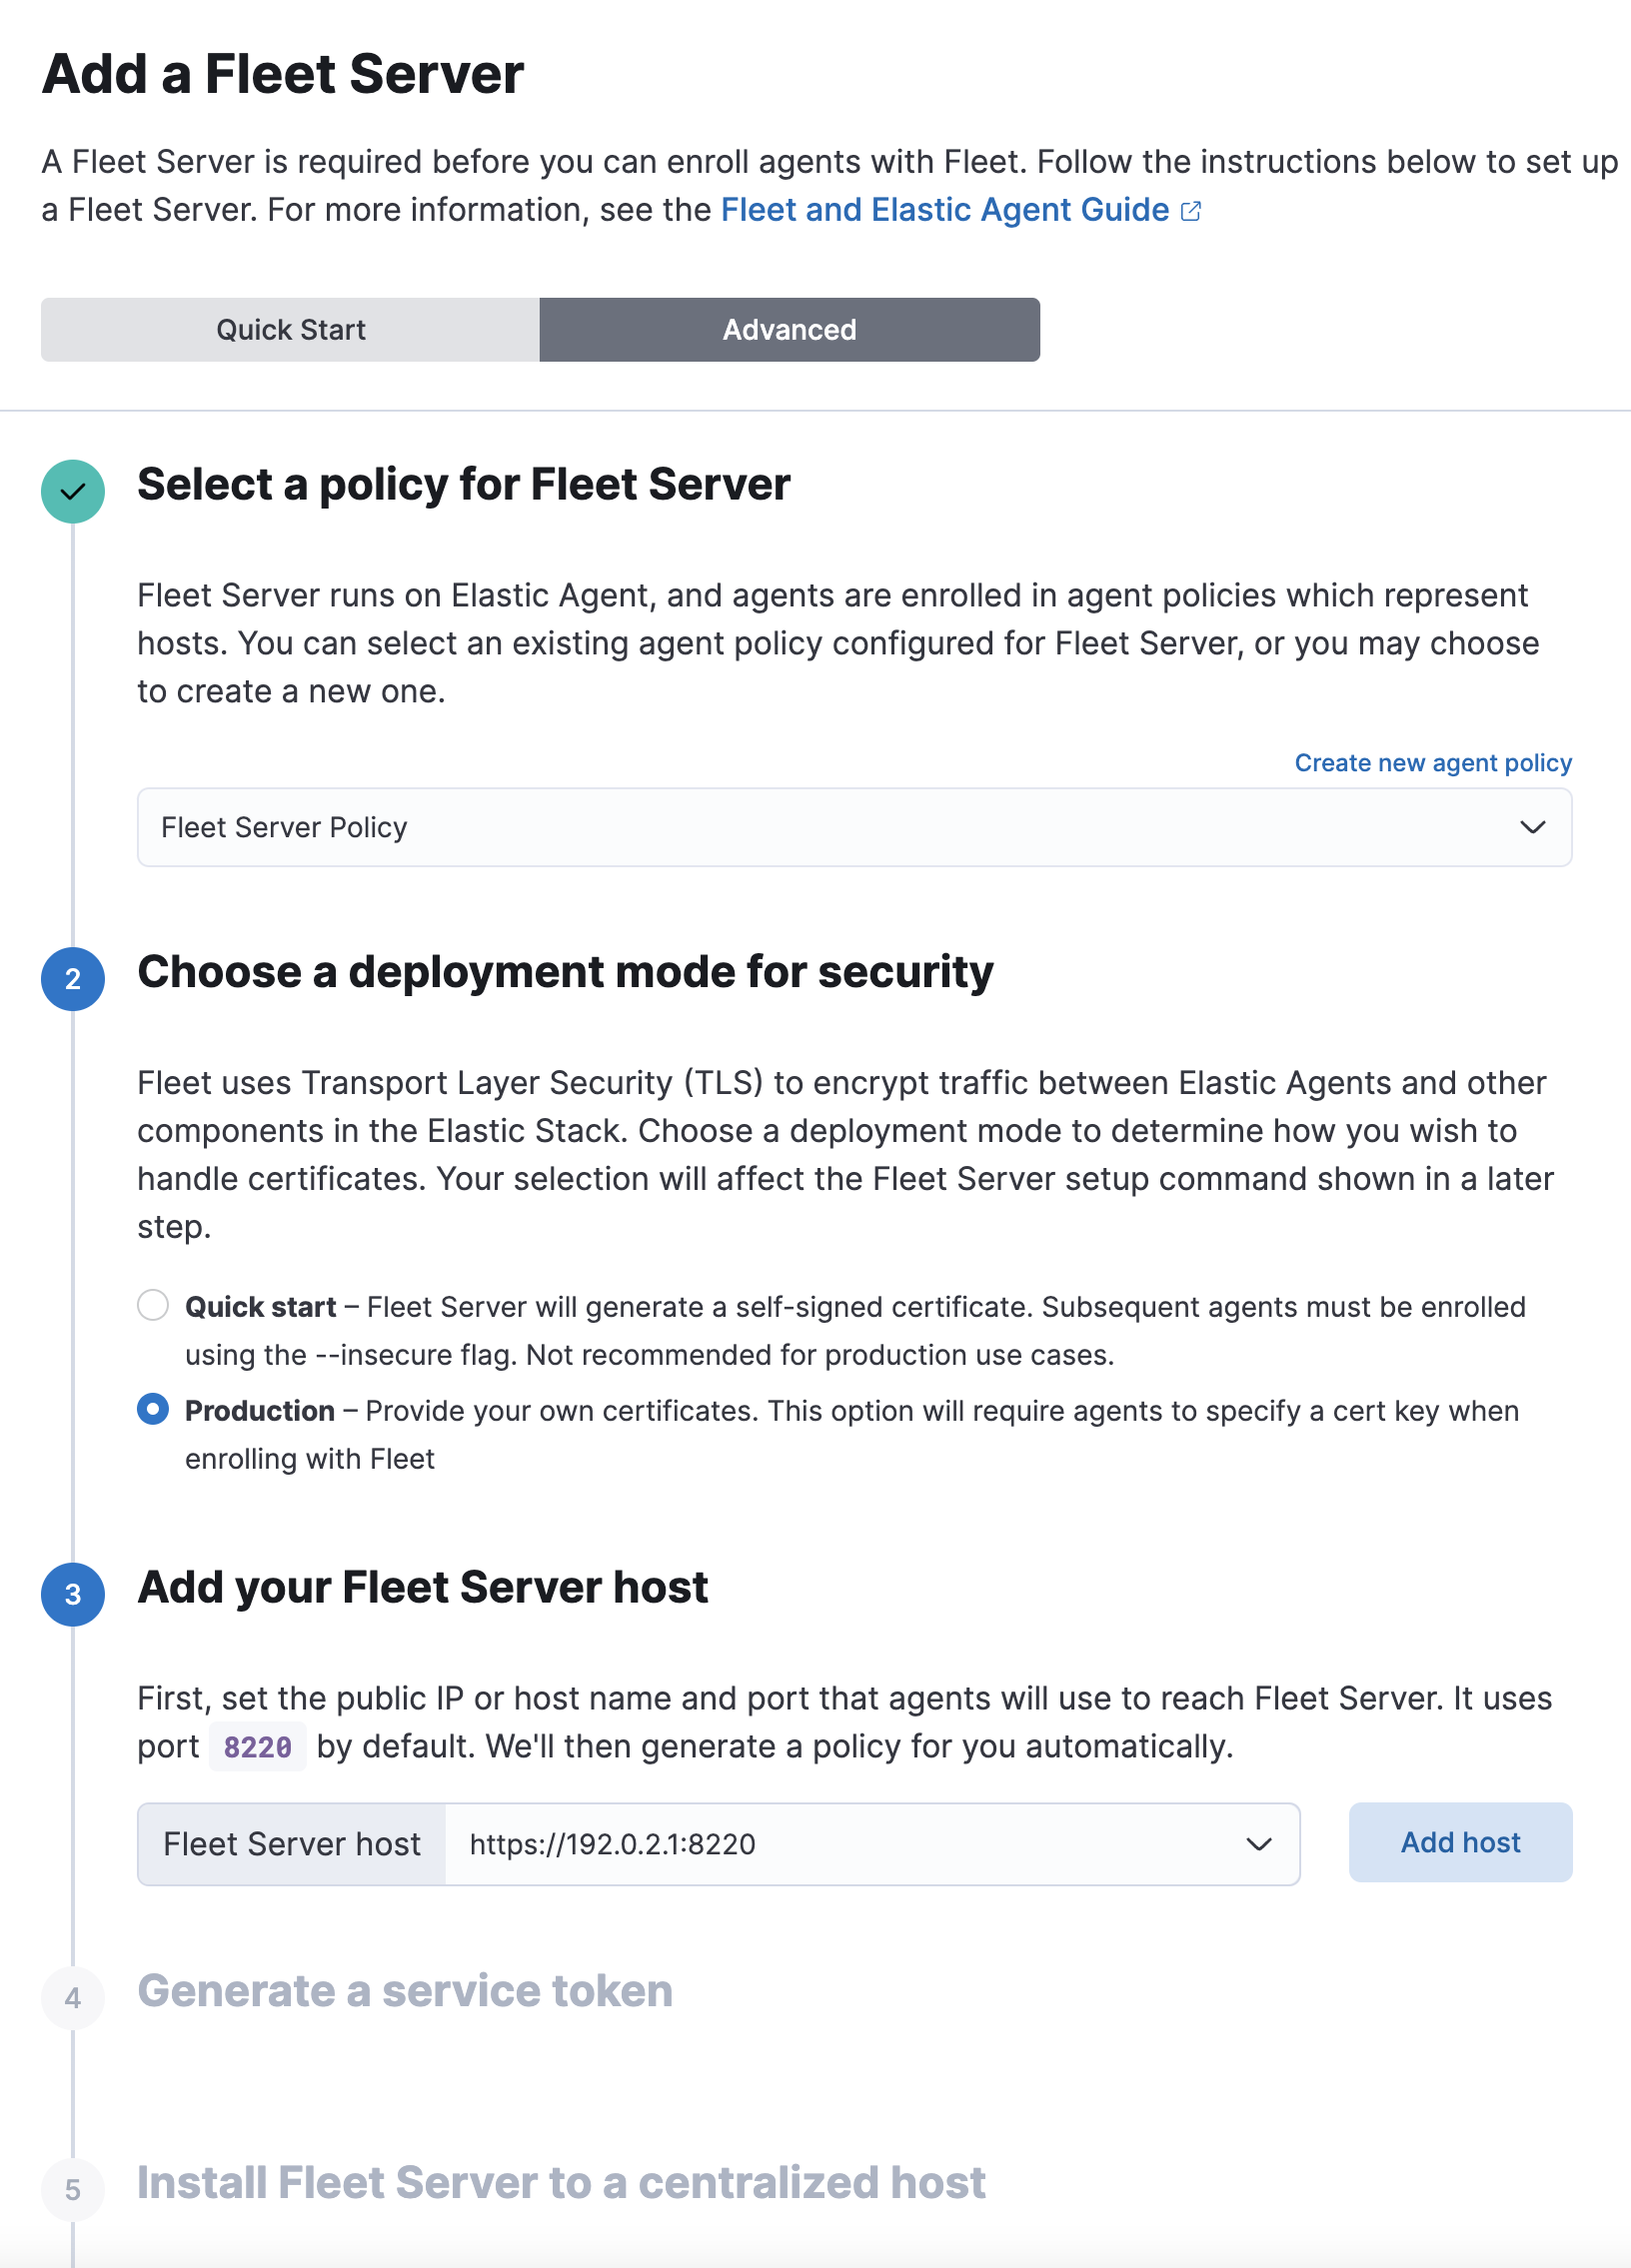
Use Advanced if you want to either:
- Use your own Fleet Server policy. Fleet Server policies manage and configure the Elastic Agent running on Fleet Server hosts to launch a Fleet Server process. You can create a new Fleet Server policy or select an existing one. Alternatively you can create a Fleet Server policy without using the UI, and then select the policy here.
-
Use your own TLS certificates. TLS certificates encrypt traffic between Elastic Agents and Fleet Server. To learn how to generate certs, refer to Configure SSL/TLS for self-managed Fleet Servers.
If you are providing your own certificates:
-
Before running the
installcommand, make sure you replace the values in angle brackets. -
Note that the URL specified by
--urlmust match the DNS name used to generate the certificate specified by--fleet-server-cert.
-
Before running the
-
-
Then, use the in-product instructions to install the Elastic Agent.
The
installcommand installs the Elastic Agent as a managed service and enrolls it in a Fleet Server policy. For more Fleet Server commands, see Elastic Agent command reference. - If installation is successful, you’ll see confirmation that Fleet Server connected. Click Continue enrolling Elastic Agent to begin enrolling your agents in Fleet Server.
It’s recommended you generate a unique service token for each
Fleet Server. For other ways to generate service tokens, see
elasticsearch-service-tokens.
Troubleshooting
editIf you’re unable to add a Fleet-managed agent, click the Agents tab and confirm that the agent running Fleet Server is healthy.
Next steps
editNow you’re ready to add Elastic Agents to your host systems. To learn how, see Install Fleet-managed Elastic Agents.