Managing crawls in Kibana
editManaging crawls in Kibana
editThis documentation contains all the information you need for managing crawls using the Kibana UI.
If you’d prefer to see a concrete crawler use case, see Website search tutorial. If you need to learn how to optimize source files for the crawler, see Optimizing web content.
Overview
editIt’s important to understand the primary crawl management tools and how they influence your crawls:
- Domains set crawl boundaries.
- Entry points and Sitemaps set starting points within domains.
-
Crawl rules and
robots.txtdirectives set additional rules for crawling, beyond the starting points.
Here you’ll learn about discovering content, extracting content, crawling manually and scheduling crawls.
Discovering content:
Extracting content:
Running manual crawls:
Scheduling automated crawls:
Domains
editA domain is a website or property you’d like to crawl. You must associate one or more domains to your index’s web crawler. The web crawler cannot discover and index content outside of specified domains.
Each domain has a domain URL that identifies the domain using a protocol and hostname. The domain URL can not include a path. If a path is provided, it will automatically be removed from the domain URL, and instead added as an entry point.
Each unique combination of protocol and hostname is a separate domain. This can be a source of confusion. Note that each of the following is its own domain:
-
http://example.com -
https://example.com -
http://www.example.com -
https://www.example.com -
http://shop.example.com -
https://shop.example.com
Each domain has:
- One or more entry points.
- One or more crawl rules.
-
Zero or one
robots.txtfiles. - Zero or more sitemaps.
Manage the domains for a crawl in the Kibana UI. Add your first domain on the getting started screen. From there, you can view, add, manage, and delete domains.
Entry points and sitemaps
editEntry points
editEach domain must have at least one entry point.
Entry points are the paths from which the crawler will start each crawl.
Ensure entry points for each domain are allowed by the domain’s crawl rules, and the directives within the domain’s robots.txt file.
See robots.txt files to learn about managing robots.txt files.
Add multiple entries, if some pages are not discoverable from the first entry point. For example, if your domain contains an “island” page that is not linked from other pages, simply add that full URL as an entry point. If your domain has many pages that are not linked from other pages, it may be easier to reference them all via a sitemap.
Sitemaps
editIf the website you are crawling uses sitemaps, you can specify the sitemap URLs. Note that you can choose to submit URLs to the web crawler using sitemaps, entry points, or a combination of both.
You can manage the sitemaps for a domain through the Kibana UI:
- Navigate to Enterprise Search → Content → Elasticsearch indices → your-index → Manage domains.
- Select a domain.
- Click Add sitemap.
From here, you can view, add, edit, and delete sitemaps.
To add a sitemap to a domain you manage, you can specify it within a robots.txt file.
At the start of each crawl, the web crawler fetches and processes each domain’s robots.txt file and each sitemap specified within those files.
You may prefer to use sitemaps over entry points, because you have already published sitemaps for other web crawlers.
See Sitemaps if you are editing and managing sitemap source files.
Authentication
editIf the domain you are crawling has pages that require authentication, you can manage the authentication settings in the Kibana UI. The web crawler supports two authentication methods:
- Basic authentication (username and password)
- Authentication header (e.g. bearer tokens)
Follow these steps to add authentication information in the Kibana UI:
- Navigate to Enterprise Search → Content → Elasticsearch indices → your-index → Manage domains.
- Select a domain.
- Click Add credentials.
- Add the Basic authentication username/password or Authentication header.
- Click Save.
You can only save one authentication method per domain.
We do not currently support form based authentication.
Crawl rules
editA crawl rule is a crawler instruction to allow or disallow specific paths within a domain.
For a concrete example of crawl rules in action, see our website search guide.
Remember that order matters and each URL is evaluated according to the first match.
The web crawler will crawl only those paths that are allowed by the crawl rules for the domain and the directives within the robots.txt file for the domain.
Ensure entry points for each domain are allowed.
The web crawler will crawl only those paths that are allowed by the crawl rules for the domain and the directives within the robots.txt file for the domain.
See robots.txt files to learn about using robots.txt files to allow/disallow paths.
Crawl rule logic (rules)
editThe logic for each rule is as follows:
- Begins with
-
The path pattern is a literal string except for the character
*, which is a meta character that will match anything.The rule matches when the path pattern matches the beginning of the path (which always begins with
/).If using this rule, begin your path pattern with
/. - Ends with
-
The path pattern is a literal string except for the character
*, which is a meta character that will match anything.The rule matches when the path pattern matches the end of the path.
- Contains
-
The path pattern is a literal string except for the character
*, which is a meta character that will match anything.The rule matches when the path pattern matches anywhere within the path.
- Regex
-
The path pattern is a regular expression compatible with the Ruby language regular expression engine. In addition to literal characters, the path pattern may include metacharacters, character classes, and repetitions. You can test Ruby regular expressions using Rubular.
The rule matches when the path pattern matches the beginning of the path (which always begins with
/).If using this rule, begin your path pattern with
\/or a metacharacter or character class that matches/.
Crawl rule matching
editThe following table provides various examples of crawl rule matching:
| URL path | Rule | Path pattern | Match? |
|---|---|---|---|
|
Begins with |
|
YES |
|
Begins with |
|
YES |
|
Begins with |
|
NO |
|
Begins with |
|
NO |
|
Ends with |
|
YES |
|
Ends with |
|
YES |
|
Ends with |
|
NO |
|
Ends with |
|
NO |
|
Contains |
|
YES |
|
Contains |
|
NO |
|
Regex |
|
YES |
|
Regex |
|
NO |
|
Regex |
|
NO |
Restricting paths using crawl rules
editThe domain dashboard adds a default crawl rule to each domain: Allow if Regex .*.
You cannot delete or re-order this rule through the dashboard.
This rule is permissive, allowing all paths within the domain. To restrict paths, use either of the following techniques:
Add rules that disallow specific paths (e.g. disallow the blog):
| Policy | Rule | Path pattern |
|---|---|---|
|
|
|
|
|
|
Or, add rules that allow specific paths and disallow all others (e.g. allow only the blog):
| Policy | Rule | Path pattern |
|---|---|---|
|
|
|
|
|
|
|
|
|
When you restrict a crawl to specific paths, be sure to add entry points that allow the crawler to discover those paths.
For example, if your crawl rules restrict the crawler to /blog, add /blog as an entry point.
If you leave only the default entry point /, the crawl will end immediately, since / is disallowed.
User Agent
editThe User Agent is a request header that allows websites to identify the request sender.
The default User Agent for the Elastic web crawler is Elastic-Crawler (<crawler_version_number>).
For example, in version 8.6.0 the User Agent is Elastic-Crawler (8.6.0).
Every request sent by the Elastic crawler will contain this header.
The User Agent header can be changed in the enterprise-search.yml file.
See Elastic crawler configuration settings for more information.
Duplicate document handling
editBy default, the web crawler identifies groups of duplicate web documents and stores each group as a single document in your index.
The document’s url and additional_urls fields represent all the URLs where the web crawler discovered the document’s content — or a sample of URLs if more than 100.
The url field represents the canonical URL, or the first discovered URL if no canonical URL is defined.
If you manage your site’s HTML source files, see Canonical URL link tags to learn how to embed canonical URL link tag elements in pages that duplicate the content of other pages.
The crawler identifies duplicate content intelligently, ignoring insignificant differences such as navigation, whitespace, style, and scripts. More specifically, the crawler combines the values of specific fields, and it hashes the result to create a unique "fingerprint" to represent the content of the web document.
The web crawler then checks your index for an existing document with the same content hash. If it doesn’t find one, it saves a new document to the index. If it does exist, the crawler updates the existing document instead of saving a new one. The crawler adds the additional URL at which the content was discovered.
You can manage which fields the web crawler uses to create the content hash. You can also disable this feature and allow duplicate documents.
Set the default fields for all domains using the following configuration setting: connector.crawler.extraction.default_deduplication_fields.
Manage these settings for each domain within the web crawler UI.
Manage duplicate document handling
editAfter extracting the content of a web document, the web crawler compares that content to your existing documents, to check for duplication. To compare documents, the web crawler examines specific fields.
Manage these fields for each domain within the web crawler UI:
- Navigate to Enterprise Search → Content → Indices → your-index-name → domain name.
- Locate the section named Duplicate document handling.
- Select or deselect the fields you’d like the crawler to use. Alternatively, allow duplicate documents for a domain by deselecting Prevent duplicate documents.
If you want to manage duplicate documents by editing your HTML content, see Canonical URL link tags.
Binary content extraction
editThe web crawler can extract content from downloadable binary files, such as PDF and DOCX files. To use this feature, you must:
-
Enable binary content extraction with the configuration:
connector.crawler.content_extraction.enabled: true. -
Select which MIME types should have their contents extracted. For example:
connector.crawler.content_extraction.mime_types: ["application/pdf", "application/msword"].-
The MIME type is determined by the HTTP response’s
Content-Typeheader when downloading a given file. - While intended primarily for PDF and Microsoft Office formats, you can use any of the supported formats documented by Apache Tika.
-
No default
mime_typesare defined. You must configure at least one MIME type in order to extract non-HTML content.
-
The MIME type is determined by the HTTP response’s
The ingest attachment processor does not support compressed files, e.g., an archive file containing a set of PDFs. Expand the archive file and make individual uncompressed files available for the web crawler to process.
Enterprise Search uses an Elasticsearch ingest pipeline to power the web crawler’s binary content extraction.
The default pipeline, ent-search-generic-ingestion (ent_search_crawler before 8.5), is automatically created when Enterprise Search first starts.
You can view this pipeline in Kibana. Customizing your pipeline usage is also an option. See Index-specific ingest pipelines.
If you make changes to the default ent_search_crawler ingest pipeline, these will not be overwritten when you upgrade Enterprise Search, provided you have incremented its version above the upgrade version.
See Manage ingest pipelines on this page for more information.
Storing full HTML
editYou can enable your crawler to save the full HTML of pages that it indexes.
The full HTML value will be saved under the field full_html in the Web crawler schema as a string.
Each crawler index can have this setting toggled on or off. This setting is off by default.
In Kibana, navigate to:
Enterprise Search → Content → Elasticsearch indices
Then choose the index to manage and choose the Configuration tab.
Within that tab, toggle the Store full HTML on or off.
Enabling full HTML extraction can dramatically increase the index size if the site being crawled is large.
Content extraction rules
editManage ingest pipelines
editThe web crawler extracts webpage content and transforms it into fields in Elasticsearch documents, according to the Web crawler schema. However, you can use ingest pipelines to perform additional processing and transformation on each document, before it is written to Elasticsearch.
Each crawler index has a default ingest pipeline, which you can customize or replace through Kibana.
In Kibana, navigate to:
Enterprise Search → Content → Elasticsearch indices
Then choose the index to manage and choose the Pipelines tab.
This functionality applies to all search indices, including crawler and API indices. Refer to the following documentation for further details: Ingest pipelines.
Running manual crawls
editManual crawls are useful for testing and debugging the web crawler. Your first crawl will be manual by default.
Other use cases for manual crawls include:
- Crawling content only once for a specific purpose: For example, crawling a website you don’t control to make it easier to search its pages.
- Crawling content that changes infrequently: For example, it might make sense to only run manual crawls when content is updated.
- Your team needs to closely manage usage costs: For example, you only run crawls when needed, such as after updating a website.
How to run a manual crawl
editTo run a manual crawl, follow these steps in the web crawler UI:
- Navigate to your crawler index in Content → Indices → index-name.
- Click on Crawl.
-
You have 3 options for manual crawls:
- Crawl all domains on this index
- Crawl with custom settings
- Reapply crawl rules
Crawl with custom settings
editSet up a one-time crawl with custom settings. We recommend using this option for tests, because it allows you to further restrict which pages are crawled.
Crawl with custom settings gives you the option to:
-
Set a maximum crawl depth, to specify how many pages deep the crawler traverses.
-
Set the value to
1, for example, to limit the crawl to only entry points.
-
Set the value to
- Crawl select domains.
- Define seed URLs with sitemaps and entry points.
Reapply crawl rules
editIf you’ve modified crawl rules, you can apply the updated rules to existing documents without running a full crawl. The web crawler will remove all existing documents that are no longer allowed by your current crawl rules. This operation is called a process crawl.
We recommend cancelling any active web crawls, before opting to re-apply crawl rules. A web crawl running concurrently with a process crawl may continue to index fresh documents with out-of-date configuration. Changes in crawl rule configuration will only apply to documents indexed at the time of the request.
Scheduling automated crawls
editYou can schedule new crawls to start automatically. New crawls will be skipped if there is an active crawl.
To manage automated crawls within the UI:
- Navigate to your index and select the Scheduling tab.
- Toggle Enable recurring crawls with the following schedule.
-
Set up your desired scheduling type from the two options.
- Save your settings.
The crawl schedule will perform a full crawl on every domain on this index.
Here’s what the scheduling options look like in the Kibana UI:
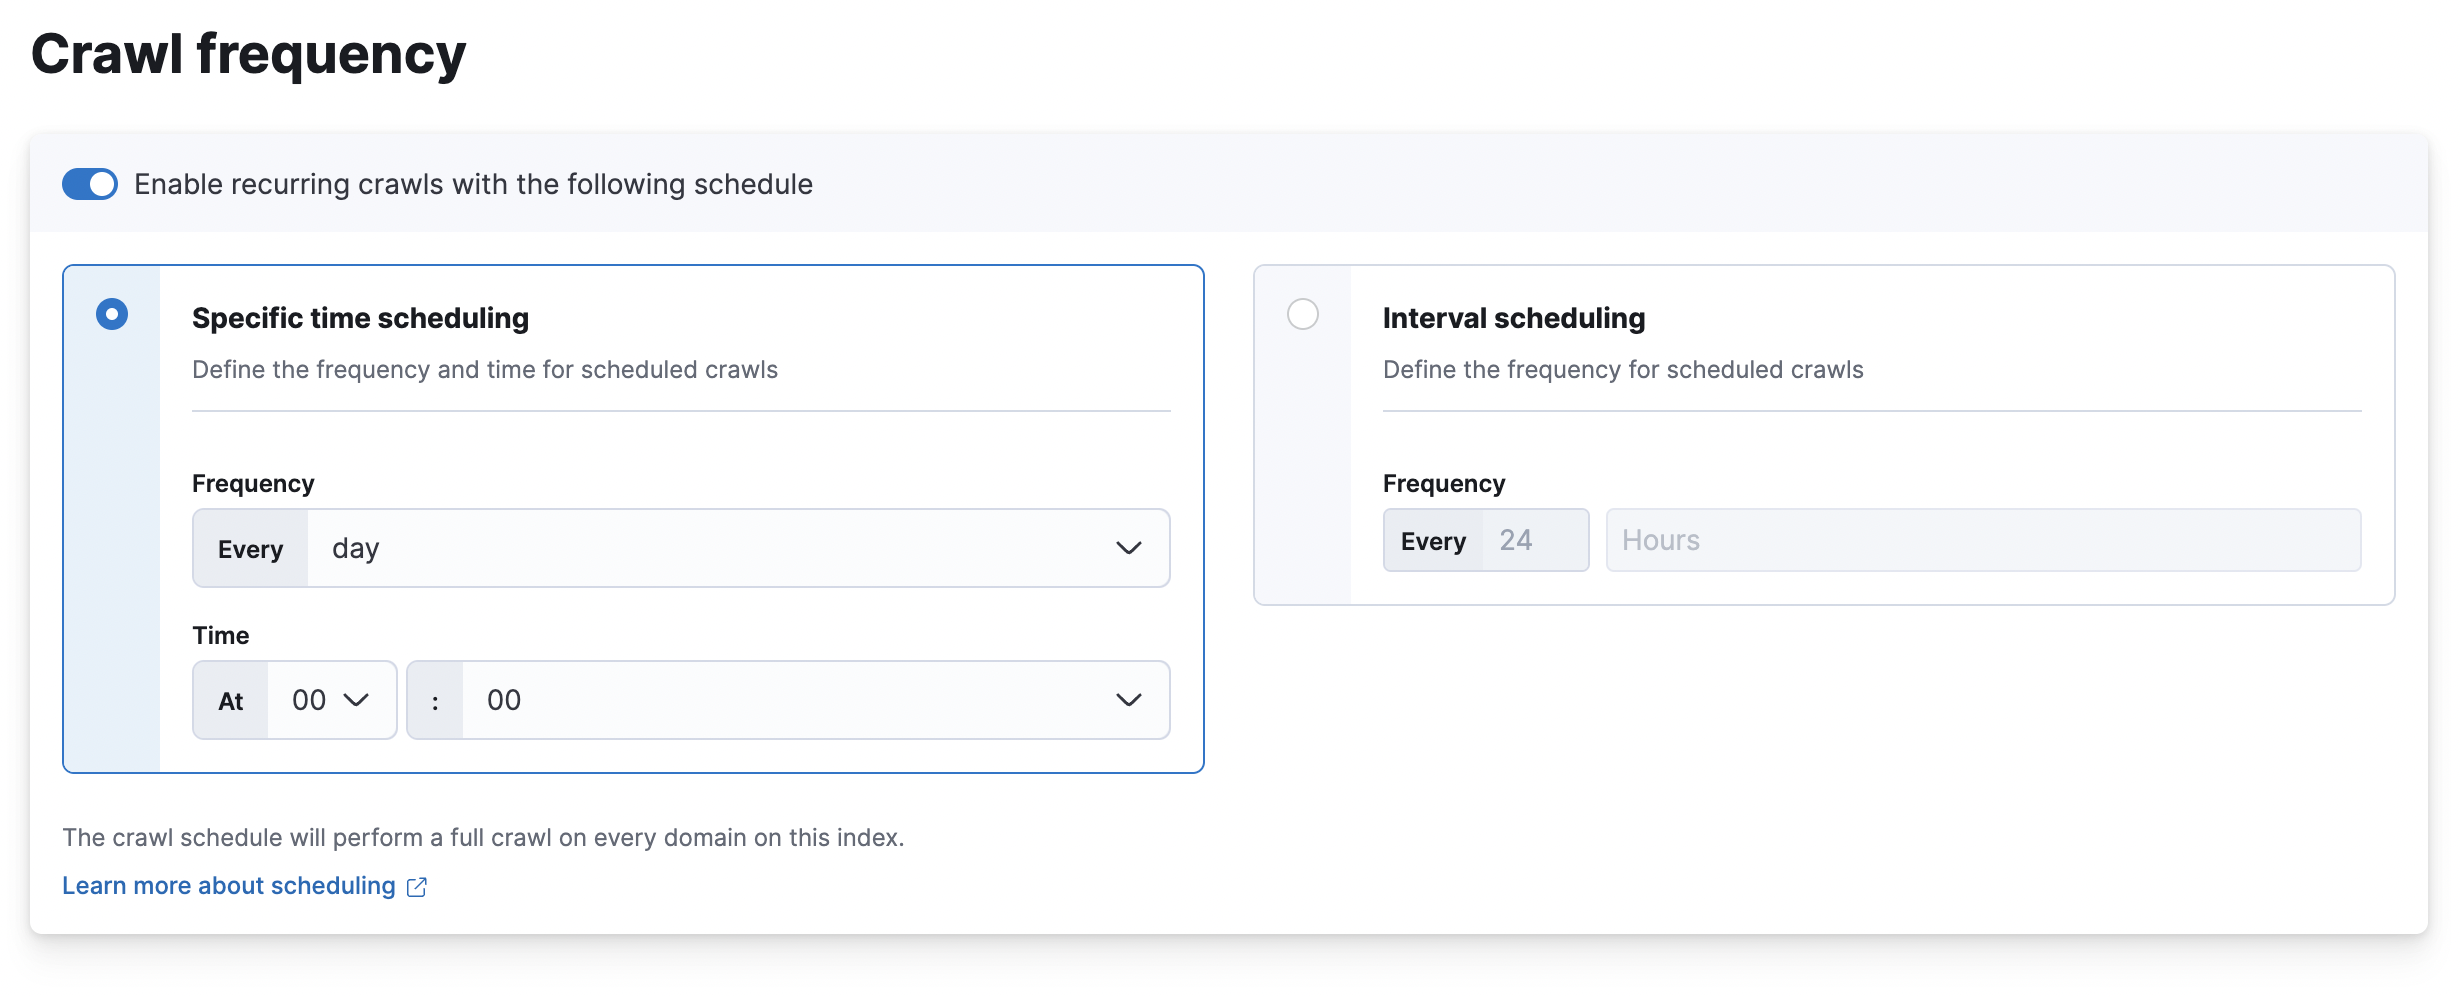
Interval scheduling
editUse interval schedules to automatically launch crawls at a set interval after the previous crawl completed. For example, consider a crawl that completes on a Tuesday. If the crawl is configured to run every 7 days, the next crawl would start on the following Tuesday. If the crawl is configured to run every 3 days, then the next crawl would start on Friday.
Scheduling an interval crawl does not necessarily run the crawl immediately.
Specific-time scheduling
editUse specific-time schedules to run crawls at a specific time. Specific-time schedules do not consider the duration of the previous crawl. If the previous crawl is still running, then the crawler will not run again until the next scheduled time.
Just like interval scheduling, scheduling a specific-time crawl does not necessarily run the crawl immediately.
Scheduling multiple crawls
editYou can schedule multiple crawls with different configurations using the Kibana Console. To do this, you will need your crawler’s connector document ID.
Finding the crawler’s connector document
editAll elastic crawlers have a connector document.
These are found in the index .elastic-connectors, and are connected to the crawler through the field index_name.
There are a two crawler features that are managed through its connector document.
The first is specific-time scheduling, which is found in the scheduling field of the connector document.
The second is multiple schedules, which is found in the custom_scheduling field.
You can read more about the connector document structure Connector Protocol.
To set up multiple schedules, you will need the connector document ID for your crawler. You can find a crawler’s connector document ID in the Kibana Console.
- Navigate to the Kibana Console
- Run the command below (replace "<search-crawler-name>" value with the name of your crawler)
-
Copy the value found at
hits.hits[0]._id
GET /.elastic-connectors/_search
{
  "_source": false,
  "query": {
    "match": {
      "index_name": "<search-crawler-name>"
    }
  }
}
Currently the connector document is the only place where you can check existing multiple schedules. This is not yet available in the UI.
Creating multiple schedules
editIn the Kibana Console, run the query below.
Replace the <connector_document_id> with the document ID you retrieved in the previous step.
Replace <schedule_key> with any unique key, for example schedule_1 or my_schedule.
POST /.elastic-connectors/_update/<connector_document_id>
{
  "doc" : {
    "custom_scheduling": {
      "<schedule_key>": {
        "name": "My Schedule",
        "interval": "0 0 12 * * ?",
        "enabled": true,
        "last_synced": null,
        "configuration_overrides": {
          "max_crawl_depth": 1,
          "sitemap_discovery_disabled": true,
          "domain_allowlist": [
            "https://example.com"
          ],
          "sitemap_urls": [
            "https://example.com/sitemap.xml"
          ],
          "seed_urls": [
            "https://example.com/blog",
            "https://example.com/info"
          ]
        }
      }
    }
  }
}
The fields should contain the following data:
| Field | Data Type | Description | Example | Nullable |
|---|---|---|---|---|
|
String |
A non-unique identifier for a schedule, it will be used in the UI once it is available. |
|
No |
|
String |
A quartz-cron pattern that describes when a crawl should be triggered. |
|
No |
|
Boolean |
A flag to enable or disable a schedule. |
|
No |
|
String |
A timestamp representing the last time a crawl was triggered for this schedule. |
|
Yes (this should always be initialised as |
|
Object |
The configuration settings that will be used to override a crawler’s usual configuration. |
|
No (if no configuration overrides are needed, initialise as an empty object |
|
Integer |
The maximum website depth for a crawl triggered by this schedule |
|
No* |
|
Boolean |
Whether or not sitemaps should be discoverable during the crawl. |
|
No* |
|
Array of strings |
An array of URLs listing which domains are allowed to be crawled. |
|
No* |
|
Array of strings |
An array of URLs for sitemaps. |
|
No* |
|
Array of strings |
An array of URLs for the starting points that the crawler can use. |
|
No* |
* If you don’t want this configuration overrides option, don’t include the field name at all. You can add or remove fields using queries after creating a schedule. See the examples below.
With only one configuration overrides:
POST /.elastic-connectors/_update/<connector_document_id>
{
  "doc" : {
    "custom_scheduling": {
      "<schedule_key>": {
        "name": "My Schedule",
        "interval": "0 0 12 * * ?",
        "enabled": true,
        "last_synced": null,
        "configuration_overrides": {
          "max_crawl_depth": 1
        }
      }
    }
  }
}
With no configuration overrides:
POST /.elastic-connectors/_update/<connector_document_id>
{
  "doc" : {
    "custom_scheduling": {
      "<schedule_key>": {
        "name": "My Schedule",
        "interval": "0 0 12 * * ?",
        "enabled": true,
        "last_synced": null,
        "configuration_overrides": {}
      }
    }
  }
}
Updating multiple schedules
editIf you want to update a schedule, you can run the same command as creating a schedule. You only need to include field names that you are updating.
For example, to disable a document only the enabled field is required.
All fields not included in the update query will be skipped.
POST /.elastic-connectors/_update/<connector_document_id>
{
  "doc" : {
    "custom_scheduling": {
      "<schedule_key>": {
        "enabled": false
      }
    }
  }
}
Deleting fields from configuration overrides
editYou can also remove a field from within configuration_overrides entirely.
For example, the query below will completely remove configuration_overrides.max_crawl_depth from a schedule.
POST /.elastic-connectors/_update/<document_id>
{
  "script": "ctx._source['custom_scheduling']['<schedule_key>']['configuration_overrides'].remove('max_crawl_depth')"
}
You should never remove fields from a schedule that are not inside the configuration_overrides object.
Doing so may cause your crawler to stop working.
Deleting schedules entirely
editIf you want to delete a schedule entirely, you can run the following query. This will only delete the schedule from the crawler. It will not delete any associated crawl jobs or indexed documents.
POST /.elastic-connectors/_update/<document_id>
{
  "script": "ctx._source['custom_scheduling'].remove('<schedule_key>')"
}
Troubleshooting multiple schedules
editIf a schedule you created is not running as expected, check the following common issues:
-
You have the correct
.elastic-connectorsdocument ID for your crawler -
The structure for your schedule inside the
custom_schedulingfield is correct -
Your
intervalis a valid quartz-cron expression -
There are no invalid fields inside the
configuration_overridesobject -
The
configuration_overridesvalues are of correct typing
If your connector document is structured correctly but a schedule is not running, you can look through your query logs.
If it is still unclear what is wrong, try enabling logging and monitoring for your deployment. This will allow you to see uncaught errors from Enterprise Search.
If the above fails, please contact support.
Next steps
editSee Troubleshooting crawls to learn how to troubleshoot issues with your crawls.