Search across Elasticsearch indices, App Search engines, and Workplace Search content sources
editSearch across Elasticsearch indices, App Search engines, and Workplace Search content sources
editLearn how to search content stored in different Elastic data stores at once: Elasticsearch indices, App Search engines, and Workplace Search content sources.
Engines, content sources, and indices
editAll Enterprise Search tools store data in Elasticsearch indices. App Search and Workplace Search each have their own user-friendly abstractions over the underlying Elasticsearch indices: Content Sources and Engines. Refer to Tool compatibility for more details.
Newer Enterprise Search tools, like the web crawler, store data directly in Elasticsearch indices. Users can manage these indices in the Content UI.
No matter which tool you used to index and manage your content, you can now search all these data stores at once. Users send one query, and get back one set of relevance-tuned results.
How it works
edit- Access the underlying Elasticsearch index for any given ingestion method.
- Create an App Search engine based on this index.
- Create a meta engine to combine these engines in one place.
- Use Elastic Search UI to create a unified search experience over the meta engine.
The user of your search experience is unaware that the data comes from disparate sources, using different tools and abstractions. A unified search experience allows them to query all this data simultaneously.
Example
editFor example, your team might:
- Have used the Workplace Search Salesforce connector to ingest Salesforce data into a Workplace Search content source.
- Have used the App Search documents API to ingest JSON documents into an App Search engine.
- Use the Elastic web crawler to ingest webpage content directly into Elasticsearch indices.
The following diagram shows how these 3 different data sources are ingested and combined into a single search experience. Follow the arrows from the original data source, through the ingestion method, to the underlying Elasticsearch index. From there the user creates App Search engines, and finally a meta engine, to be searched in a single UI.
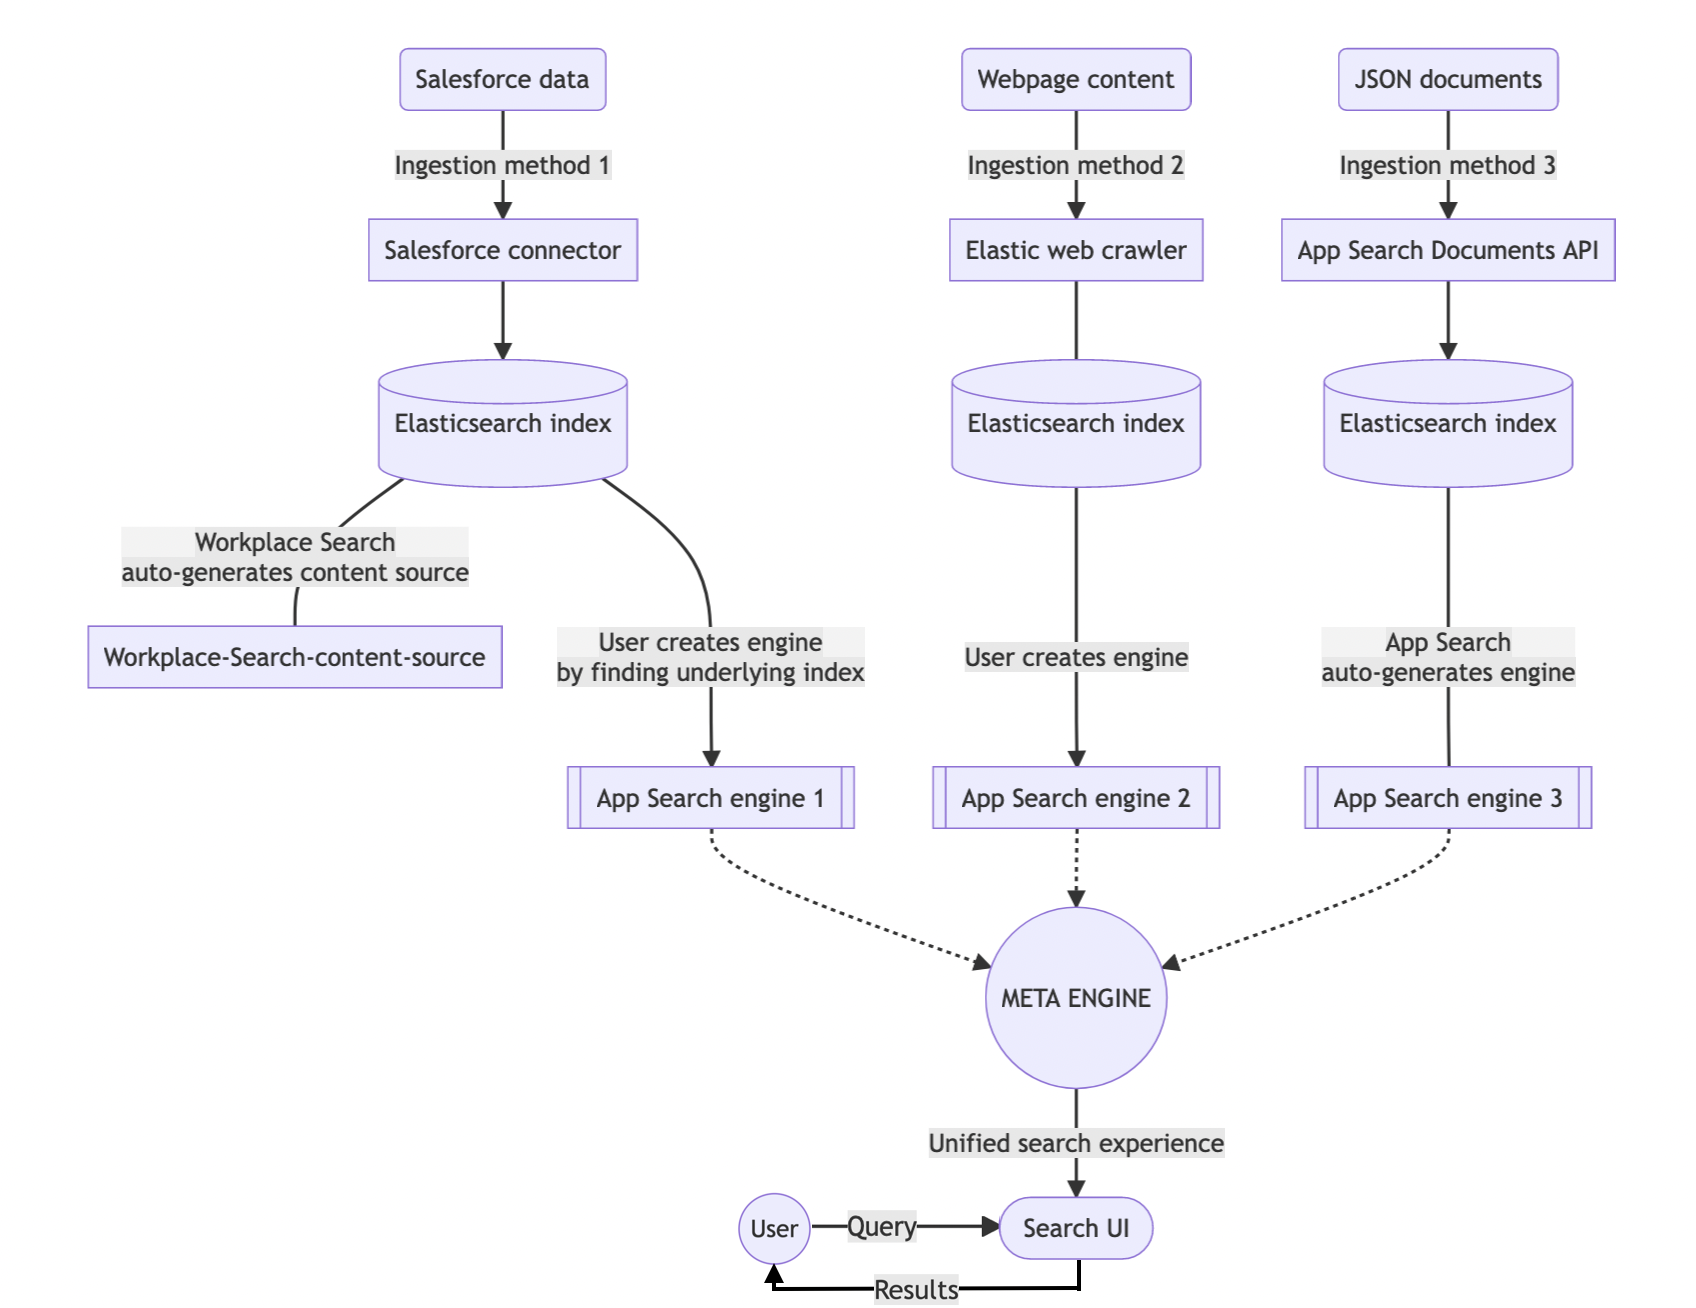
In this diagram:
- Arrowed lines represent steps that require actions by the user.
- Solid lines without arrows represent automatic steps, requiring no user action.
- Dashed lines represent the fact that a meta engine contains no documents of its own. A meta engine combines multiple engines, to be searched together as a single engine.
Follow the steps below to learn how to do this.
Step 1: Find the underlying index
editElasticsearch indices are easy to find in the Enterprise Search content UI.
Go to Enterprise Search > Content > Elasticsearch indices.
For indices created using an Enterprise Search ingestion method, these search- prefixed indices are immediately visible under Available indices.
The underlying indices for Workplace Search content sources are hidden indices. To find these indices see Access the Elasticsearch index for a Workplace Search content source.
Step 2: Create an App Search engine
editOnce you’ve accessed the underlying indices, it’s time to create App Search engines. It only takes a few steps, and the App Search UI guides you through the process.
Jump straight to this screen in Enterprise Search > App Search > Engines > Create an engine.
Learn how to:
Remember, App Search automatically creates engines for data ingested using App Search tools.
Step 3: Create an App Search meta engine
editYou now have several App Search engines. Jump to Enterprise Search > App Search > Engines to create a meta engine in the App Search UI.
See the App Search documentation to learn more about creating meta engines in the Kibana UI.
You can also manage meta engines by API.
Step 4: Create a unified search experience with Search UI
editSearch UI is a React library maintained by Elastic that allows you to quickly implement search experiences.
You can use App Search’s built-in Search UI page to bootstrap a UI for your meta engine in a few clicks.
You can also see a live preview of your search experience within App Search. If you’d like to customize this UI, but don’t want to build it from scratch, you can download the generated source code. This can be the blueprint for your development. Or, you can use the Search UI library to build a custom UI.
Option 1: Use App Search’s autogenerated Search UI
editTo get started with the built-in Search UI:
- Go to Enterprise Search > App Search > Engines > your-meta-engine.
- Select the Search UI tab.
- Follow the instructions to set the fields you want to search over, and the facets you want to display.
- Select Generate search experience. This will open a complete search UI based on your indexed documents.
- Test out a few queries to see how it works, and start tweaking.
Read the next section if you want to download the source code and run your search UI locally. If you’d prefer to build your Search UI from scratch, jump to Option 2.
Download the source code and run your search UI locally
editYou’ll need to have node.js and npm installed for this step.
Follow these steps to download and run the search UI locally:
- On the generated search experience page, select Download.
-
Save and then open up the package.
The
src/config/engine.jsonfile contains all of the preset configuration settings, and setting options are listed in theREADMEfile. -
Open a terminal window and
cdinto the package directory. -
Run
npm installto set everything up. -
Run
npm startto launch the application.
If you run into any problems, refer to the Search UI or App Search Troubleshooting documentation.
Once you’re comfortable running your search UI locally, you can think about deploying to production environments.
Option 2: Use the Search UI library to build from scratch
editUse the search-ui-app-search-connector to create a search UI for your App Search meta engine.
For guidance, follow the tutorial in the Search UI documentation.