Tutorial: Transforming the eCommerce sample data
editTutorial: Transforming the eCommerce sample data
editTransforms enable you to retrieve information from an Elasticsearch index, transform it, and store it in another index. Let’s use the Kibana sample data to demonstrate how you can pivot and summarize your data with transforms.
- Verify that your environment is set up properly to use transforms. If the Elasticsearch security features are enabled, to complete this tutorial you need a user that has authority to preview and create transforms. You must also have specific index privileges for the source and destination indices. See Setup.
-
Choose your source index.
In this example, we’ll use the eCommerce orders sample data. If you’re not already familiar with the
kibana_sample_data_ecommerceindex, use the Revenue dashboard in Kibana to explore the data. Consider what insights you might want to derive from this eCommerce data. -
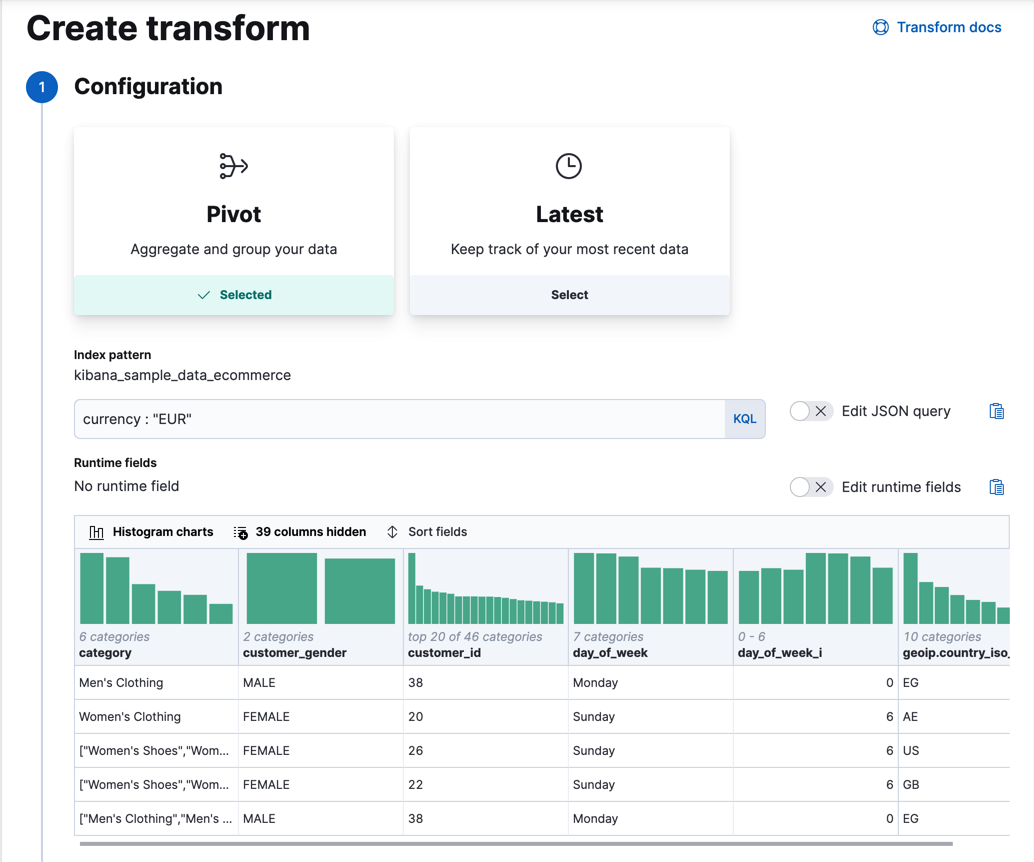
Choose the pivot type of transform and play with various options for grouping and aggregating the data.
There are two types of transforms, but first we’ll try out pivoting your data, which involves using at least one field to group it and applying at least one aggregation. You can preview what the transformed data will look like, so go ahead and play with it! You can also enable histogram charts to get a better understanding of the distribution of values in your data.
For example, you might want to group the data by product ID and calculate the total number of sales for each product and its average price. Alternatively, you might want to look at the behavior of individual customers and calculate how much each customer spent in total and how many different categories of products they purchased. Or you might want to take the currencies or geographies into consideration. What are the most interesting ways you can transform and interpret this data?
Go to Management > Stack Management > Data > Transforms in Kibana and use the wizard to create a transform:
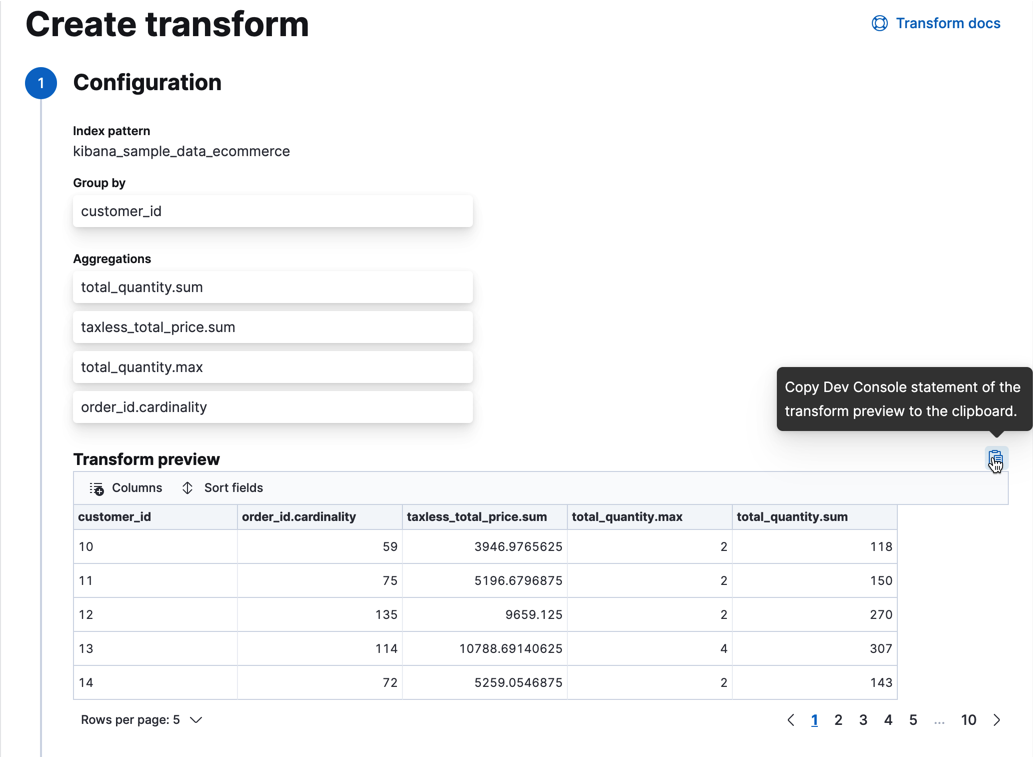
Group the data by customer ID and add one or more aggregations to learn more about each customer’s orders. For example, let’s calculate the sum of products they purchased, the total price of their purchases, the maximum number of products that they purchased in a single order, and their total number of orders. We’ll accomplish this by using the
sumaggregation on thetotal_quantityandtaxless_total_pricefields, themaxaggregation on thetotal_quantityfield, and thecardinalityaggregation on theorder_idfield: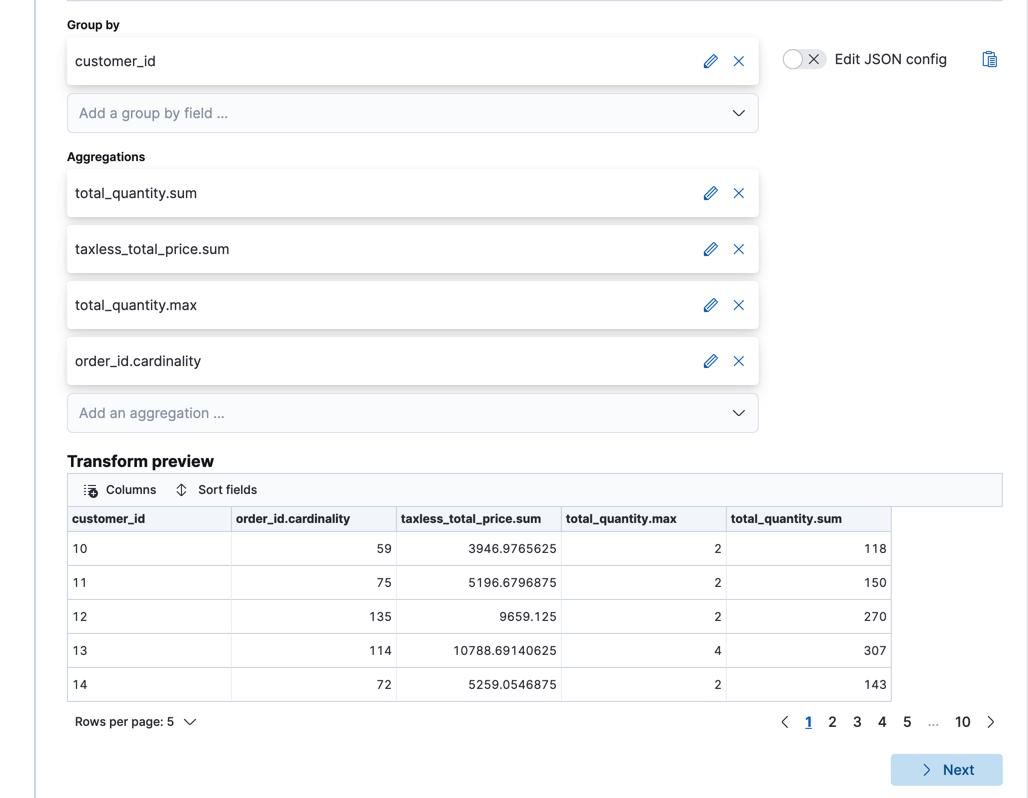
If you’re interested in a subset of the data, you can optionally include a query element. In this example, we’ve filtered the data so that we’re only looking at orders with a
currencyofEUR. Alternatively, we could group the data by that field too. If you want to use more complex queries, you can create your data frame from a saved search.If you prefer, you can use the preview transforms API.
API example
POST _transform/_preview { "source": { "index": "kibana_sample_data_ecommerce", "query": { "bool": { "filter": { "term": {"currency": "EUR"} } } } }, "pivot": { "group_by": { "customer_id": { "terms": { "field": "customer_id" } } }, "aggregations": { "total_quantity.sum": { "sum": { "field": "total_quantity" } }, "taxless_total_price.sum": { "sum": { "field": "taxless_total_price" } }, "total_quantity.max": { "max": { "field": "total_quantity" } }, "order_id.cardinality": { "cardinality": { "field": "order_id" } } } } } -
When you are satisfied with what you see in the preview, create the transform.
- Supply a transform ID, the name of the destination index and optionally a description. If the destination index does not exist, it will be created automatically when you start the transform.
-
Decide whether you want the transform to run once or continuously. Since
this sample data index is unchanging, let’s use the default behavior and just
run the transform once. If you want to try it out, however, go ahead and click
on Continuous mode. You must choose a field that the transform can use to
check which entities have changed. In general, it’s a good idea to use the
ingest timestamp field. In this example, however, you can use the
order_datefield. - Optionally, you can configure a retention policy that applies to your transform. Select a date field that is used to identify old documents in the destination index and provide a maximum age. Documents that are older than the configured value are removed from the destination index.
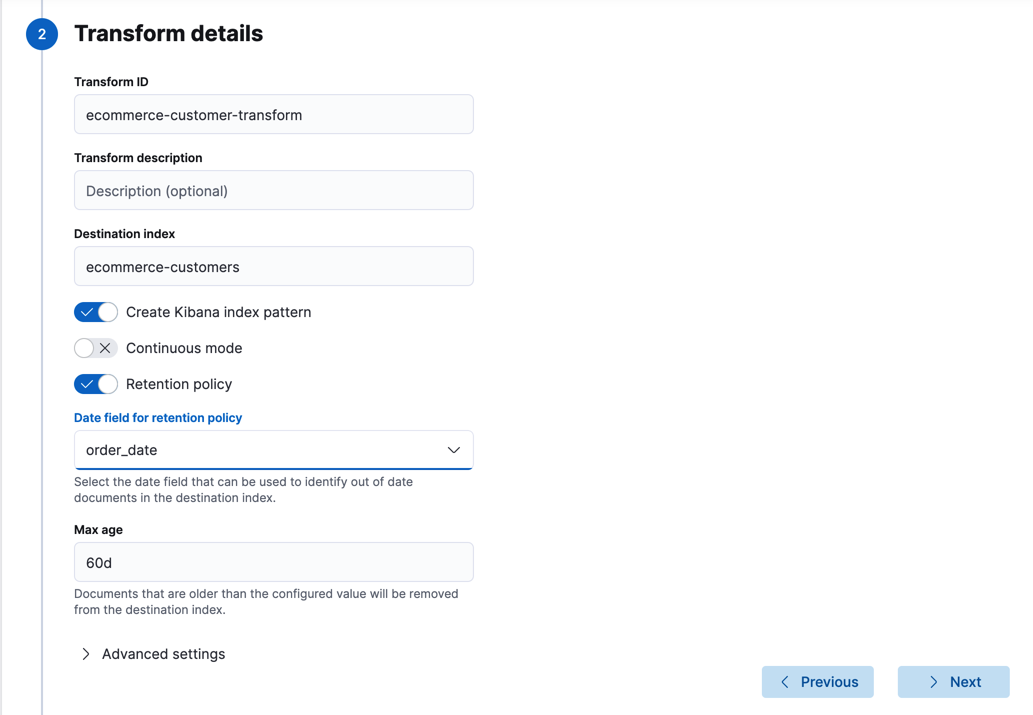
In Kibana, before you finish creating the transform, you can copy the preview transform API request to your clipboard. This information is useful later when you’re deciding whether you want to manually create the destination index.
If you prefer, you can use the create transforms API.
API example
PUT _transform/ecommerce-customer-transform { "source": { "index": [ "kibana_sample_data_ecommerce" ], "query": { "bool": { "filter": { "term": { "currency": "EUR" } } } } }, "pivot": { "group_by": { "customer_id": { "terms": { "field": "customer_id" } } }, "aggregations": { "total_quantity.sum": { "sum": { "field": "total_quantity" } }, "taxless_total_price.sum": { "sum": { "field": "taxless_total_price" } }, "total_quantity.max": { "max": { "field": "total_quantity" } }, "order_id.cardinality": { "cardinality": { "field": "order_id" } } } }, "dest": { "index": "ecommerce-customers" }, "retention_policy": { "time": { "field": "order_date", "max_age": "60d" } } } -
Optional: Create the destination index.
If the destination index does not exist, it is created the first time you start your transform. A pivot transform deduces the mappings for the destination index from the source indices and the transform aggregations. If there are fields in the destination index that are derived from scripts (for example, if you use
scripted_metricsorbucket_scriptsaggregations), they’re created with dynamic mappings. You can use the preview transform API to preview the mappings it will use for the destination index. In Kibana, if you copied the API request to your clipboard, paste it into the console, then refer to thegenerated_dest_indexobject in the API response.Transforms might have more configuration options provided by the APIs than the options available in Kibana. For example, you can set an ingest pipeline for
destby calling the Create transform. For all the transform configuration options, refer to the documentation.API example
{
  "preview" : [
    {
      "total_quantity" : {
        "max" : 2,
        "sum" : 118.0
      },
      "taxless_total_price" : {
        "sum" : 3946.9765625
      },
      "customer_id" : "10",
      "order_id" : {
        "cardinality" : 59
      }
    },
    ...
  ],
  "generated_dest_index" : {
    "mappings" : {
      "_meta" : {
        "_transform" : {
          "transform" : "transform-preview",
          "version" : {
            "created" : "8.0.0"
          },
          "creation_date_in_millis" : 1621991264061
        },
        "created_by" : "transform"
      },
      "properties" : {
        "total_quantity.sum" : {
          "type" : "double"
        },
        "total_quantity" : {
          "type" : "object"
        },
        "taxless_total_price" : {
          "type" : "object"
        },
        "taxless_total_price.sum" : {
          "type" : "double"
        },
        "order_id.cardinality" : {
          "type" : "long"
        },
        "customer_id" : {
          "type" : "keyword"
        },
        "total_quantity.max" : {
          "type" : "integer"
        },
        "order_id" : {
          "type" : "object"
        }
      }
    },
    "settings" : {
      "index" : {
        "number_of_shards" : "1",
        "auto_expand_replicas" : "0-1"
      }
    },
    "aliases" : { }
  }
}
In some instances the deduced mappings might be incompatible with the actual data. For example, numeric overflows might occur or dynamically mapped fields might contain both numbers and strings. To avoid this problem, create your destination index before you start the transform. For more information, see the create index API.
API example
You can use the information from the transform preview to create the destination index. For example:
PUT /ecommerce-customers { "mappings": { "properties": { "total_quantity.sum" : { "type" : "double" }, "total_quantity" : { "type" : "object" }, "taxless_total_price" : { "type" : "object" }, "taxless_total_price.sum" : { "type" : "double" }, "order_id.cardinality" : { "type" : "long" }, "customer_id" : { "type" : "keyword" }, "total_quantity.max" : { "type" : "integer" }, "order_id" : { "type" : "object" } } } } -
Start the transform.
Even though resource utilization is automatically adjusted based on the cluster load, a transform increases search and indexing load on your cluster while it runs. If you’re experiencing an excessive load, however, you can stop it.
You can start, stop, and manage transforms in Kibana:
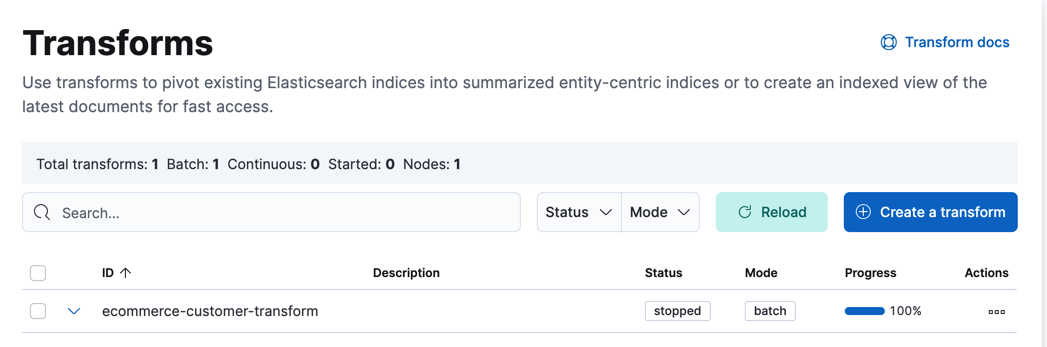
Alternatively, you can use the start transforms and stop transforms APIs.
API example
POST _transform/ecommerce-customer-transform/_start
If you chose a batch transform, it is a single operation that has a single checkpoint. You cannot restart it when it’s complete. Continuous transforms differ in that they continually increment and process checkpoints as new source data is ingested.
-
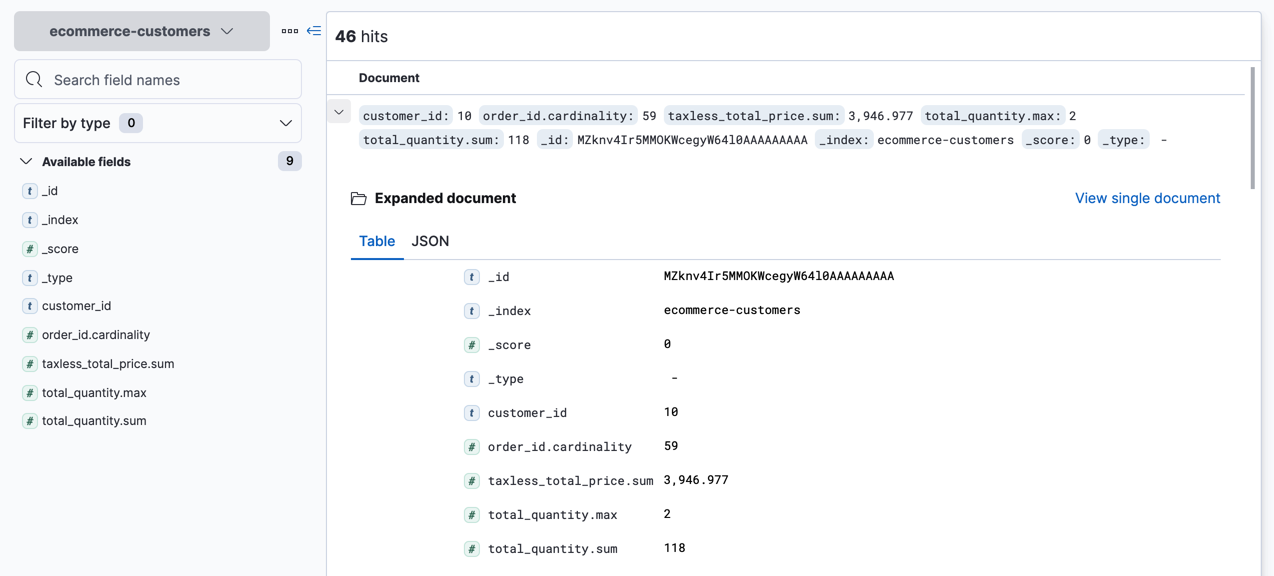
Explore the data in your new index.
For example, use the Discover application in Kibana:
-
Optional: Create another transform, this time using the
latestmethod.This method populates the destination index with the latest documents for each unique key value. For example, you might want to find the latest orders (sorted by the
order_datefield) for each customer or for each country and region.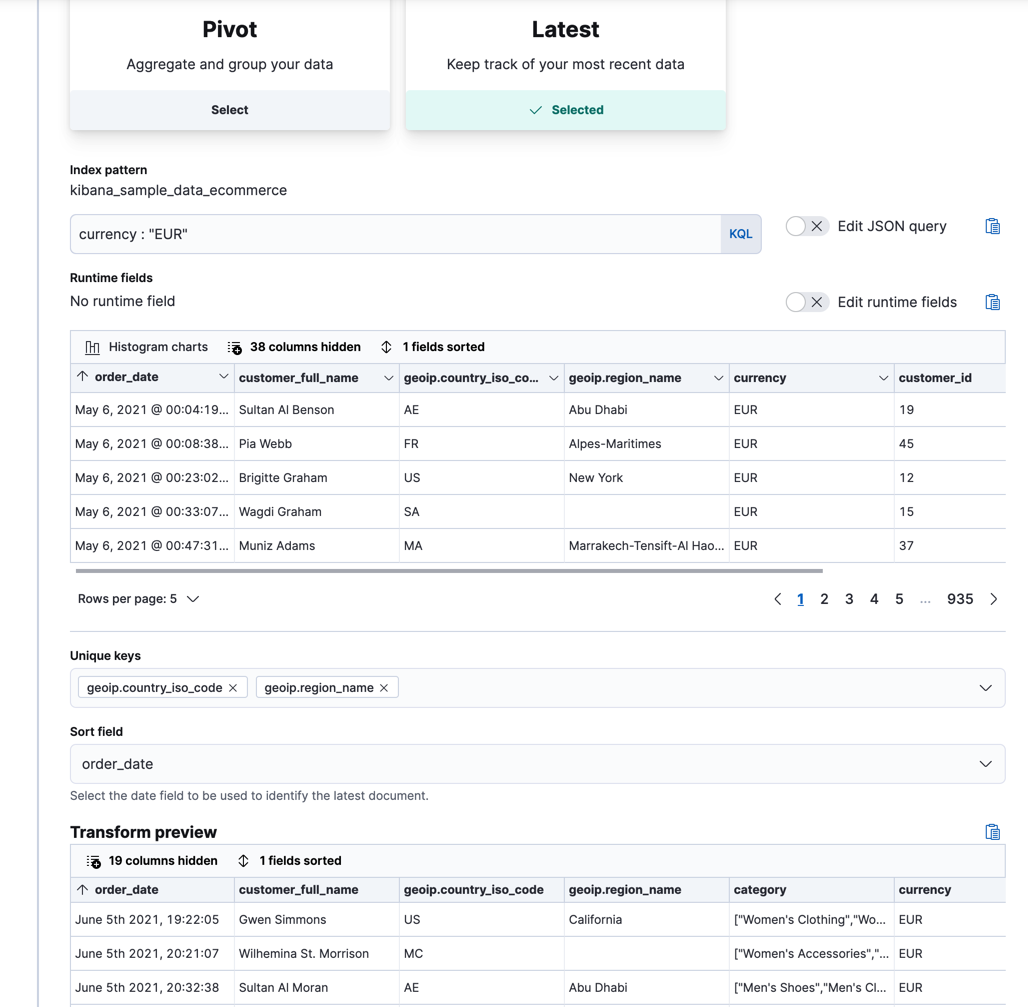
API example
POST _transform/_preview
{
  "source": {
    "index": "kibana_sample_data_ecommerce",
    "query": {
      "bool": {
        "filter": {
          "term": {"currency": "EUR"}
        }
      }
    }
  },
  "latest": {
    "unique_key": ["geoip.country_iso_code", "geoip.region_name"],
    "sort": "order_date"
  }
}
If the destination index does not exist, it is created the first time you start your transform. Unlike pivot transforms, however, latest transforms do not deduce mapping definitions when they create the index. Instead, they use dynamic mappings. To use explicit mappings, create the destination index before you start the transform.
- If you do not want to keep a transform, you can delete it in Kibana or use the delete transform API. By default, when you delete a transform, its destination index and Kibana index patterns remain.
Now that you’ve created simple transforms for Kibana sample data, consider possible use cases for your own data. For more ideas, see When to use transforms and Examples.