It is time to say goodbye: This version of Elastic Cloud Enterprise has reached end-of-life (EOL) and is no longer supported.
The documentation for this version is no longer being maintained. If you are running this version, we strongly advise you to upgrade. For the latest information, see the current release documentation.
Work with snapshots
editWork with snapshots
editSnapshots provide backups of your Elasticsearch indices. You can use snapshots to recover from a failure when not enough availability zones are used to provide high availability or to recover from accidental deletion.
Before you begin
editTo enable snapshots for your Elasticsearch clusters and to work with them, you must have configured a repository. After you have configured a snapshot repository, a snapshot is taken every 30 minutes or at the interval that you specify.
Snapshots back up only open indices. If you close an index, it is not included in snapshots and you will not be able to restore the data.
Beginning with Elastic Stack version 7.6, use Kibana to manage your snapshots. In Kibana, you can set up additional repositories where the snapshots are stored, other than the one currently managed by Elastic Cloud Enterprise. You can view and delete snapshots, and configure a snapshot lifecycle management (SLM) policy to automate when snapshots are created and deleted. To learn more, see the Kibana Snapshot and Restore documentation.
To use the snapshot lifecycle management features available starting in Elastic Stack version 7.6 you must also be using Elastic Cloud Enterprise version 2.5 or higher. If you upgrade to Elastic Stack version 7.6 in an earlier ECE version, when you upgrade to ECE version 2.5, on the Snapshots page you will have an option to initiate the migration to SLM. As well, if you create a deployment using Stack version 7.6.0 and an ECE version prior to 2.5, when you upgrade your ECE version to 2.5 you also need to upgrade your deployment to the next minor release after 7.6.0.
From within the Elastic Cloud Enterprise you can view the list of snapshots and also restore a snapshot from a different deployment in the same region.
For deployments with Elastic Stack versions 7.5 and below, You can configure the ECE snapshot count to keep up to a maximum of the 100 most recent, successful snapshots. Once your cluster has reached the total snapshot count, ECE removes old snapshots as new ones are taken. These tasks are available from the Elastic Cloud Enterprise UI:
List available snapshots
editTo list all available snapshots:
- Log into the Cloud UI.
-
On the deployments page, select your deployment.
Narrow the list by name, ID, or choose from several other filters. To further define the list, use a combination of filters.
- From your deployment menu, go to Elasticsearch and then Snapshots where the list of available snapshots is shown, newest first.
- Click on a specific snapshot to see more details.
The list shows when the snapshot was completed, whether the snapshot succeeded or was only partially successful, along with the number of shards and indices in the snapshot.
Configure the snapshot retention period
editFor Elastic Stack versions 7.6 and above, refer to the Kibana Snapshot and Restore documentation to learn about the snapshot management features.
For Elastic Stack versions 7.5 and below, from within Elastic Cloud Enterprise you can set the snapshot interval and count to have control over the retention period for your clusters. The calculation displayed is based on a projected estimate of the snapshot interval, expected snapshot count, and current cluster size. Changing any of these factors results in a different retention period.
Change the snapshot interval
editIf you find the the default snapshot interval isn’t working for your environment, you can change it. It might make sense to use a 4 or 24 hour interval if the data in your index doesn’t change that often but you need more snapshot history.
- Log into the Cloud UI.
-
On the deployments page, select your deployment.
Narrow the list by name, ID, or choose from several other filters. To further define the list, use a combination of filters.
- Open the Snapshot settings section.
- Make a selection from the Snapshot interval drop-down menu.
- Click Update settings.
When you change the interval, the interval timer begins after the next scheduled snapshot.
Change the snapshot count
editYou can get more control over your repository space by adjusting the number of snapshots that are stored for your cluster. The minimum number of snapshots must be at least 12, the maximum limit is 100.
- Log into the Cloud UI.
-
On the deployments page, select your deployment.
Narrow the list by name, ID, or choose from several other filters. To further define the list, use a combination of filters.
- Open the Snapshot settings section.
- Enter a number in the Snapshot count field.
- Click Update settings.
Restore a snapshot
editFor Elastic Stack versions 7.6 and above, for details about restoring a snapshot see the Kibana Snapshot and Restore documentation.
For Elastic Stack versions 7.5 and below, use these steps to restore a snapshot:
- List the available snapshots, and click on the timestamp link of a snapshot to see the snapshot details.
-
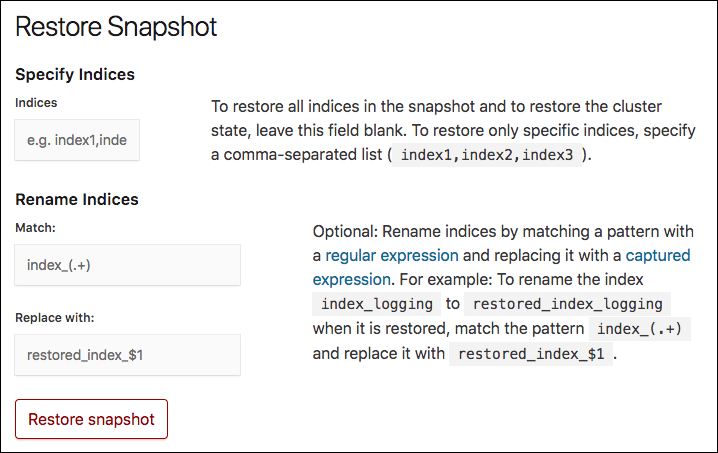
Optional: In the Restore Snapshot section, specify how you want to restore the snapshot. If you do not specify any options, all the indices of the snapshot are restored on the Elasticsearch cluster where the snapshot was taken.
-
In the Specify Indices field, you can limit which indices get restored by specifying an index pattern. For example, entering
logstash-*,.kibanarestores any indices starting withlogstash-as well as the.kibanaindex. All other indices are ignored. - You might need to specify values in the Match and Replace with fields, if you restore to the same cluster, as you cannot restore to an index that already exists.
-
In the Specify Indices field, you can limit which indices get restored by specifying an index pattern. For example, entering
- Click Restore snapshot.
After the snapshot is restored, a brief message indicates that the operation was successful.
Restore across clusters
editSnapshots can be restored to either the same Elasticsearch cluster or to another cluster. If you are restoring all indices to another cluster, you can clone a cluster.
Users created using the X-Pack security features or using Shield are not included when you restore across clusters, only data from Elasticsearch indices is restored. If you do want to create a cloned cluster with the same users as your old cluster, you need to recreate the users manually on the new cluster.
Restoring to another cluster is useful for scenarios where isolating activities on a separate cluster is beneficial, such as:
- Performing ad hoc analytics
- For most logging and metrics use cases, it is cost prohibitive to have all the data in memory, even if it would provide the best performance for aggregations. Cloning the relevant data to an ad hoc analytics cluster that can be discarded after use is a cost effective way to experiment with your data, without risk to existing clusters used for production.
- Enabling your developers
- Realistic test data is crucial for uncovering unexpected errors early in the development cycle. What can be more realistic than actual data from a production cluster? Giving your developers access to real production data is a great way to break down silos.
- Testing mapping changes
- Mapping changes almost always require reindexing. Unless your data volume is trivial, reindexing requires time and tweaking the parameters to achieve the best reindexing performance usually takes a little trial and error. While this use case could also be handled by running the scan and scroll query directly against the source cluster, a long lived scroll has the side effect of blocking merges even if the scan query is very light weight.
- Integration testing
- Test your application against a real live Elasticsearch cluster with actual data. If you automate this, you could also aggregate performance metrics from the tests and use those metrics to detect if a change in your application has introduced a performance degradation.
A cluster is eligible as a destination for a snapshot restore, if it meets these criteria:
- The destination cluster is able to read the indices. You can restore to your Elasticsearch cluster snapshots of indices created back to the previous major version.
To restore snapshots across clusters:
-
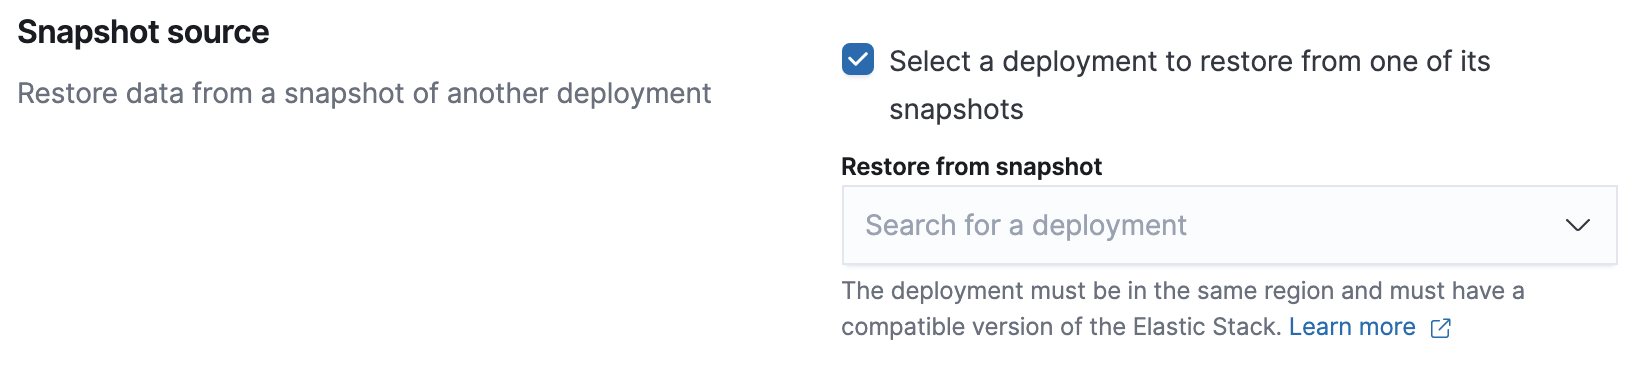
First, create a new deployment and in the Snapshot source section under Deployment settings, select the deployment that you want to restore a snapshot from.
The latest successful snapshot from the cluster you selected is restored on the new cluster when you create it. If you don’t know the exact name, you can put in a few characters and then select from the list of matching deployments.
- Manually recreate users using the X-Pack security features or using Shield on the new cluster. User information is not included when you restore across clusters.