Connecting Zendesk
editConnecting Zendesk
editZendesk is cloud-based customer relationship management and customer support platform that provides tools for tracking, prioritizing, and solving customer support tickets. The Zendesk connector provided with Workplace Search automatically captures, syncs and indexes the following items:
Tickets |
ID, ticket content, tags, status, priority, user data and timestamps |
Configuring the Zendesk Connector
editConfiguring the Zendesk connector is the first step prior to connecting the Zendesk service to Workplace Search, and requires that you create an OAuth App from the Zendesk platform. To get started, first log in to Zendesk and access your administrative dashboard:
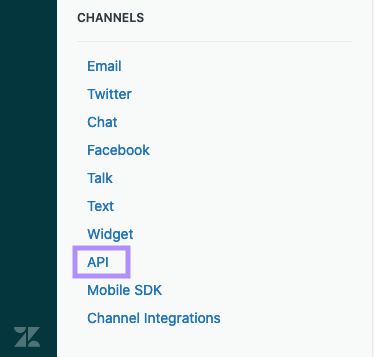
Step 1. Locate the Zendesk Admin interface (gear icon in the sidebar). Select API under Channels:
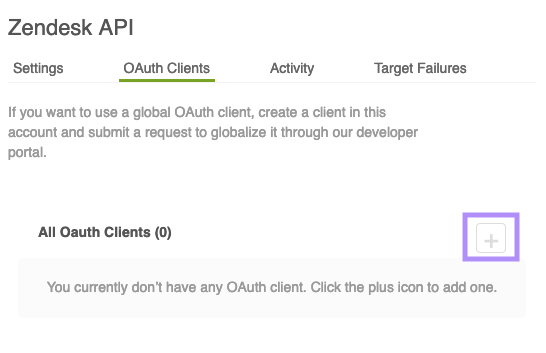
Step 2. Make sure to agree to the Terms of Service. Navigate over to the OAuth Clients tab and click the + button on the right-hand side:
Step 3. Time to fill out some information:
- Client Name: You’ll use this to identify the OAuth application.
- Description: Also used for identification, use at your own discretion.
- Company: Elastic makes Workplace Search. You can use that, or your own – whatever works.
- Logo: Optional, will be displayed during the Connection process.
-
Unique Identifier:
elastic_enterprise_search– this is required and must be as is. -
Redirect URLs: The appropriate redirect URLs for your Workplace Search deployment.
The redirect URIs required vary by which user interface you are using to manage Enterprise Search. Enterprise Search in Kibana and standalone Enterprise Search use different redirect URIs. See user interfaces for details on each UI.
When using standalone Enterprise Search use the following two URLs, substituting
<WS_BASE_URL>with the base URL at which Workplace Search is hosted (scheme + host, no path).<WS_BASE_URL>/ws/org/sources/zendesk/create <WS_BASE_URL>/ws/sources/zendesk/create
Examples:
# Deployment using a custom domain name
https://www.example.com/ws/org/sources/zendesk/create
https://www.example.com/ws/sources/zendesk/create

# Deployment using a default Elastic Cloud domain name
https://c3397e558e404195a982cb68e84fbb42.ent-search.us-east-1.aws.found.io:443/ws/org/sources/zendesk/create
https://c3397e558e404195a982cb68e84fbb42.ent-search.us-east-1.aws.found.io:443/ws/sources/zendesk/create

# Unsecured local development environment
http://localhost:3002/ws/org/sources/zendesk/create
http://localhost:3002/ws/sources/zendesk/create
When using Enterprise Search in Kibana, use the following URL, substituting
<KIBANA_BASE_URL>with the base URL of your Kibana instance. This should correspond with the value ofkibana.external_urlin yourenterprise-search.yml:<KIBANA_BASE_URL>/app/enterprise_search/workplace_search/sources/added
Examples:
# Deployment using a custom domain name for Kibana
https://www.example.com/app/enterprise_search/workplace_search/sources/added

# Deployment using a default Elastic Cloud domain name for Kibana
https://c3397e558e404195a982cb68e84fbb42.kb.us-east-1.aws.found.io:443/app/enterprise_search/workplace_search/sources/added

# Unsecured local Kibana environment
http://localhost:5601/app/enterprise_search/workplace_search/sources/added
Step 4. Upon saving, a secret token will be generated. Keep it safe and handy, as we’ll require it in just a few moments.
Step 5. From the Workplace Search administrative dashboard’s Sources area, locate Zendesk and provide both the Client ID (elastic_enterprise_search) and the Client Secret (the secret token previously generated). Voilà! The Zendesk connector is now configured, and ready to be used to synchronize content. In order to capture data, you must now connect a Zendesk instance with the adequate authentication credentials.
Connecting Zendesk to Workplace Search
editOnce the Zendesk connector has been configured, you may connect a Zendesk instance to your organization.
Step 1. Head to your organization’s Workplace Search administrative dashboard, and locate the Sources tab.
Step 2. Click Add a new source.
Step 3. Select Zendesk in the Configured Sources list, and follow the Zendesk authentication flow as presented.
Step 4. Upon the successful authentication flow, you will be redirected to Workplace Search, and your organization’s Zendesk content will now be captured and will be ready for search gradually as it is synced. Once successfully configured and connected, the Zendesk synchronization automatically occurs every 2 hours.
Synchronized fields
editThe following table lists the fields synchronized from the connected source to Workplace Search. The attributes in the table apply to the default search application, as follows:
- Display name - The label used when displayed in the UI
- Field name - The name of the underlying field attribute
- Faceted filter - whether the field is a faceted filter by default, or can be enabled (see also: Customizing filters)
-
Automatic query refinement preceding phrases - The default list of phrases that must precede a value of this field in a search query in order to automatically trigger query refinement. If "None," a value from this field may trigger refinement regardless of where it is found in the query string. If
'', a value from this field must be the first token(s) in the query string. IfN.A., automatic query refinement is not available for this field by default. All fields that have a faceted filter (defaultorconfigurable) can also be configured for automatic query refinement; see also Update a content source, Get a content source’s automatic query refinement details and Customizing filters.
| Display name | Field name | Faceted filter | Automatic query refinement preceding phrases |
|---|---|---|---|
Id |
|
No |
N.A. |
URL |
|
No |
N.A. |
Title |
|
No |
N.A. |
Type |
|
No |
None |
Body |
|
No |
N.A. |
Created at |
|
No |
N.A. |
Updated at |
|
No |
N.A. |
Last updated |
|
No |
N.A. |
Channel |
|
Configurable |
N.A. |
Status |
|
Configurable |
[ |
Tags |
|
Configurable |
[ |
Priority |
|
Configurable |
[ |
Ticket type |
|
Configurable |
N.A. |
Assigned to |
|
Configurable |
[ |
Created by |
|
Configurable |
[ |