Connecting Confluence Server
editConnecting Confluence Server
editInstructions provided in this guide apply to Confluence Server only. Refer to Confluence Cloud guide for more information.
Confluence Server is a team workspace, where knowledge and collaboration meet. Often used as an organizational wiki and intranet, it usually houses valuable information for staff across multiple areas of businesses, large and small. The Confluence Server connector provided with Workplace Search automatically captures, syncs and indexes the following items:
Spaces |
Including ID, Content, Type, and timestamps |
Pages |
Including ID, Content, Type, Comments, Project, Collaborators and timestamps |
Blog Posts |
Including ID, Content, Type, Comments, Project, Collaborators and timestamps |
Attachments |
Including ID, Size, Type, Comments, Project, Collaborators and timestamps |
Workplace Search supports Confluence Server versions: 7.2.1, 6.15.x
Configuring the Confluence Server Connector
editStep 1. From the Workplace Search administrative dashboard’s Sources area, locate Confluence Server and click Configure. You are presented with a Public Key and a Consumer Key. Copy these keys and keep them handy, as we’ll need them in just a second.
Step 2. Head to the Confluence Server administrative console and log in.
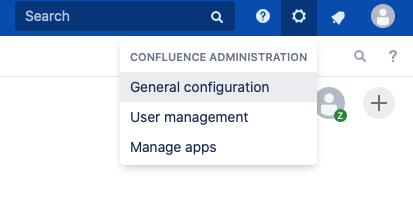
Step 3. Click the Gear in the top right corner and select General Configuration:
Step 4. Locate Application Links in the sidebar menu.
Provide the host for your Workplace Search deployment. Click Create new link:
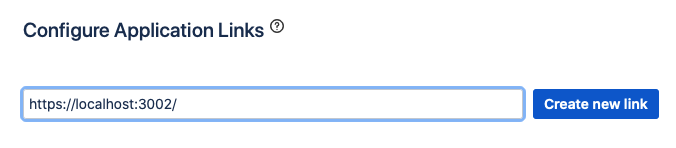
This operation will fail, and is normal behavior for the time being.
Step 5. Confirm the link, and proceed. A modal appears. Provide the information accordingly:
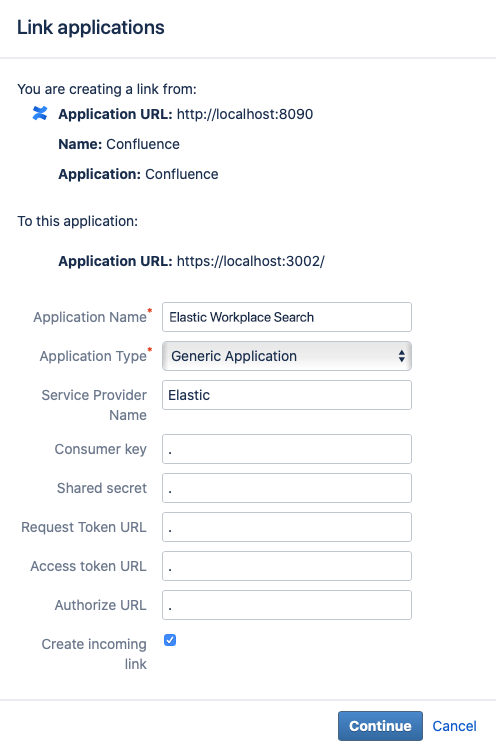
- Application Name: Elastic Workplace Search
- Application Type: Generic Application
- Service Provider Name: Elastic
- Consumer key, Shared secret, Request Token URL, Access token URL, Authorize URL: Any random value. A simple period will do.
- Create incoming link: Check this box.
Click Continue.
Step 6. A final modal appears:
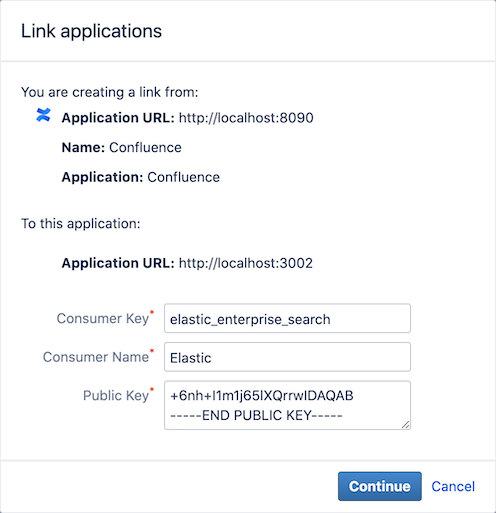
- Consumer Key: The Consumer Key from Workplace Search
- Consumer Name: Elastic
- Public Key: The Public Key from Workplace Search you’ve previously copied.
Click Continue.
Step 7. Back to the Workplace Search administrative dashboard, enter the appropriate Confluence Server Base URI. Do not include a trailing slash.
Step 8. Save the configuration. Voilà! The Confluence Server connector is now configured, and ready to be used to synchronize content. In order to capture data, you must now connect a Confluence Server instance with the adequate authentication credentials.
Connecting Confluence Server to Workplace Search
editOnce the Confluence Server connector has been configured, you may connect a Confluence Server instance to your organization.
Step 1. Head to your organization’s Workplace Search administrative dashboard, and locate the Sources tab.
Step 2. Click Add a new source.
Step 3. Select Confluence Server in the Configured Sources list, and follow the Confluence Server authentication flow as presented.
Step 4. Upon the successful authentication flow, you will be redirected to Workplace Search.
Confluence Server content will now be captured and will be ready for search gradually as it is synced. Once successfully configured and connected, the Confluence Server synchronization automatically occurs every 2 hours.