Distributed tracing
editDistributed tracing
editA trace is a group of transactions and spans with a common root.
Each trace tracks the entirety of a single request.
When a trace travels through multiple services, as is common in a microservice architecture,
it is known as a distributed trace.
Why is distributed tracing important?
editDistributed tracing enables you to analyze performance throughout your microservice architecture by tracing the entirety of a request — from the initial web request on your front-end service all the way to database queries made on your back-end services.
Tracking requests as they propagate through your services provides an end-to-end picture of where your application is spending time, where errors are occurring, and where bottlenecks are forming. Distributed tracing eliminates individual service’s data silos and reveals what’s happening outside of service borders.
For supported technologies, distributed tracing works out-of-the-box, with no additional configuration required.
How distributed tracing works
editDistributed tracing works by injecting a custom traceparent HTTP header into outgoing requests.
This header includes information, like trace-id, which is used to identify the current trace,
and parent-id, which is used to identify the parent of the current span on incoming requests
or the current span on an outgoing request.
When a service is working on a request, it checks for the existence of this HTTP header. If it’s missing, the service starts a new trace. If it exists, the service ensures the current action is added as a child of the existing trace, and continues to propagate the trace.
Trace propagation examples
editIn this example, Elastic’s Ruby agent communicates with Elastic’s Java agent.
Both support the traceparent header, and trace data is successfully propagated.

In this example, Elastic’s Ruby agent communicates with OpenTelemetry’s Java agent.
Both support the traceparent header, and trace data is successfully propagated.

In this example, the trace meets a piece of middleware that doesn’t propagate the traceparent header.
The distributed trace ends and any further communication will result in a new trace.

W3C Trace Context specification
editAll Elastic agents now support the official W3C Trace Context specification and traceparent header.
See the table below for the minimum required agent version:
| Agent name | Agent Version |
|---|---|
Go Agent |
≥ |
Java Agent |
≥ |
.NET Agent |
≥ |
Node.js Agent |
≥ |
PHP Agent |
≥ |
Python Agent |
≥ |
Ruby Agent |
≥ |
RUM Agent |
≥ |
Older Elastic agents use a unique elastic-apm-traceparent header.
For backward-compatibility purposes, new versions of Elastic agents still support this header.
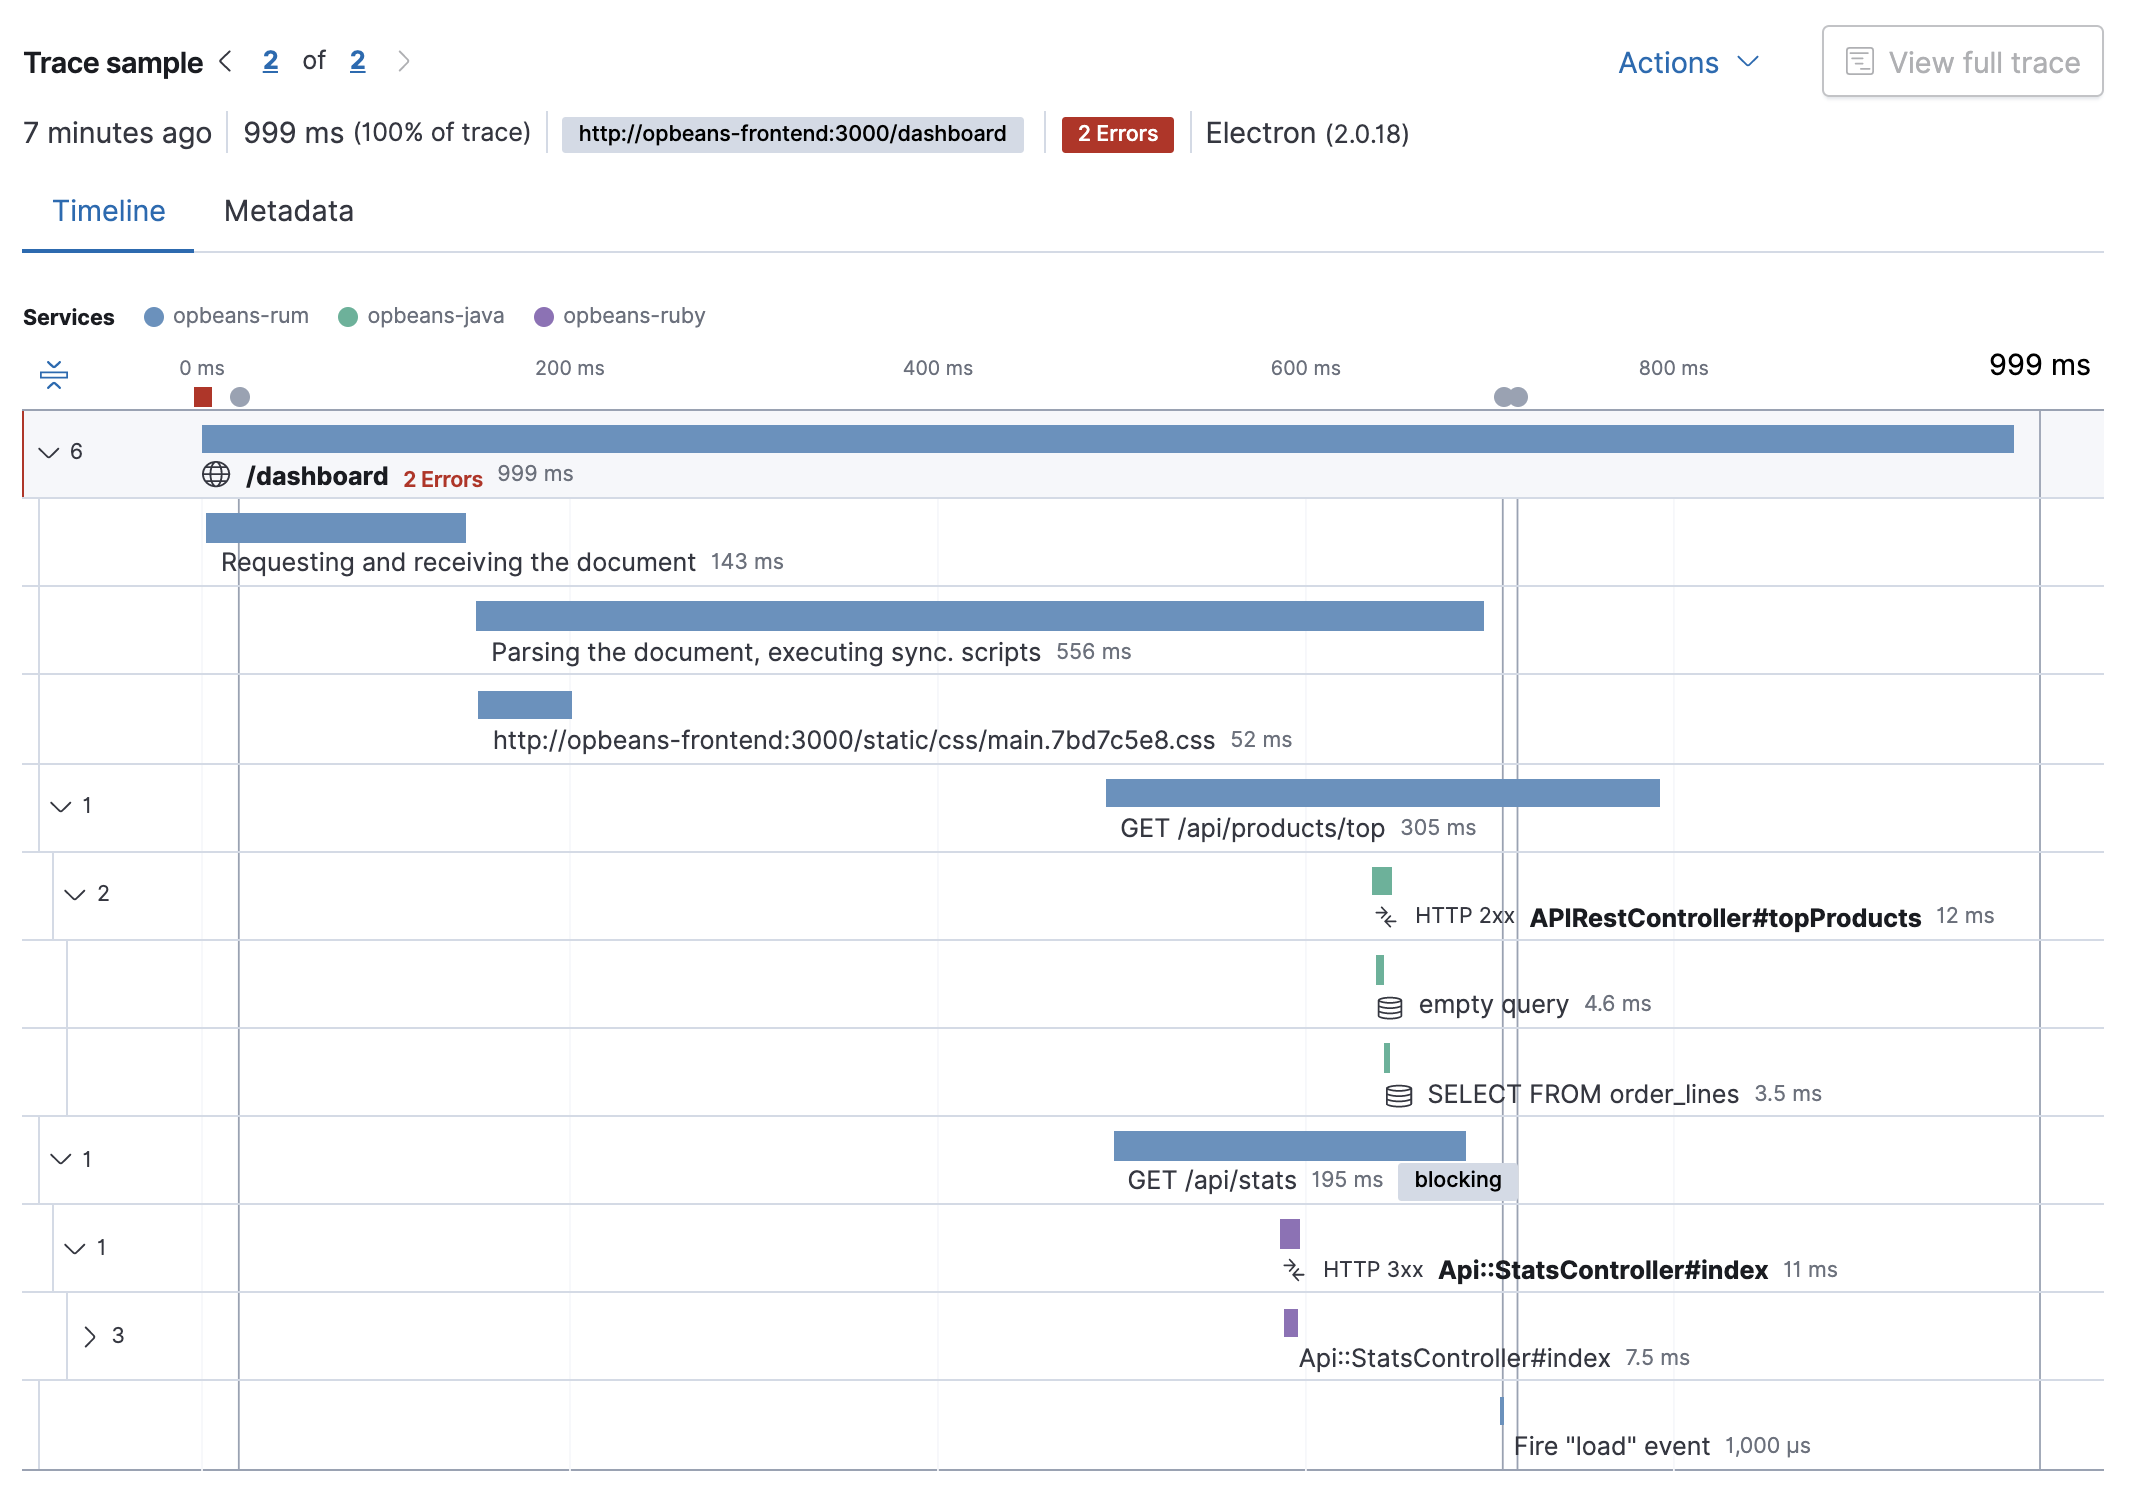
Visualize distributed tracing
editThe APM app’s timeline visualization provides a visual deep-dive into each of your application’s traces:
Manual distributed tracing
editElastic agents automatically propagate distributed tracing context for supported technologies. If your service communicates over a different, unsupported protocol, you can manually propagate distributed tracing context from a sending service to a receiving service with each agent’s API.
Add the traceparent header to outgoing requests
editSending services must add the traceparent header to outgoing requests.
Not applicable.
-
Start a transaction with
StartTransactionor a span withStartSpan. -
Get the active
TraceContext. -
Send the
TraceContextto the receiving service.
Example:
The agent will automatically inject trace headers into network requests using URLSessions, but if you’re using a non-standard network library you may need to manually inject them. It will be done using the OpenTelemetry APIs:
-
Create a
Setter -
Create a
Spanper Open Telemetry standards - Inject trace context to header dictionary
-
Follow the procedure of your network library to complete the network request. Make sure to call
span.end()when the request succeeds or fails.
import OpenTelemetryApi
import OpenTelemetrySdk

struct BasicSetter: Setter {
    func set(carrier: inout [String: String], key: String, value: String) {
        carrier[key] = value
    }
}

let span : Span = ...
let setter = BasicSetter()
let propagator = W3CTraceContextPropagator()
var headers = [String:String]()

propagator.inject(spanContext: span.context, carrier: &headers, setter:setter)

let request = URLRequest(...)
request.allHTTPHeaderFields = headers
... // make network request
span.end()
-
Start a transaction with
startTransaction, or a span withstartSpan. -
Inject the
traceparentheader into the request object withinjectTraceHeaders
Example of manually instrumenting an RPC framework:
// Hook into a callback provided by the RPC framework that is called on outgoing requests
public Response onOutgoingRequest(Request request) throws Exception {
  Span span = ElasticApm.currentSpan()
          .startSpan("external", "http", null)
          .setName(request.getMethod() + " " + request.getHost());
  try (final Scope scope = transaction.activate()) {
      span.injectTraceHeaders((name, value) -> request.addHeader(name, value));
      return request.execute();
  } catch (Exception e) {
      span.captureException(e);
      throw e;
  } finally {
      span.end();
  }
}
-
Serialize the distributed tracing context of the active transaction or span with
CurrentTransactionorCurrentSpan. - Send the serialized context the receiving service.
Example:
string outgoingDistributedTracingData =
    (Agent.Tracer.CurrentSpan?.OutgoingDistributedTracingData
        ?? Agent.Tracer.CurrentTransaction?.OutgoingDistributedTracingData)?.SerializeToString();
// Now send `outgoingDistributedTracingData` to the receiving service
-
Start a transaction with
apm.startTransaction(), or a span withapm.startSpan(). -
Get the serialized
traceparentstring of the started transaction/span withcurrentTraceparent. -
Encode the
traceparentand send it to the receiving service inside your regular request.
Example using raw UDP to communicate between two services, A and B:
- On the client side (i.e., the side sending the request) get the current distributed tracing context.
- Serialize the current distributed tracing context to a format supported by the request’s transport and send it to the server side (i.e., the side receiving the request).
Example:
-
Start a transaction with
begin_transaction(). -
Get the
trace_parentof the active transaction. -
Send the
trace_parentto the receiving service.
Example:
-
Start a span with
with_span. -
Get the active
TraceContext. -
Send the
TraceContextto the receiving service.
Parse the traceparent header on incoming requests
editReceiving services must parse the incoming traceparent header,
and start a new transaction or span as a child of the received context.
Not applicable.
-
Parse the incoming
TraceContextwithParseTraceparentHeaderorParseTracestateHeader. -
Start a new transaction or span as a child of the incoming transaction with
StartTransactionOptionsorStartSpanOptions.
Example:
// Receive incoming TraceContext
traceContext, _ := apmhttp.ParseTraceparentHeader(r.Header.Get("Traceparent"))
traceContext.State, _ = apmhttp.ParseTracestateHeader(r.Header["Tracestate"]...)

opts := apm.TransactionOptions{
	TraceContext: traceContext,
}
transaction := apm.DefaultTracer().StartTransactionOptions("GET /", "request", opts)
Not applicable.
-
Create a transaction as a child of the incoming transaction with
startTransactionWithRemoteParent(). -
Start and name the transaction with
activate()andsetName().
Example:
// Hook into a callback provided by the framework that is called on incoming requests
public Response onIncomingRequest(Request request) throws Exception {
    // creates a transaction representing the server-side handling of the request
    Transaction transaction = ElasticApm.startTransactionWithRemoteParent(request::getHeader, request::getHeaders);
    try (final Scope scope = transaction.activate()) {
        String name = "a useful name like ClassName#methodName where the request is handled";
        transaction.setName(name);
        transaction.setType(Transaction.TYPE_REQUEST);
        return request.handle();
    } catch (Exception e) {
        transaction.captureException(e);
        throw e;
    } finally {
        transaction.end();
    }
}
Deserialize the incoming distributed tracing context, and pass it to any of the
StartTransaction or
CaptureTransaction APIs — all of which have an optional DistributedTracingData parameter.
This will create a new transaction or span as a child of the incoming trace context.
Example starting a new transaction:
var transaction2 = Agent.Tracer.StartTransaction("Transaction2", "TestTransaction",
     DistributedTracingData.TryDeserializeFromString(serializedDistributedTracingData));
-
Decode and store the
traceparentin the receiving service. -
Pass in the
traceparentas thechildOfoption to manually start a new transaction as a child of the receivedtraceparentwithapm.startTransaction().
Example receiving a traceparent over raw UDP:
- Receive the distributed tracing data on the server side.
-
Begin a new transaction using the agent’s public API. For example, use
ElasticApm::beginCurrentTransactionand pass the received distributed tracing data (serialized as string) as a parameter. This will create a new transaction as a child of the incoming trace context. - Don’t forget to eventually end the transaction on the server side.
Example:
$receiverTransaction = ElasticApm::beginCurrentTransaction(
    'GET /data-api',
    'data-layer',
    /* timestamp */ null,
    $distDataAsString
);
Once this new transaction has been created in the receiving service, you can create child spans, or use any other agent API methods as you typically would.
-
Create a
TraceParentobject from a string or HTTP header. -
Start a new transaction as a child of the
TraceParentby passing in aTraceParentobject.
Example using HTTP headers:
parent = elasticapm.trace_parent_from_headers(headers_dict)
client.begin_transaction('processors', trace_parent=parent)
|
Create a |
|
|
Begin a new transaction as a child of the received |
See the TraceParent API for additional examples.
Start a new transaction or span as a child of the incoming transaction or span with
with_transaction or
with_span.
Example:
Distributed tracing with RUM
editSome additional setup may be required to correlate requests correctly with the Real User Monitoring (RUM) agent.
See the RUM distributed tracing guide for information on enabling cross-origin requests, setting up server configuration, and working with dynamically-generated HTML.