Installing Marvel
editInstalling Marvel
editTo use Marvel, you need to install two components:
- An Elasticsearch plugin that collects data from each node in your cluster. This plugin must be installed on every node.
- A Kibana app that provides the Marvel monitoring UI.
By default, the Marvel plugin stores data in the same Elasticsearch cluster where it is installed. If you are monitoring a production cluster we recommend that you store the Marvel data in a separate monitoring cluster. Sending the Marvel data to a monitoring cluster helps ensure that you can continue to monitor your production cluster if it’s in an unhealthy state.
For basic installation instructions, see Getting Started with Marvel. For information about storing Marvel data in a separate monitoring cluster, see Setting up a Separate Monitoring Cluster.
Marvel Installation Prerequisites
editMarvel 2.4.6 requires:
- Java 7 or later
- Elasticsearch 2.4.6
- Kibana 4.6.5
- Elasticsearch License 2.4.6 plugin
- A modern web browser - Supported Browsers
For information about installing the latest Oracle JDK, see Java SE Downloads. For information about installing Elasticsearch, see Installation in the Elasticsearch Reference.
You must run the version of Marvel that matches the version of Elasticsearch you are running.
Installing the Marvel Agent on a DEB/RPM Package Installation
editIf you use the DEB/RPM packages to install Elasticsearch, by default Elasticsearch is installed in
/usr/share/elasticsearch and the configuration files are stored in /etc/elasticsearch. (For the
complete list of default paths, see Directory Layout in
the Elasticsearch Reference.)
To install the License plugin and Marvel agent on a DEB/RPM package installation, you need to run
bin/plugin install from the /usr/share/elasticsearch directory with superuser permissions:
cd /usr/share/elasticsearch
sudo bin/plugin install license
sudo bin/plugin install marvel-agent
If the configuration files are not in /etc/elasticsearch you need to specify the location of
the configuration files by including -Des.path.conf.
Installing Marvel on Offline Machines
editThe Elasticsearch bin/plugin script and bin/kibana plugin require Internet access to
download and install the License and Marvel plugins. If your server doesn’t have Internet access,
you can manually download and install the plugins.
To install Marvel on a machine that doesn’t have Internet access:
-
Manually download the License and Marvel binaries:
- https://download.elastic.co/elasticsearch/release/org/elasticsearch/plugin/license/2.4.6/license-2.4.6.zip (sha1)
- https://download.elastic.co/elasticsearch/release/org/elasticsearch/plugin/marvel-agent/2.4.6/marvel-agent-2.4.6.zip (sha1)
- https://download.elasticsearch.org/elasticsearch/marvel/marvel-2.4.5.tar.gz (sha1)
- Transfer the archive files to a temporary directory on the offline machine. (Do NOT put the archive files in the Elasticsearch plugins directory.)
-
Specify the archive files when you run
bin/pluginandbin/kibana. For example:bin/plugin install file:///path/to/file/license-2.4.6.zip bin/plugin install file:///path/to/file/marvel-agent-2.4.6.zip bin/kibana plugin --install marvel --url file:///path/to/file/marvel-2.4.5.tar.gz
You must specify an absolute path to the zip file after the
file://protocol.
Setting up a Separate Monitoring Cluster
editTo store Marvel data in a separate monitoring cluster:
-
Set up the Elasticsearch cluster you want to use for monitoring and start Elasticsearch.
For example, you might set up a two host cluster with the nodes
es-mon-1andes-mon-2. You do not need to install the Marvel agent plugin on the nodes in the monitoring cluster, only on the production nodes you’ll be monitoring. You can configure Shield on your monitoring cluster to protect your monitoring data. For information about how to set up Shield, see the Shield Reference. -
Configure the nodes in your production cluster to send Marvel data to your monitoring cluster by configuring an HTTP exporter in the
marvel.agent.exporterssettings inelasticsearch.yml:marvel.agent.exporters: id1: type: http host: ["http://es-mon-1:9200", "http://es-mon2:9200"]If Shield is enabled on the monitoring cluster, you must also configure credentials for the agent. If SSL is enabled, you must specify the truststore to use to verify the identity of the nodes in the monitoring cluster. For more information, see Using Marvel with Shield in the Shield Reference.
-
Install the Marvel agent and License plugins on the nodes in your production cluster:
bin/plugin install license
bin/plugin install marvel-agent
-
Restart Elasticsearch on the nodes in your production cluster
You may want to temporarily disable shard allocation before you restart your nodes to avoid unnecessary shard reallocation during the install process.
-
Install the Marvel app into Kibana.
bin/kibana plugin --install elasticsearch/marvel/2.4.5
-
Configure Kibana to connect to your monitoring cluster by setting the
elasticsearch_urlproperty in thekibana.ymlconfiguration file. For example:elasticsearch_url: "http://es-mon-1:9200"
-
Start Kibana by running
bin/kibana. -
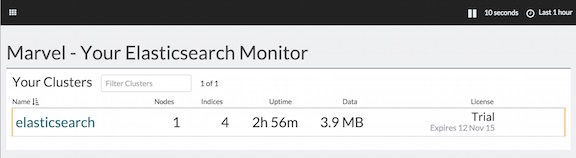
To verify your Marvel installation, point your web browser at your Kibana host, click the App Switcher icon in the Kibana menu bar, and select Marvel.

Marvel should display a list of the clusters you are monitoring.
Using Marvel with Shield
editIf you are using Shield to secure your Elasticsearch cluster, you need to follow the instructions
in Using
Kibana 4 with Shield to set up user authentication and secure communications and then grant your
users the marvel_users role defined in roles.yml. If you are using a separate monitoring
cluster, you also need to configure credentials for the Marvel agent installed on each node of
the cluster being monitored. For more information, see
Using Marvel with Shield in the Shield Reference.
Upgrading Marvel
editWhen upgrading Marvel, you must upgrade the Marvel agent on every node you are monitoring. You do not need to fully shut down your production cluster to perform the upgrade, you can perform a rolling upgrade.
You must run the version of Marvel that matches the version of Elasticsearch you are running. For example, Marvel 2.4.6 requires Elasticsearch 2.4.6.
To upgrade Marvel:
-
Disable shard reallocation on the nodes you are monitoring. While this is optional, it enables a faster startup after cluster shutdown. If you don’t disable shard reallocation, the nodes immediately start trying to replicate shards to each other on startup and spend a lot of time on wasted I/O. With shard reallocation disabled, the nodes join the cluster with their indices intact and do not attempt to rebalance. After startup is complete, you can turn reallocation back on.
curl -XPUT localhost:9200/_cluster/settings -d '{ "transient" : { "cluster.routing.allocation.enable" : "none" } }' -
Upgrade each node, one at a time:
- Stop Elasticsearch.
-
Remove the old version of the Marvel agent from Elasticsearch:
bin/plugin remove marvel-agent
-
Install the latest version of the Marvel agent:
bin/plugin install marvel-agent
-
If you are upgrading from Marvel 1.x and use a separate monitoring cluster,
update your exporter configuration in
elasticsearch.yml. For more information, see Setting up a Separate Monitoring Cluster. - Start Elasticsearch and confirm that the node rejoins the cluster and that there are no errors in the logs.
-
When you’ve upgraded all of the nodes in the cluster, reenable shard allocation:
curl -XPUT localhost:9200/_cluster/settings -d '{ "transient" : { "cluster.routing.allocation.enable" : "all" } }' -
Upgrade the Marvel Kibana app:
- Stop Kibana.
-
Remove the old version of the Marvel app:
bin/kibana plugin --remove marvel
-
Install the new version of the Marvel app:
bin/kibana plugin --install elasticsearch/marvel/2.4.5
-
Restart Kibana by running
bin/kibana.
Uninstalling Marvel
editTo uninstall Marvel:
- Shut down Elasticsearch and Kibana.
-
Remove the Marvel agent plugin from Elasticsearch:
bin/plugin remove marvel-agent
-
Remove the Marvel Kibana app:
bin/kibana plugin --remove marvel
- Restart Elasticsearch and Kibana.