MongoDB native connector tutorialedit
Learn how to use the Elastic MongoDB connector to sync data from MongoDB Atlas to an Elastic Cloud deployment.
This tutorial explains how to set up automatic, ongoing syncs from a MongoDB database to a search-optimized index on Elastic Cloud. We’ll use an Atlas deployment, together with built-in sample datasets in this tutorial, but you can also use your own data.
This tutorial is an example of:
- How to use the MongoDB connector, which is compatible with MongoDB Atlas and on premises MongoDB servers. See Compatibility.
- How to use any connector available as a native connector. The workflow in this tutorial applies to all native connectors.
This tutorial has three main sections:
-
Set up MongoDB Atlas: First you’ll need to get MongoDB Atlas up and running. (Skip this step if you already have a MongoDB instance you’d like to use.)
- You’ll create a free account, set up a free Atlas cluster, and load some sample data.
- Gather details about your MongoDB instance Once that’s done, you’ll need to gather some details about your Atlas cluster, so you can connect it to an Elastic Cloud deployment.
-
Set up Elastic Cloud: Next, you’ll need to get Elastic Cloud up and running.
- Then you’ll need to create an Elasticsearch index and configure the Elastic connector to interface with your Atlas cluster. We’ll do all this in the Kibana UI.
- Once configured, you’ll set a syncing schedule to start indexing your MongoDB data into Elasticsearch and ensure it stays up to date.
Set up MongoDB Atlasedit
Follow the steps in the MongoDB documentation to create a free Atlas account:
- Create and deploy a free Atlas cluster.
-
Under Security > Network Access, add IP access to
0.0.0.0/0. This CIDR-notation allows connections from any IP address. This enables the Elastic connector, running on Elastic Cloud, to access Atlas. See the Atlas documentation for complete instructions. - Create a database user, with a username and password combination. Select Add new database user in Security > Database access. Keep these details handy, as you’ll need them to configure the connector later.
Load sample data into Atlasedit
In this example we’ll use the sample data available to MongoDB Atlas. You can do this in the MongoDB Atlas UI.
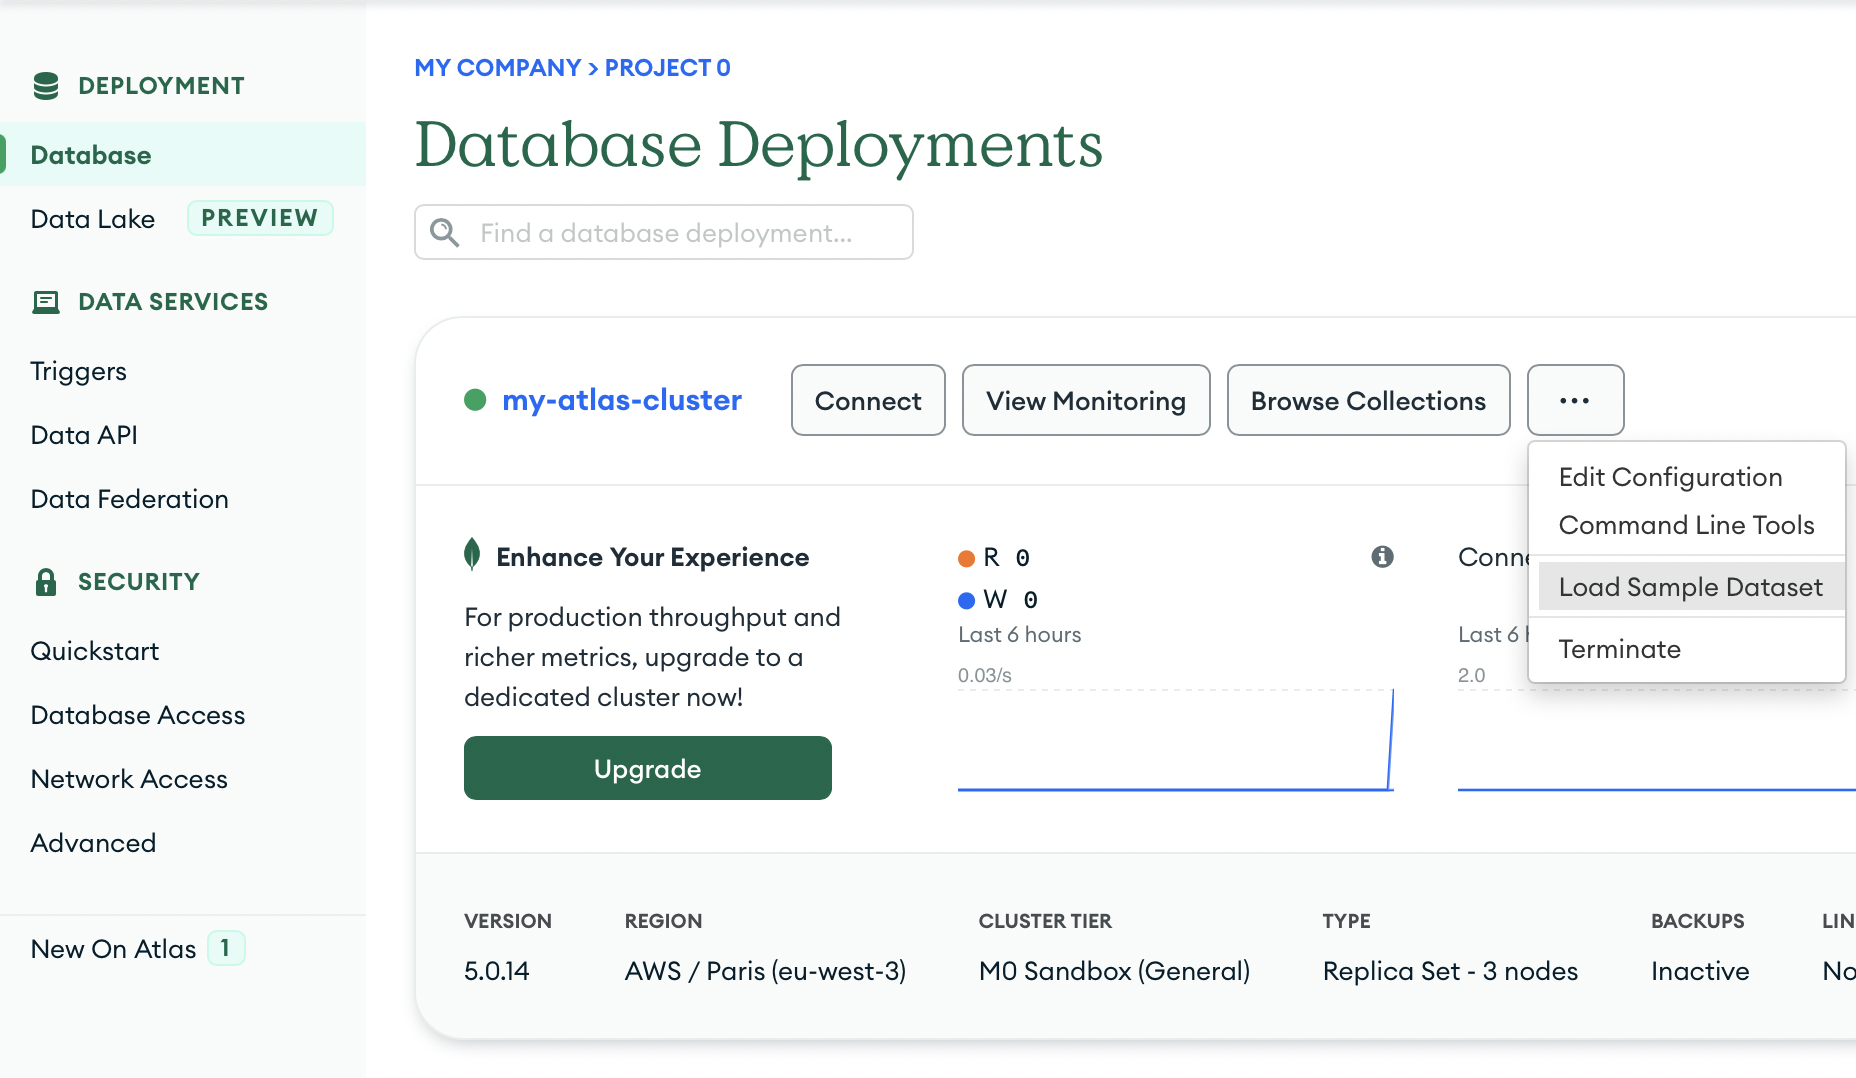
Use the Load Sample Dataset button in the Atlas UI, under Database Deployments. Find this by selecting the "…" button next to your cluster name.
Detailed instructions are available in the Atlas documentation.
Browse sample data in Atlas UIedit
Once loaded, you can view your sample data in the Atlas UI, by selecting your database deployment’s Browse Collections button. Confirm that the sample databases have been added to your database deployment.
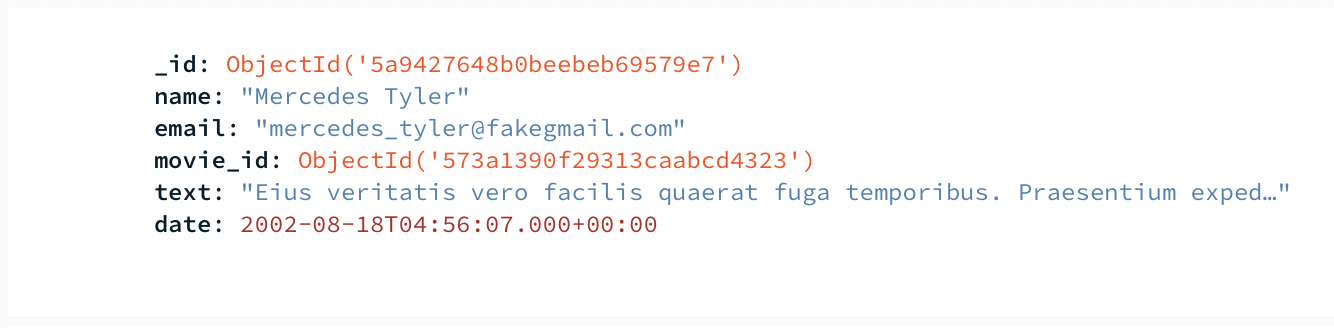
In this example, we’ll use the sample_mflix dataset, which contains data on movies and movie theaters.
The database contains collections for certain metadata, including users and comments on specific movies.
We’ll focus on the comments collection in this example.
Each document contains a comment, and information such as the commenter’s name and email address.
comments collectionLater, once the connector transforms MongoDB documents into Elasticsearch documents, you can compare their structure.
We’ve added data to our MongoDB Atlas cluster, and now we need to configure the Elastic MongoDB connector.
Gather details about your MongoDB instanceedit
Before we switch over to working in Elastic Cloud, we need to gather some details about our MongoDB Atlas cluster. We’ll need these details to configure the Elastic MongoDB connector. You can find these details in the Atlas UI.
Find the following details:
-
Host: The URI of your MongoDB Atlas cluster. This should look like
mongodb+srv://<your-cluster-name>.hjksqfc.mongodb.net. Find this by connecting to your cluster in the MongoDB Atlas UI.- One way to find this URI is to select Connect with MongoDB Shell and copy the connection string from the CLI instructions.
-
Database: The name of the database you want to sync.
In this example, we’ll use the
sample_mflixdatabase. -
Collection: The name of the collection you want to sync.
In this example, we’ll use the
commentscollection of thesample_mflixdatabase. - Username: The username you created earlier, in the the setup phase.
- Password: The password you created earlier.
Keep these details handy!
Set up Elastic Cloudedit
Everything is set up in MongoDB Atlas and we have the details we need to configure the Elastic MongoDB connector. First we’ll need to get an Elastic Cloud deployment up and running.
Create an Elastic Cloud deploymentedit
This step is for users who are new to Elastic Cloud. Skip this step if your team already has an Elastic Cloud deployment.
Log in to Elastic Cloud, and use the UI to create a deployment. You’ll need to run version 8.5.0+ or later.
Read prerequisites for native connectors for full details.
Once you’re deployment is created, navigate to Search.
Create an Elasticsearch indexedit
The Elastic connector will sync your MongoDB data into a search-optimized Elasticsearch index. The first step is to create your index in the Kibana UI.
In the main menu navigate to Search > Content > Indices.
Follow these steps to create your index:
- Select Create an Elasticsearch index.
- Choose Connector as your ingestion method.
- Select the MongoDB connector type.
-
Name your new index, for example
search-mongo-sample, then save. This takes you to the Configuration tab of your index overview page.
Next we need to input our Atlas details to configure the connector.
Configure the MongoDB connectoredit
Using the details gathered earlier, configure the MongoDB connector.
Enter the details under the Configuration step.
Set the Direct connection option to false for this example.
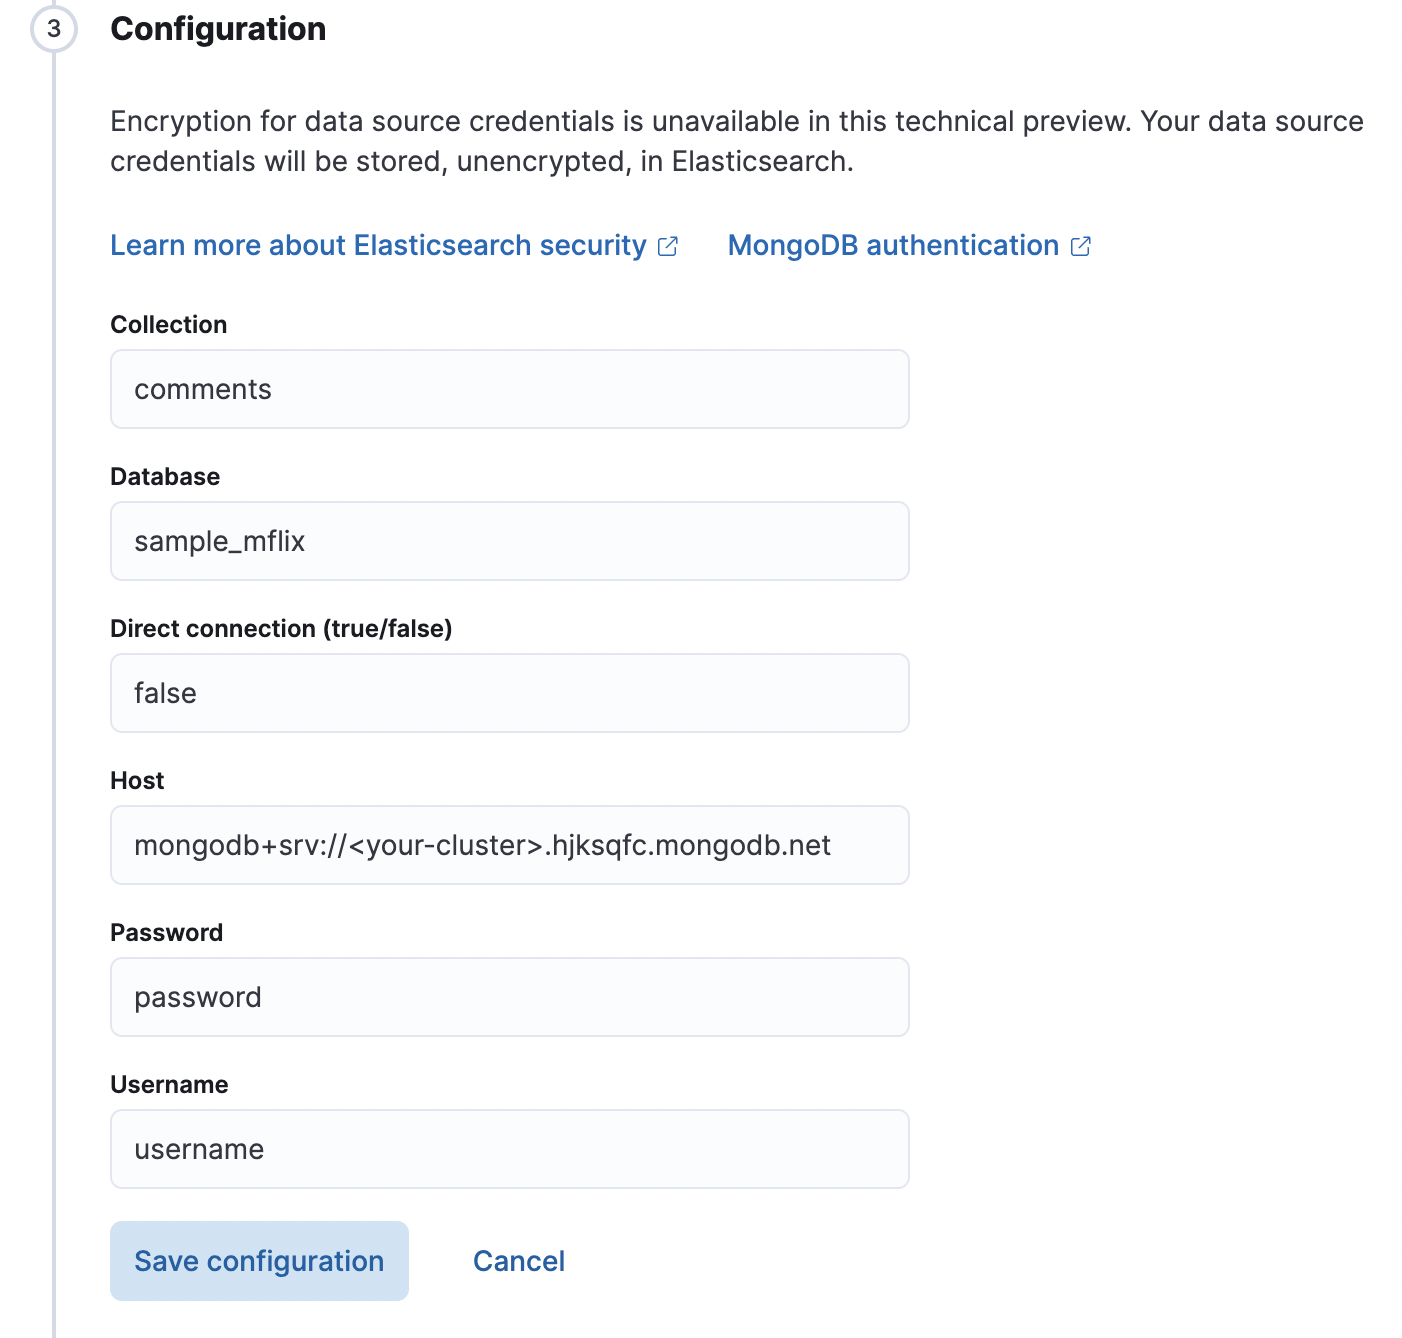
Once you’ve entered these details, select Save configuration.
Begin syncingedit
Once you’ve configured your MongoDB connector, it’s time to schedule a sync.
The UI will take you to the Scheduling tab of your index overview page. We’ll schedule a recurring sync for this example, which will run every day at midnight.
In the Scheduling tab:
- Toggle Enable recurring syncs with the following schedule.
-
Select Frequency, "Every"
day. -
Select Time, "At"
00:00. - Save this sync schedule.
Once you save your sync schedule, the connector will start syncing your MongoDB Atlas data into Elasticsearch.
Verify documentsedit
Our reference documentation explains how documents in your MongoDB database and collection are extracted and transformed into documents in your Elasticsearch index.
If all the configuration details are correct, the sync will begin and documents will start to appear in your Elasticsearch index.
As soon as your first documents are synced, you can view the documents and inspect the mapping for the index:
- In Kibana, navigate to Search > Content > Indices.
-
Select your index, for example
search-mongo-sample. - Choose the Documents tab to view the synced documents. Expand a document to view its fields.
Learn moreedit
- Refer to the Elastic MongoDB connector reference documentation for detailed information about the connector, including how sync rules work.
- For an overview of all native connectors, see Native connectors (managed service).
- Learn about Sync rules for native connectors.
- Learn how to create an App Search Engine for your index, to quickly spin up a search engine for your data.
- Learn about ingest pipelines for Search indices
- Refer to the official MongoDB Atlas documentation for MongoDB-specific questions.