Extract custom fields using web crawler and proxy
editExtract custom fields using web crawler and proxy
editIf you can change the source code of the web pages you’re crawling, see Optimizing web content instead.
When parsing body text from a webpage, the Elastic web crawler extracts the content and organizes it into fields based on HTML tags:
-
Text within
titletags are mapped to thetitlefield -
Anchor tags (
<a></a>) are parsed as links -
The body tag is parsed as one big field (
body_content) containing everything else.
But what if a website has a custom structure — for example, the color, size, and price included on product pages — and you want to capture these in specific fields?
You can add meta tags or data attributes to your website to create custom fields. But sometimes making changes on the website is too complicated, or you don’t have access to the source code. In this case, you can use a proxy to parse the content and add these custom fields on the fly.
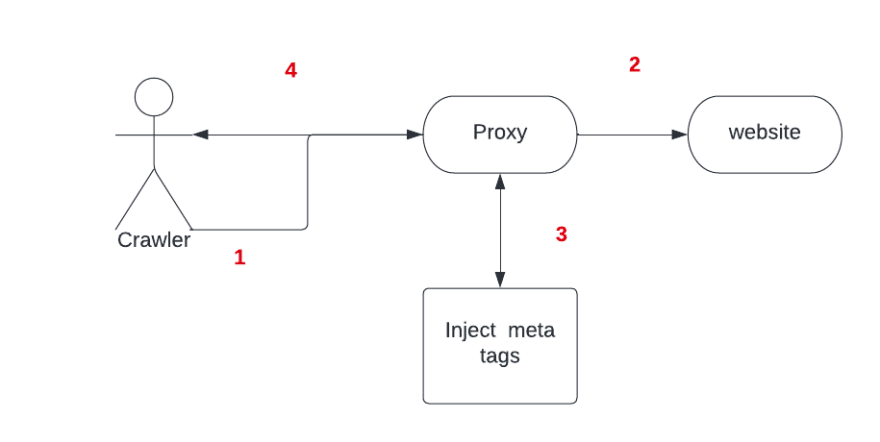
This document explains how to create a proxy between the crawler and the website, to perform the extraction, create the meta tags, and inject them into the new response.
Tools
editYou will need the following tools for this exercise:
- Nodejs: to create the example page and proxy
- Ngrok: to expose the local proxy to the internet
- Elastic web crawler: to crawl the page
The body parsing solution
editIn this example, we’ll create a NodeJS server that hosts a product page and a proxy that stands in front. This will receive the crawler request, hit the product page, inject the meta tags, and then return the page to the crawler.
The following code block adds custom fields using meta tags:
<head>
  <meta class="elastic" name="product_price" content="99.99">
</head>
<body>
  <h1 data-elastic-name="product_name">Printer</h1>
</body>
In this example, the first step is to serve a page that emulates a product page for a printer:
index.html
<html>
  <head>
    <title>Printer Page</title>
  </head>
  <body>
    <h1>Printer</h1>
    <div class="price-container">
      <div class="title">Price</div>
      <div class="value">2.99</div>
    </div>
  </body>
</html>
server.js
const express = require("express");
const app = express();

app.listen(1337, () => {
  console.log("Application started and Listening on port 1337");
});

app.get("/", (req, res) => {
  res.sendFile(__dirname + "/index.html");
});
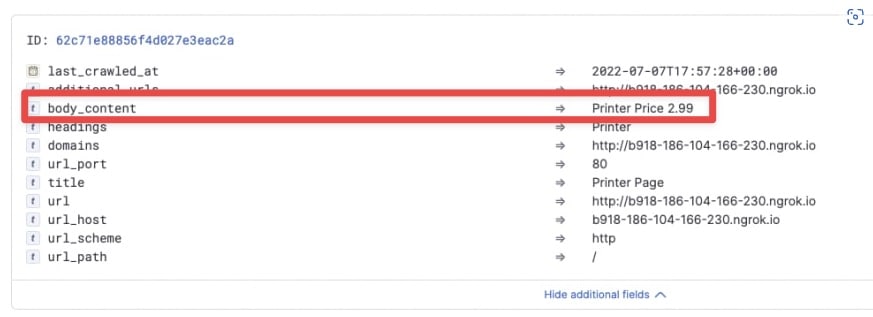
Now it’s time to crawl the page. The data you want to have as fields, such as the price, is put inside the body content field:
Next, create a proxy capable of recognizing this data and injecting a meta tag to the response, so the crawler can recognize this is a field.
proxy.js
const http = require("http"),
  connect = require("connect"),
  app = connect(),
  httpProxy = require("http-proxy");

app.use(function (req, res, next) {
  var _write = res.write;
  res.write = function (data) {
    _write.call(
      res,
      data
        .toString()
        .replace('class="value"', 'class="value" data-elastic-name="price"')
    );
  };
  next();
});

app.use(function (req, res) {
  proxy.web(req, res);
});

http.createServer(app).listen(8013);

var proxy = httpProxy.createProxyServer({
  target: "http://localhost:1337",
});

console.log("http proxy server" + " started " + "on port " + "8013");
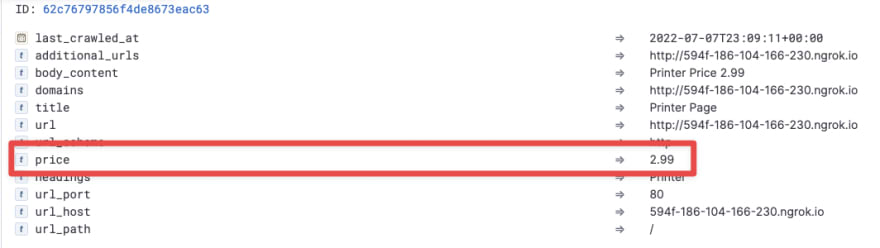
Finally, start your server and proxy to expose the proxy with Ngrok. Provide this domain to the crawler so that it crawls your website through the proxy. The price is now a separate field:
Use this guide as a blueprint for more sophisticated solutions. For example, you could build middleware that transforms the body response to add meta tags based on existing classes, but also based on the content itself.
Learn more
edit- Meta tags and data attributes to extract custom fields documents how to extract custom fields by editing webpage source files.
- Optimizing web content details all the options for optimizing webpage source files for the crawler.
- Web crawler provides an overview of all our web crawler documentation.