Migrate ECE to Podman hosts
editMigrate ECE to Podman hosts
editThis section provides guidelines and recommendations for migrating an existing platform to a Podman-based environment. You have an existing ECE installation version >=3.0 and want to migrate all hosts to use Podman as a container runtime. The recommended approach consists of three (3) high-level steps.
Step 1: Upgrade ECE to version >= 3.3.0 following the Upgrade your installation guidelines. Skip this step if your ECE installation is already running a version >= 3.3.0.
Step 2: Prepare an additional RHEL 8 VM (the version must be >= 8.5, but <9). We recommend using one additional VM to perform a rolling grow-and-shrink upgrade.
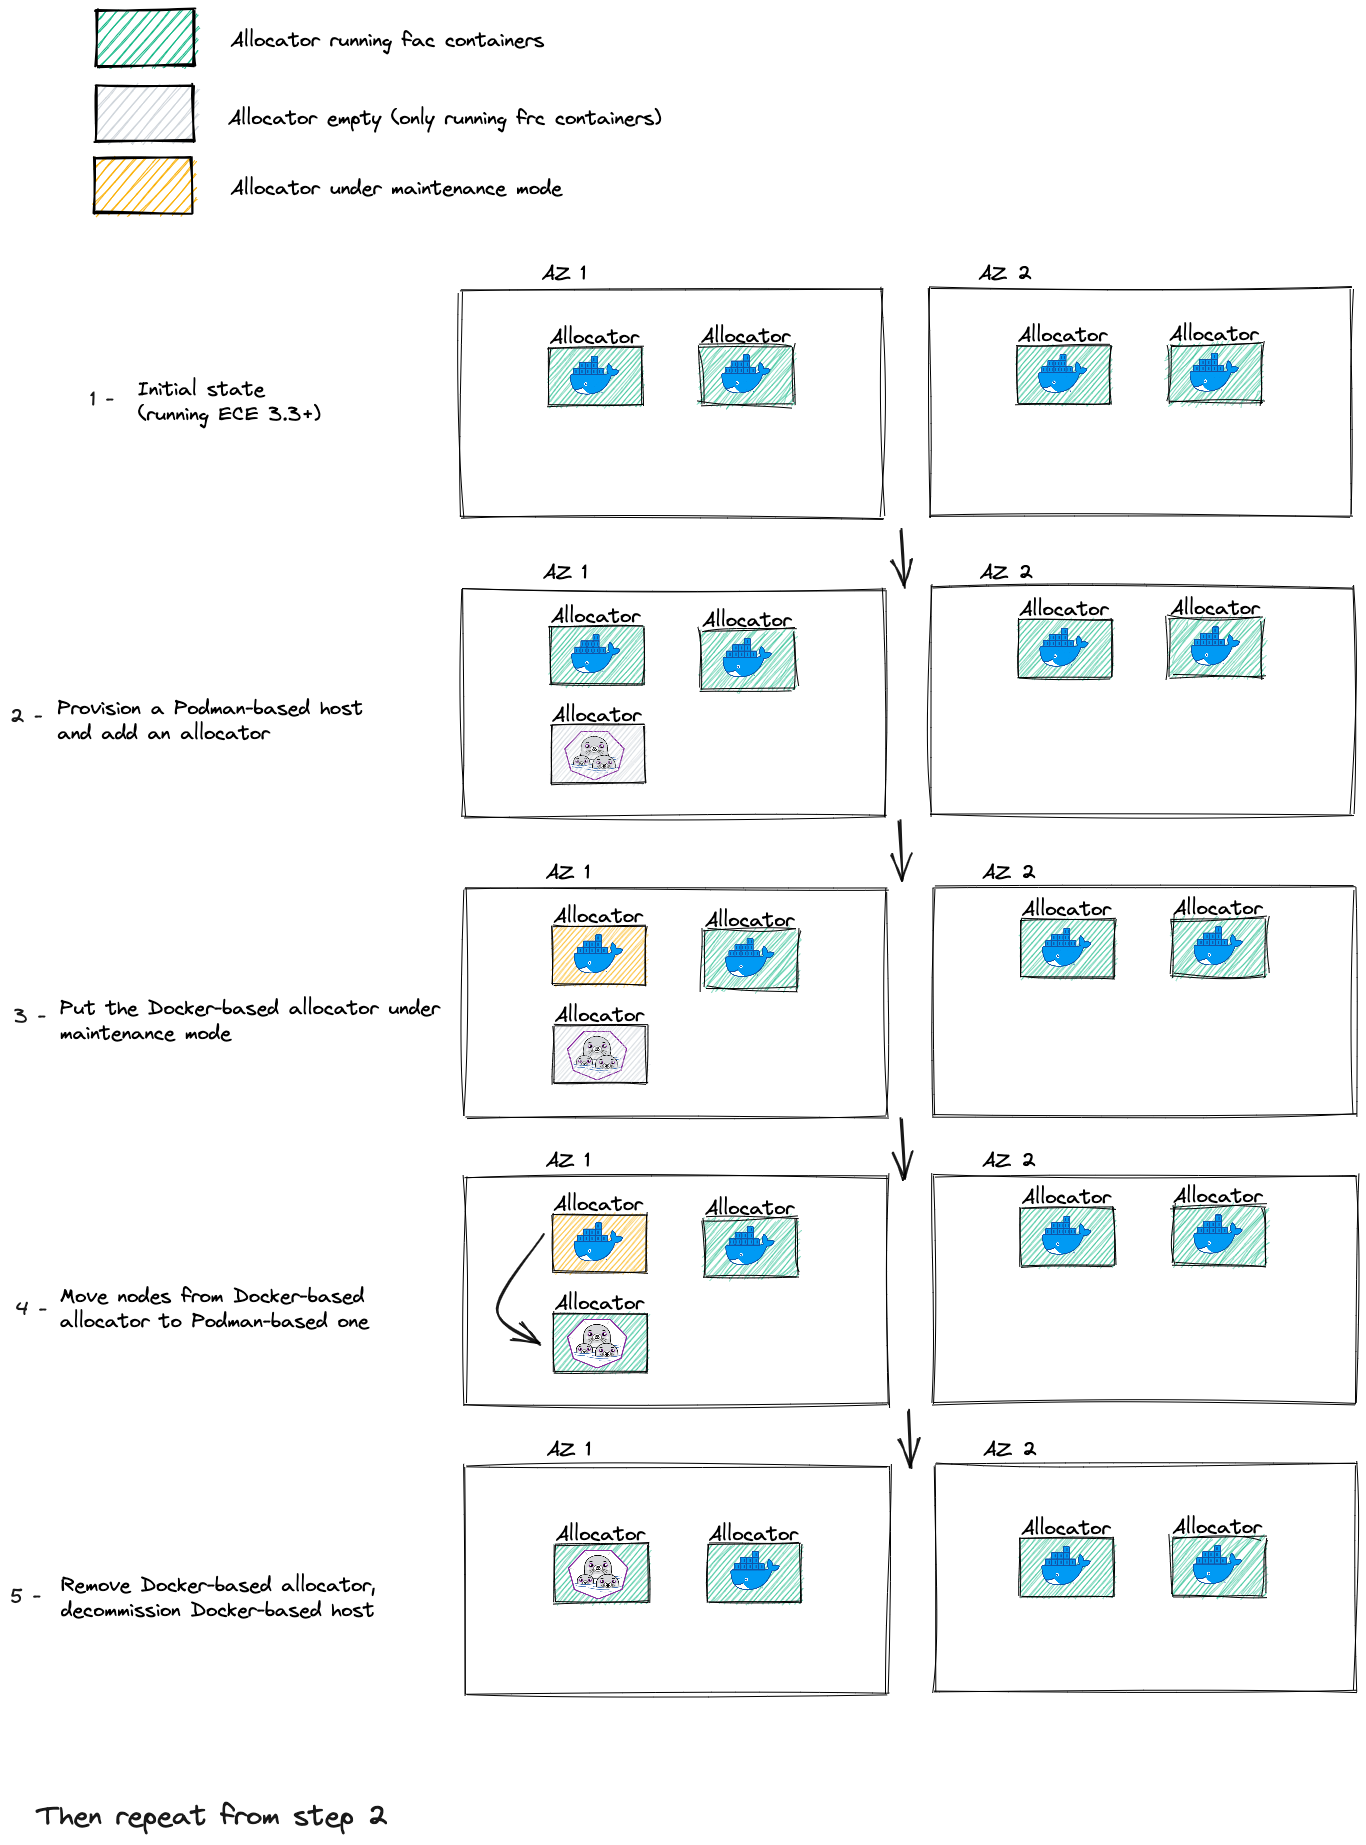
Step 3: Migrate each host one by one from docker to Podman. This allows you to move workloads from Docker-based hosts to Podman-based ones without downtime. We highly recommend to allocate the additional Podman allocator to the same zone as the docker allocator you want to replace. The following diagram shows the conceptual steps.
Using docker or Podman as container runtime is a configuration local to the host. For example, the admin console is not aware which container runtime is using Podman. Hence there is no restriction on the migration ordering of the hosts.
When copy-pasting commands, verify that characters like quotes (“) are encoded correctly in the console where you copy the command to.
Steps that run commands starting with sudo can be run as any sudoers user.
Otherwise, when the file content changes, the corresponding user is mentioned as part of the step description.
- Make sure you are running a healthy x-node ECE environment ready to be upgraded. All nodes use the docker container runtime.
- Upgrade to ECE 3.3.0+ following the Upgrade your installation guideline. Skip this step if your existing ECE installation already runs ECE >= 3.3.0
- Follow your internal guidelines to add an additional vanilla RHEL 8 VM to your environment. Note that the version must be >= 8.5, but <9.
-
Verify that required traffic from the host added in step 3 is allowed to the primary ECE VM(s). Check the Networking prerequisites and Google Cloud Platform (GCP) guidelines for a list of ports that need to be open. The technical configuration highly depends on the underlying infrastructure.
Example For AWS, allowing traffic between hosts is implemented using security groups.
-
Identify the host you want to replace with a podman-based host and copy the associated roles.
Example 1 You want to migrate the docker host
192.168.44.74with the roleAllocatorto a podman host. Copy the roleallocator.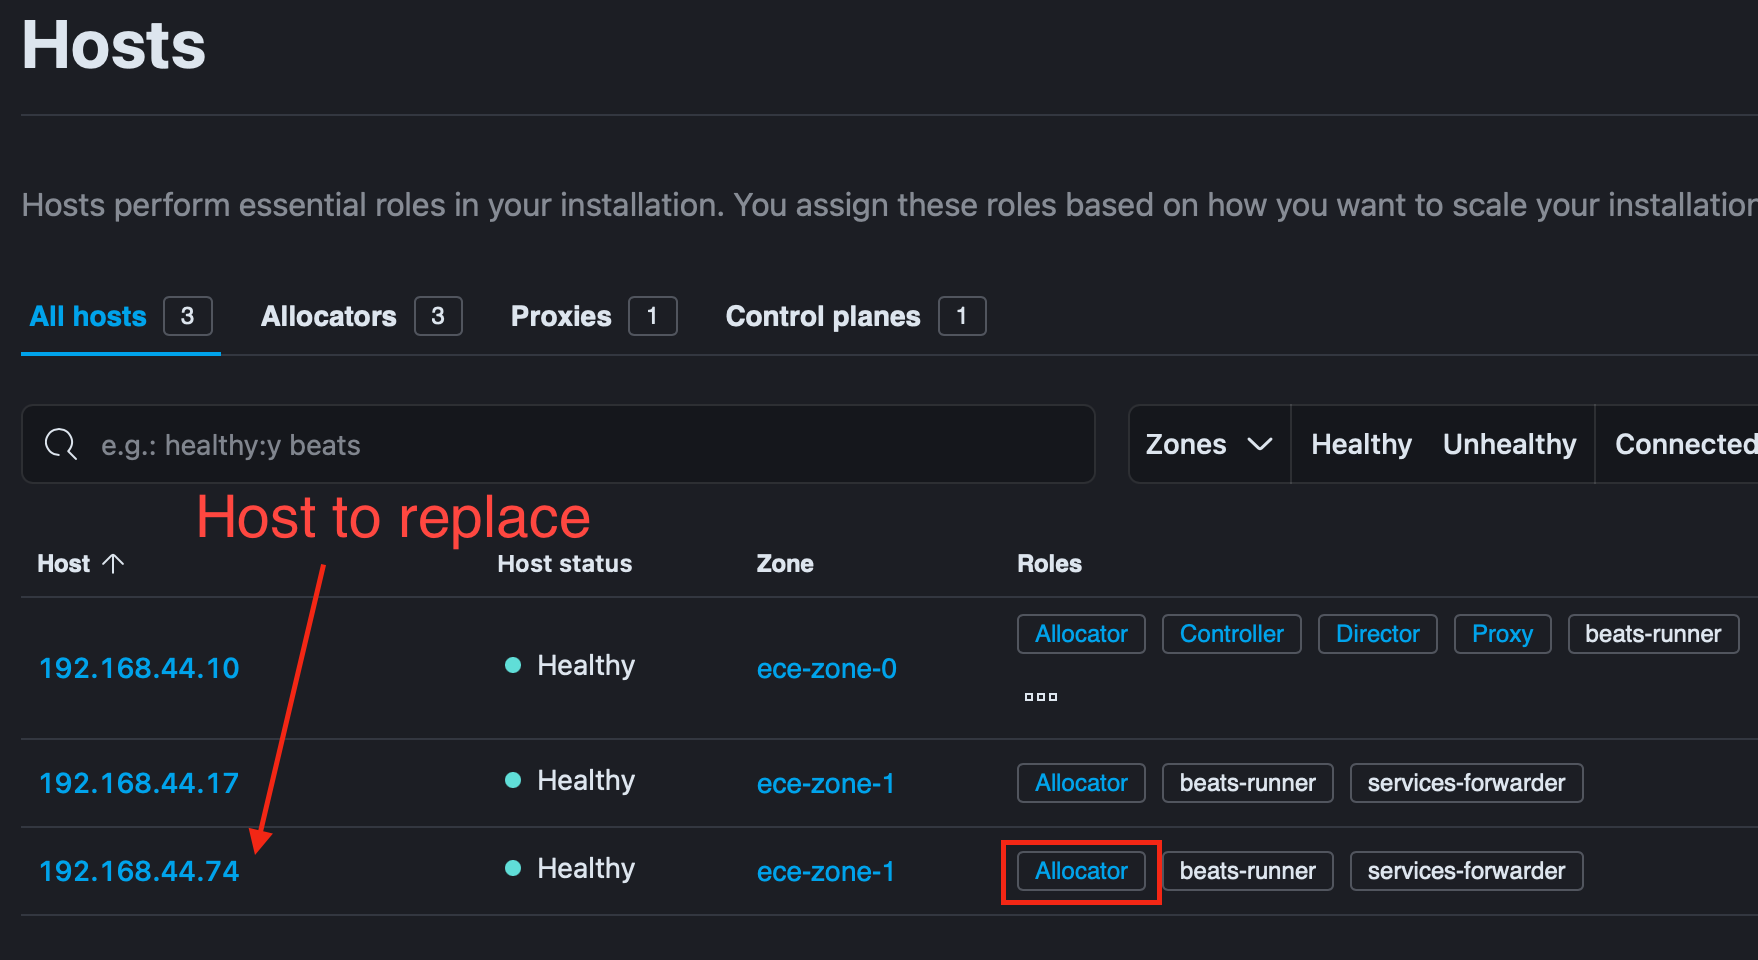
Example 2 You want to migrate the docker host
192.168.44.10with the rolesAllocator,Controller,Director, andProxyto a podman host. Copy the rolesallocator,coordinator,director,proxy.
The role
Controllerin the admin console is calledcoordinatorfor theelastic-cloud-enterprise.shscript -
Configure the RHEL 8 Host
-
Install the OS packages
lvm2,iptables,sysstat, andnet-toolsby executing -
Remove docker and previously installed podman packages (if previously installed)
sudo dnf remove docker docker-ce podman podman-remote
-
As a sudoers user, disable SELinux by adding the following parameter to /etc/selinux/config
SELINUX=disabled
-
Install podman version
4.2.*.sudo dnf install podman-4.2.* podman-remote-4.2.*
-
If podman requires a proxy in your infrastructure setup, modify the
/usr/share/containers/containers.conffile and add theHTTP_PROXYandHTTPS_PROXYenvironment variables in the [engine] section. Please note that multiple env variables in that configuration file exists — use the one in the [engine] section.Example:
[engine] env = ["HTTP_PROXY=http://{proxy-ip}:{proxy-port}", "HTTPS_PROXY=http://{proxy-ip}:{proxy-port}"] -
Restart systemd
sudo systemctl daemon-reload
-
Create OS groups, if they do not exist yet
Reference: Users and permissions
sudo groupadd elastic
sudo groupadd podman
-
Add user
elasticto thepodmangroupReference: Users and permissions
sudo useradd -g "elastic" -G "podman" elastic
-
As a sudoers user, add the following line to /etc/sudoers.d/99-ece-users
Reference: Users and permissions
elastic ALL=(ALL) NOPASSWD:ALL
-
Add the required options to the kernel boot arguments
sudo /sbin/grubby --update-kernel=ALL --args='cgroup_enable=memory cgroup.memory=nokmem swapaccount=1'
-
Create the directory
sudo mkdir -p /etc/systemd/system/podman.socket.d
-
As a sudoers user, create the file
/etc/systemd/system/podman.socket.d/podman.confwith the following content. Set the correct ownership and permission.Both
ListenStream=andListenStream=/var/run/docker.sockparameters are required!File content:
[Socket]
ListenStream=
ListenStream=/var/run/docker.sock
SocketMode=770
SocketUser=elastic
SocketGroup=podman
File ownership and permission:
sudo chown root:root /etc/systemd/system/podman.socket.d/podman.conf
sudo chmod 0644 /etc/systemd/system/podman.socket.d/podman.conf
-
As a sudoers user, create the (text) file
/usr/bin/dockerwith the following content. Verify that the regular double quotes in the text file are used (ASCII code Hex 22)#!/bin/bash podman-remote --url unix:///var/run/docker.sock "$@"
-
Set the file permissions on
/usr/bin/dockersudo chmod 0755 /usr/bin/docker
-
As a sudoers user, add the following two lines to the
[storage]section to the file/etc/containers/storage.conf. Verify that those parameters are only defined once. Either remove or comment out potentially existing parameters.runroot = "/mnt/data/docker/runroot/" graphroot = "/mnt/data/docker"
-
Enable podman so that itself and running containers start automatically after a reboot
sudo systemctl enable podman.service
sudo systemctl enable podman-restart.service
-
Enable the
overlaykernel module (check Use the OverlayFS storage driver) that the Podmanoverlaystorage driver uses (check Working with the Container Storage library and tools in Red Hat Enterprise Linux).In Docker world there are two overlay drivers, overlay and overlay2, today most users use the overlay2 driver, so we just use that one, and called it overlay.
-- https://docs.docker.com/storage/storagedriver/overlayfs-driver/ echo "overlay" | sudo tee -a /etc/modules-load.d/overlay.conf
-
Format the additional data partition
sudo mkfs.xfs /dev/nvme1n1
-
Create the
/mnt/data/directory used as a mount pointsudo install -o elastic -g elastic -d -m 700 /mnt/data
-
As a sudoers user, modify the entry for the XFS volume in the
/etc/fstabfile to addpquota,prjquota. The default filesystem path used by Elastic Cloud Enterprise is/mnt/data.Replace
/dev/nvme1n1in the following example with the corresponding device on your host, and add this example configuration as a single line to/etc/fstab./dev/nvme1n1 /mnt/data xfs defaults,nofail,x-systemd.automount,prjquota,pquota 0 2
-
Restart the local-fs target
sudo systemctl daemon-reload
sudo systemctl restart local-fs.target
-
Set the permissions on the newly mounted device
ls /mnt/data
sudo chown elastic:elastic /mnt/data
-
Create the
/mnt/data/dockerdirectory for the Docker service storagesudo install -o elastic -g elastic -d -m 700 /mnt/data/docker
-
Disable the firewalld service. The service is not compatible with Podman and interferes with the installation of ECE. You must disable firewalld before installing or reinstalling ECE.
If firewalld does not exist on your VM, you can skip this step.
sudo systemctl disable firewalld
-
Configure kernel parameters
cat <<EOF | sudo tee -a /etc/sysctl.conf
# Required by Elasticsearch 5.0 and later
vm.max_map_count=262144
# enable forwarding so the Docker networking works as expected
net.ipv4.ip_forward=1
# Decrease the maximum number of TCP retransmissions to 5 as recommended for Elasticsearch TCP retransmission timeout.
# See https://www.elastic.co/guide/en/elasticsearch/reference/current/system-config-tcpretries.html
net.ipv4.tcp_retries2=5
# Make sure the host doesn't swap too early
vm.swappiness=1
EOF
-
Apply the new sysctl settings
sudo sysctl -p
sudo systemctl restart NetworkManager
-
As a sudoers user, adjust the system limits. Add the following configuration values to the
/etc/security/limits.conffile. If you are using a user name other thanelastic, adjust the configuration values accordingly.* soft nofile 1024000 * hard nofile 1024000 * soft memlock unlimited * hard memlock unlimited elastic soft nofile 1024000 elastic hard nofile 1024000 elastic soft memlock unlimited elastic hard memlock unlimited root soft nofile 1024000 root hard nofile 1024000 root soft memlock unlimited
-
Authenticate the
elasticuser to pull images from the docker registry you use, by creating the file/home/elastic/.docker/config.json. This file needs to be owned by theelasticuser. If you are using a user name other thanelastic, adjust the path accordingly.Example: In case you use
docker.elastic.co, the file content looks like as follows:{ "auths": { "docker.elastic.co": { "auth": "<auth-token>" } } } -
Restart the podman service by running this command:
sudo systemctl daemon-reload
sudo systemctl restart podman
-
Reboot the RHEL host
sudo reboot
-
-
Use the ECE installer script together with the --podman flag to add the additional host as a podman-based host.
Refer to the official Install Elastic Cloud Enterprise on an additional host and Install ECE online documentation to adapt the command line parameters to your environment including fetching the role token.
JVM heap sizes describes recommended JVM options.
Important while running
./elastic-cloud-enterprise.sh-
Make sure you use
--podmanon the podman host. -
To fetch a role token following the Generate Roles Tokens guidelines, you need to send a JSON token to the admin console. Double check the correct format of the roles. Roles are a list of individual strings in quotes, NOT a single string.
For example 1, the JSON object is as follows:
'{ "persistent": true, "roles": [ "allocator" ] }'For example 2, the JSON object is as follows:
'{ "persistent": true, "roles": [ "allocator","coordinator","director","proxy" ] }' -
The ECE version of the additional host must be the same as the version used in step 2. Use
--cloud-enterprise-version VERSION_NAMEto specify the correct version. -
To easily identify the podman allocator, apply a tag to the additional host, for example
containerengine:podman. The podman allocator is needed as the “target allocator” when you later move instances from the docker allocator to the podman allocator. For example, use--allocator-tags containerengine:podman. -
Make sure to apply the roles as copied in step 5 to the additional host. The value for the
--rolesflag is a single string.For example 1 in step 4, use
--roles "allocator"For example 2 in step 4, use
--roles "allocator,coordinator,director,proxy" -
Add the new host to the same availability zone as the docker host you want to replace. Use the
--availability-zone <zone>flag.
-
Make sure you use
-
Login to admin console
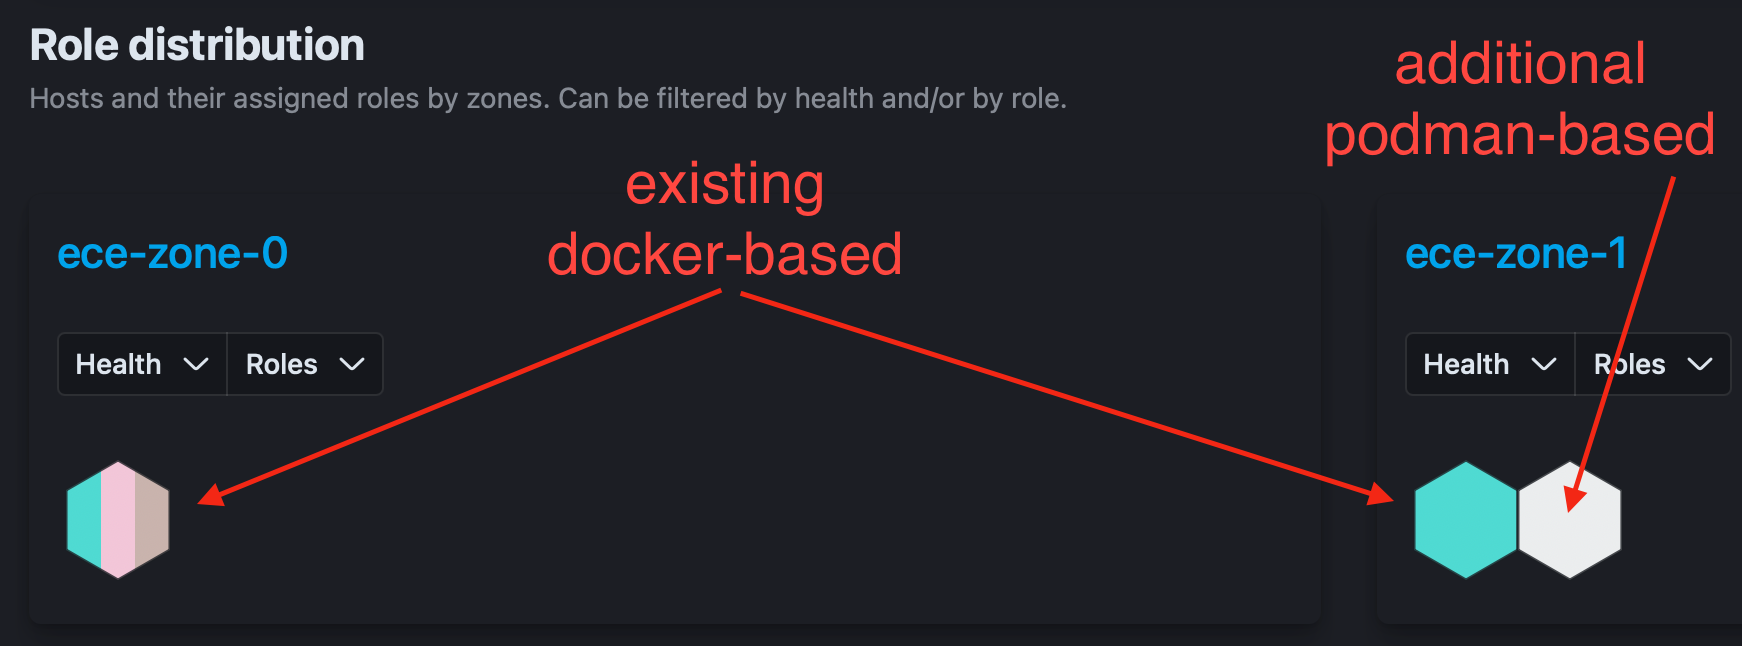
Verify that the new podman host has the same roles (same coloring of the hexagon) as the docker host you want to replace.
The following screenshot shows the state where the correct roles have been applied. Both hosts in ece-zone-1 have the same color.
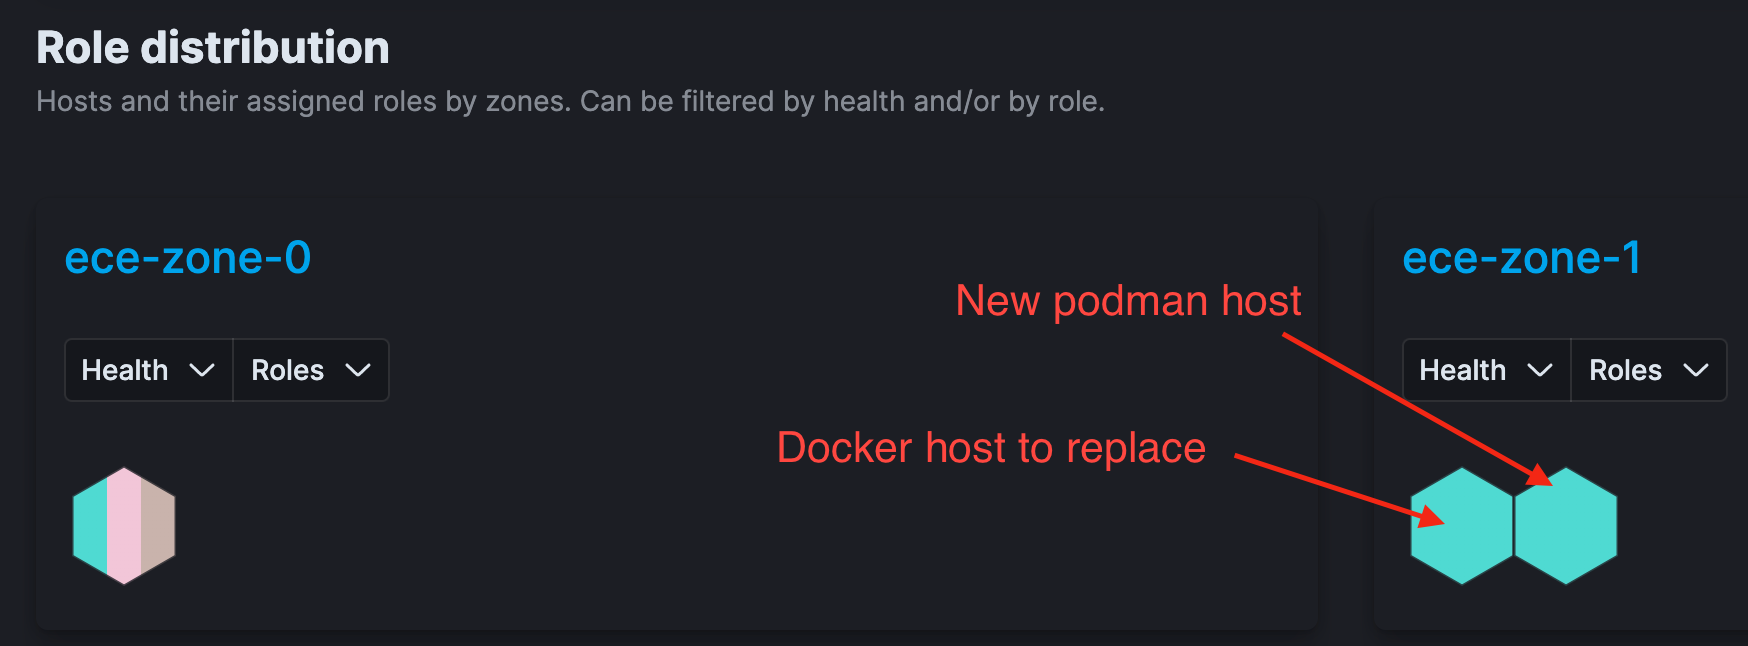
The following screenshot shows the state where incorrect roles have been applied. The hosts in ece-zone-1 do not have the same coloring.
-
Put the docker-based allocator you want to replace with a podman allocator in maintenance mode by following the Enable Maintenance Mode documentation.
As an alternative, use the Start maintenance mode API.
-
Move all instances from the docker allocator to the podman allocator by following the Move Nodes From Allocators documentation.
Make sure to specify the target podman allocator using the option “Set target allocators”.
If you move admin console instances, you might update the URL in the browser before continuing with step 11.

As an alternative, use the Move clusters API.
To identifying the correct target allocator, the following APIs might be helpful:
- Get allocators
-
{
  "allocator_id": "192.168.44.17",
  "zone_id": "ece-zone-1",
  "host_ip": "192.168.44.17",
  "public_hostname": "192.168.44.17",
  "capacity": {
      "memory": {
          "total": 26000,
          "used": 0
      }
  },
  "settings": {},
  "instances": [],
  "metadata": [
      {
          "key": "containerengine",
          "value": "podman"
      }
  ]
}
If allocators are tagged as mentioned in step 7, the metadata section of the Get allocators API should contain the tag.
This information allows you to determine what allocators are running on top of podman (automated way)
-
Remove the docker allocator by following the Delete Hosts guidelines.
As an alternative, use the Delete Runner API.