It is time to say goodbye: This version of Elastic Cloud Enterprise has reached end-of-life (EOL) and is no longer supported.
The documentation for this version is no longer being maintained. If you are running this version, we strongly advise you to upgrade. For the latest information, see the current release documentation.
Google Cloud Platform (GCP)
editGoogle Cloud Platform (GCP)
editThe following steps walk you through creating an instance group with virtual machines on Google Compute Engine in preparation for installing Elastic Cloud Enterprise.
To learn more about the concepts used in this section, see Google Cloud Platform Documentation.
To set up your GCP instance group with virtual machines:
- Log into the Google Cloud Platform console.
-
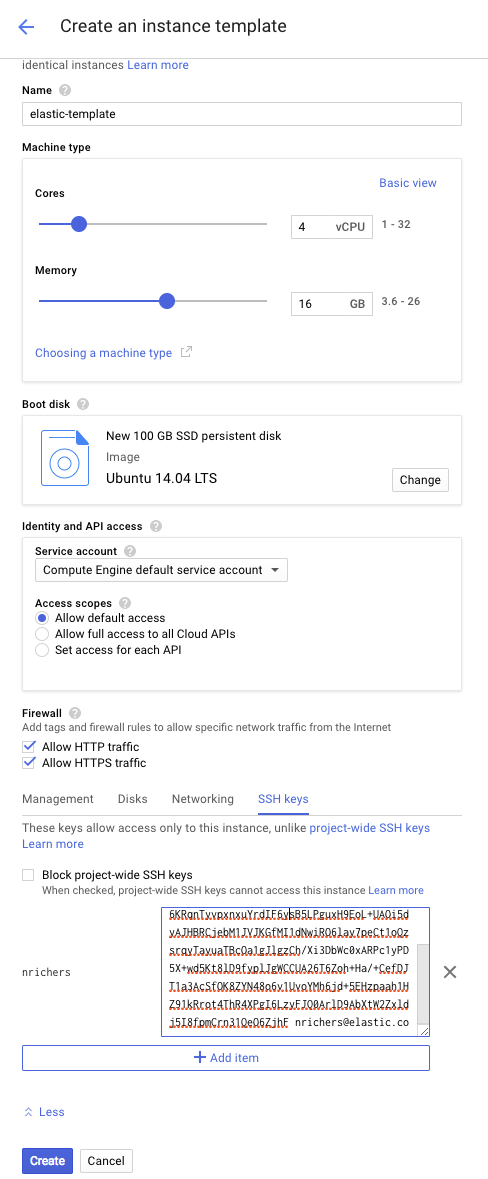
Create an instance template:
- Under Instance Templates, click CREATE INSTANCE TEMPLATE and name your template.
- Select a machine type, one of the supported Linux distributions as the boot disk and specify enough storage. Make sure that the template meets the prerequisites for Elastic Cloud Enterprise.
- Set the Firewall to allow both HTTP and HTTPS access.
- On the Networking tab, set IP forwarding to on.
- On the SSH keys tab, add your public SSH key.
-
Click Create:
-
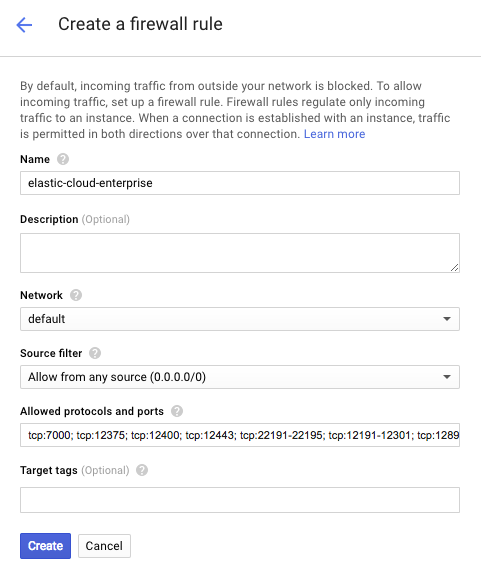
Add a firewall rule:
- Under Instance Templates, select the name of the new template and under Network, click default.
-
Click Add firewall rule and select Allow from any source (0.0.0.0/0). Enter the following allowed protocols and ports:
tcp:7000; tcp:12375; tcp:12400; tcp:12443; tcp:22191-22195; tcp:12191-12301; tcp:12898-12908; tcp:13898-13908; tcp:2112; tcp:18000-20000; tcp:9200; tcp:9243; tcp:9300; tcp:9343;
-
Click Create:
-
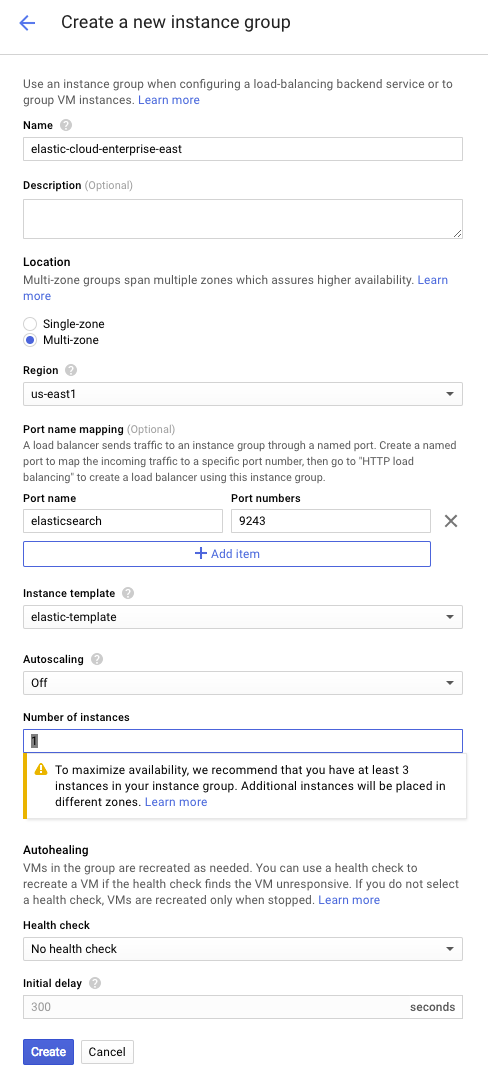
Create an instance group:
- Return to the Compute Engine panel through the Products & services menu.
- Select the Instance groups panel, click Create instance group, and name your group.
- Under Location, select Multi-zone and select a region.
-
Click Specify port name mapping and add port 9243, which is the port used by Kibana and Elasticsearch for HTTPS access.
If you are using a load balancer or firewall, consider adding port 443. To add a port, click Add item. On each host in the Elastic Cloud Enterprise cluster, run
sudo iptables -A PREROUTING -t nat -p tcp --dport 443 -j REDIRECT --to-ports 9243. - Select the instance template you created earlier.
- Specify the number of instances to create. For high availability, select at least three instances. These instances are placed into separate zones. See our deployment recommendations for how many instances you might need to bring up a production Elastic Cloud Enterprise installation.
-
Click Create:
Creating the instance group can take a few minutes. After the instances have been created, they appear under VM instances.
-
Add a disk to use with XFS to each instance:
We recommend that you add disks with a minimum of 100GB of storage each to avoid performance bottlenecks due to GCP IOPS provisioning. To learn more about how increasing your persistent disk size on GCP also increases IOPS and throughput, see Optimizing Persistent Disk and Local SSD Performance.
If you use XFS, you must use XFS on all allocators.
- Under VM instances, select one of the instances and click EDIT.
- Under Additional disk, select to add an item and then select the Name dropdown to create a new disk.
-
Name your disk. If you plan to use the configuration script in a subsequent step, make sure that the additional disks are named
esdata-1,esdata-2, and so forth. - Specify the storage type you need for your type of workload.
- Create a blank disk by selecting None (blank disk) for the source type.
- Click Create to create the new disks.
-
Click Save to add the new disk to your instance.
Don’t forget to save your updated instance after adding the disk to make sure it is available for use. You will set up XFS when you configure the instances.
- Repeat these steps until you have added disks to all instances.
-
Configure the new instances with a user ID that has sudo permission.
For Ubuntu 14.04 LTS, a configuration script is available that configures the hosts for you. This script is provided as-is and requires your additional disks to be named
esdata-1,esdata-2, and so forth. After the script reboots your instances, they are ready for Elastic Cloud Enterprise.
Next steps: When your Google Compute Engine virtual machines are up and running, you can connect to them and install Elastic Cloud Enterprise. Afterwards, add your load balancer. To learn more about load balancing that is available with GCP, see Google Cloud Load Balancing.