Tutorial 1: Installing a self-managed Elastic Stackedit
This tutorial demonstrates how to install and configure the Elastic Stack in a self-managed environment. Following these steps, you’ll set up a three node Elasticsearch cluster, with Kibana, Fleet Server, and Elastic Agent, each on separate hosts. The Elastic Agent will be configured with the System integration, enabling it to gather local system logs and metrics and deliver them into the Elasticsearch cluster. Finally, you’ll learn how to view the system data in Kibana.
It should take between one and two hours to complete these steps.
- Prerequisites and assumptions
- Elastic Stack overview
- Step 1: Set up the first Elasticsearch node
- Step 2: Configure the first Elasticsearch node for connectivity
- Step 3: Start Elasticsearch
- Step 4: Set up a second Elasticsearch node
- Step 5: Set up additional Elasticsearch nodes
- Step 6: Install Kibana
- Step 7: Install Fleet Server
- Step 8: Install Elastic Agent
- Step 9: View your system data
- Next steps
If you’re using these steps to configure a production cluster that uses trusted CA-signed certificates for secure communications, after completing Step 6 to install Kibana we recommend jumping directly to Tutorial 2: Securing a self-managed Elastic Stack.
The second tutorial includes steps to configure security across the Elastic Stack, and then to set up Fleet Server and Elastic Agent with SSL certificates enabled.
Prerequisites and assumptionsedit
To get started, you’ll need the following:
- A set of virtual or physical hosts on which to install each stack component.
-
On each host, a super user account with
sudoprivileges.
The examples in this guide use RPM packages to install the Elastic Stack components on hosts running Red Hat Enterprise Linux 8. The steps for other install methods and operating systems are similar, and can be found in the documentation linked from each section. The packages that you’ll install are:
For Elastic Agent and Fleet Server (both of which use the elastic-agent-8.13.2-linux-x86_64.tar.gz package) we recommend using TAR/ZIP packages over RPM/DEB system packages, since only the former support upgrading using Fleet.
Special considerations such as firewalls and proxy servers are not covered here.
For the basic ports and protocols required for the installation to work, refer to the following overview section.
Elastic Stack overviewedit
Before starting, take a moment to familiarize yourself with the Elastic Stack components.
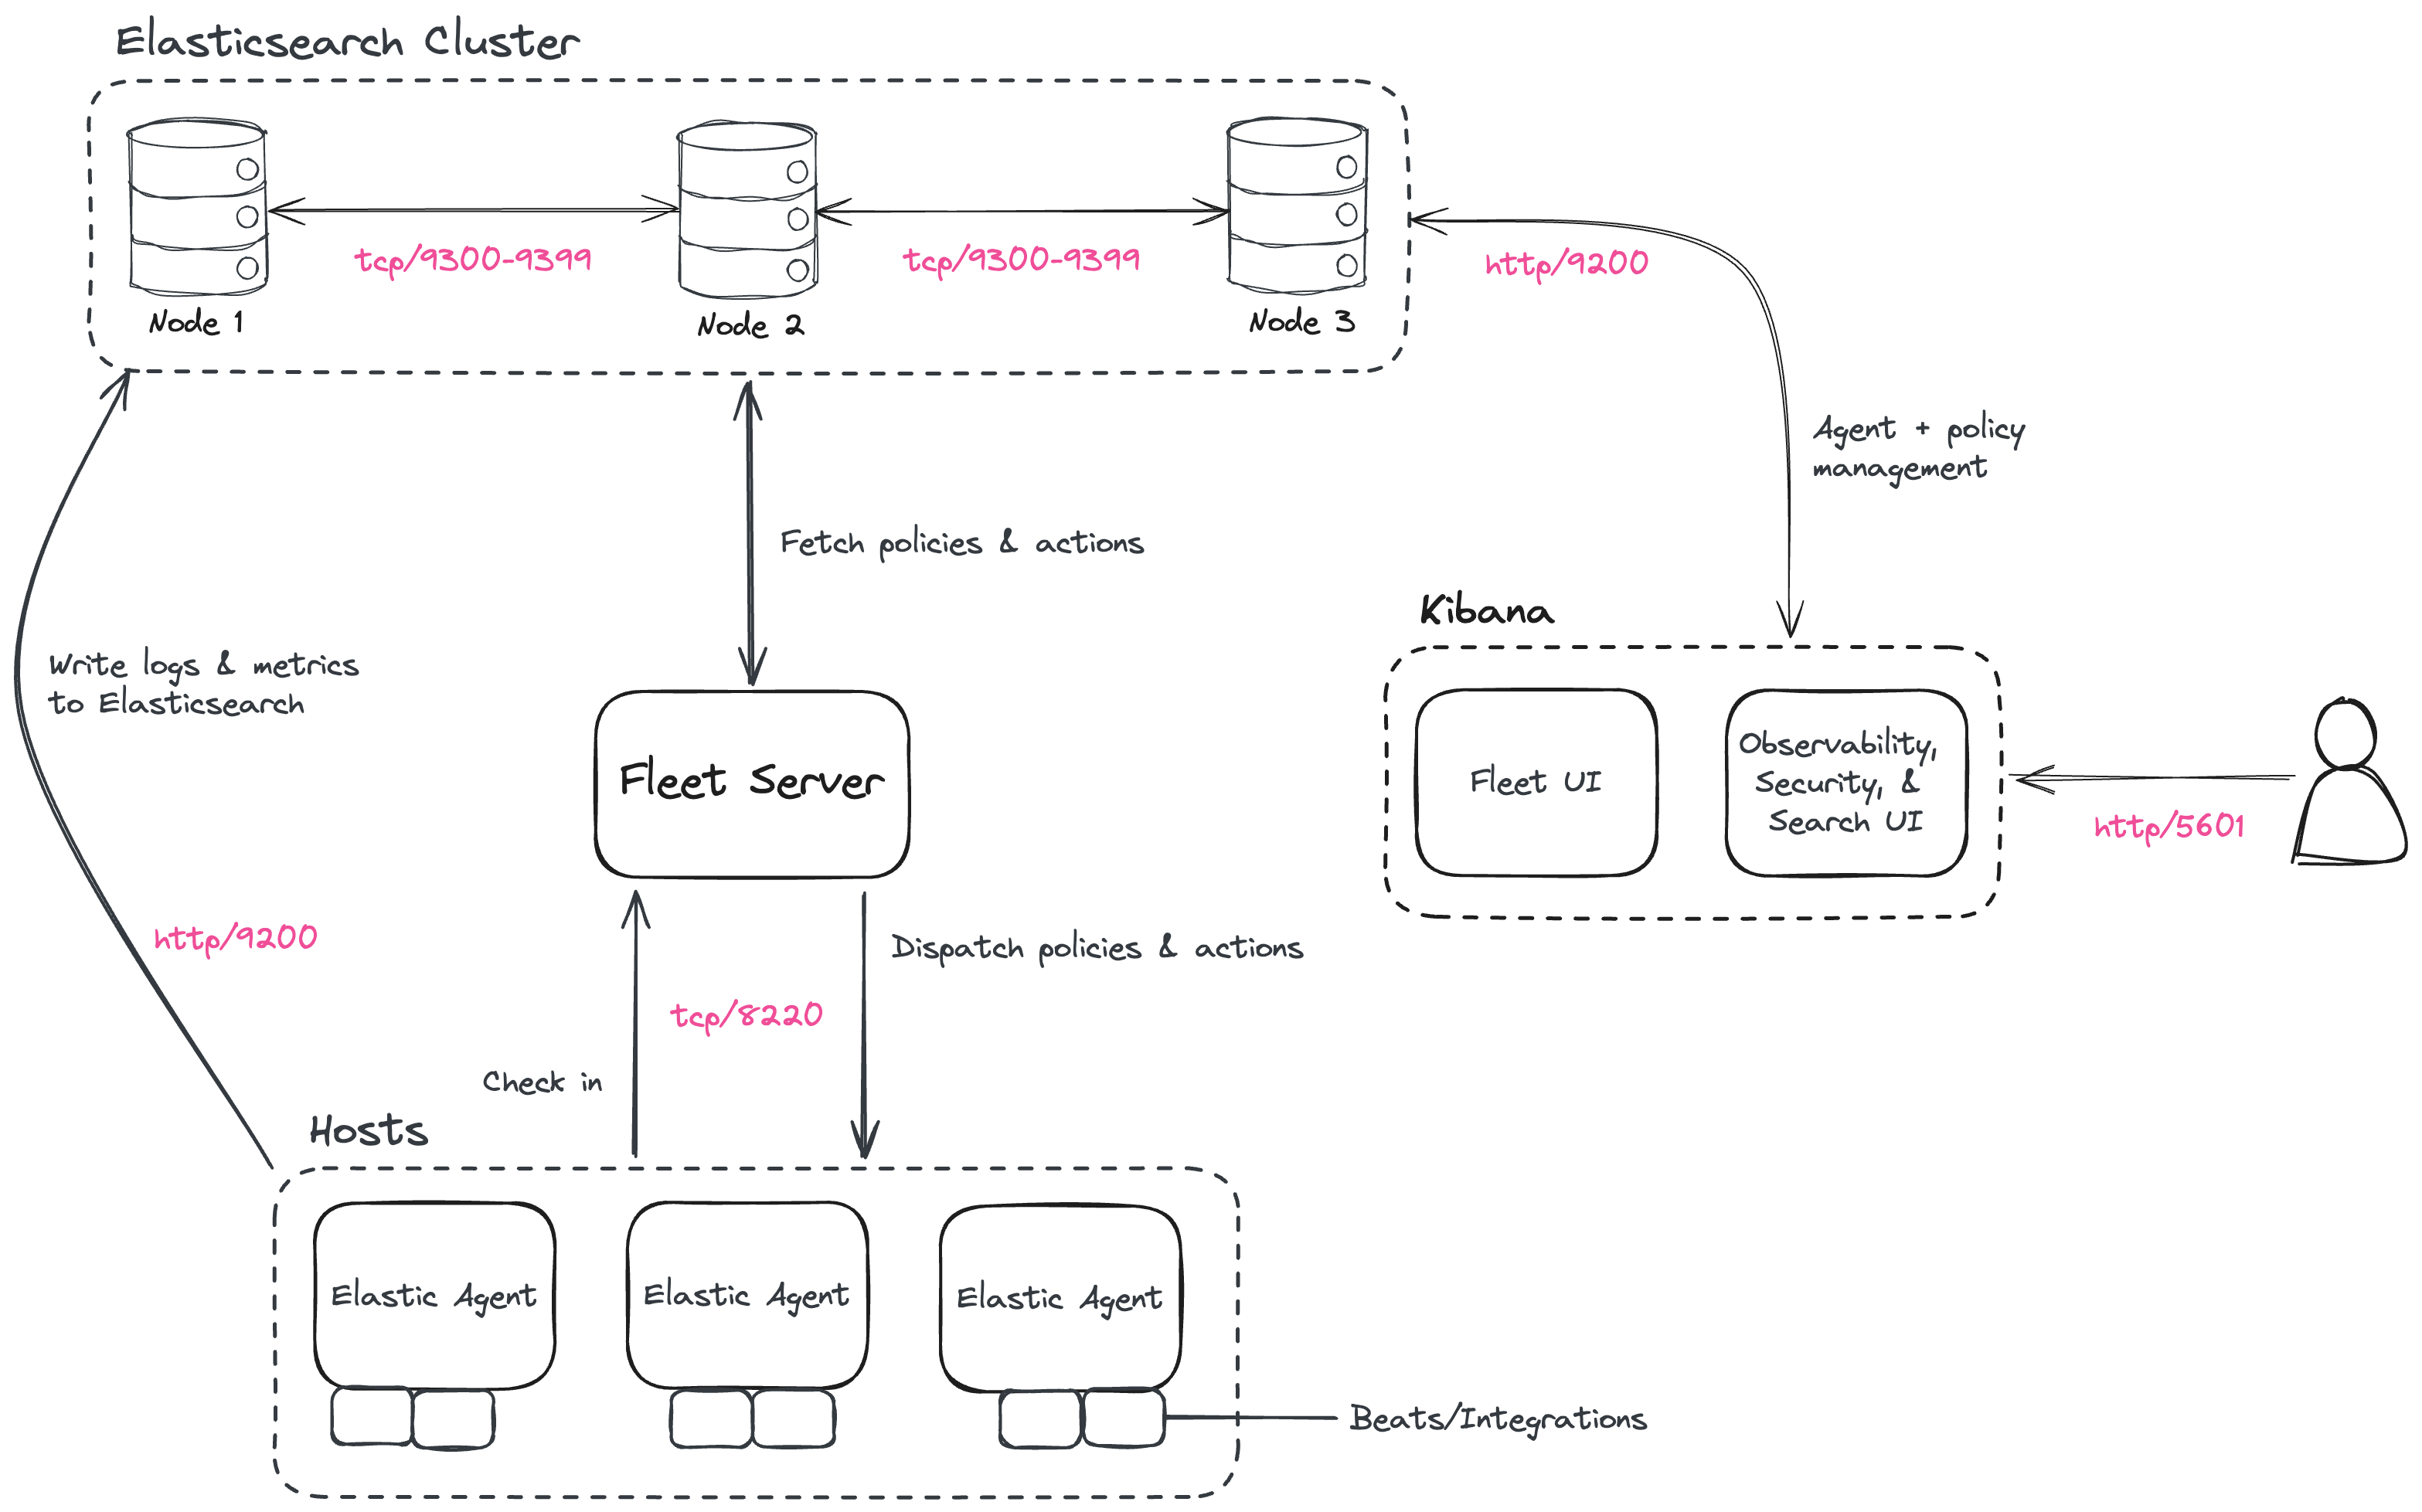
To learn more about the Elastic Stack and how each of these components are related, refer to An overview of the Elastic Stack.
Step 1: Set up the first Elasticsearch nodeedit
To begin, use RPM to install Elasticsearch on the first host. This initial Elasticsearch instance will serve as the master node.
- Log in to the host where you’d like to set up your first Elasticsearch node.
-
Create a working directory for the installation package:
mkdir elastic-install-files
-
Change into the new directory:
cd elastic-install-files
-
Download the Elasticsearch RPM and checksum file from the Elastic Artifact Registry. You can find details about these steps in the section Download and install the RPM manually.
wget https://artifacts.elastic.co/downloads/elasticsearch/elasticsearch-8.13.2-x86_64.rpm
wget https://artifacts.elastic.co/downloads/elasticsearch/elasticsearch-8.13.2-x86_64.rpm.sha512
-
Confirm the validity of the downloaded package by checking the SHA of the downloaded RPM against the published checksum:
shasum -a 512 -c elasticsearch-8.13.2-x86_64.rpm.sha512
The command should return:
elasticsearch-{version}-x86_64.rpm: OK. -
Run the Elasticsearch install command:
sudo rpm --install elasticsearch-8.13.2-x86_64.rpm
The Elasticsearch install process enables certain security features by default, including the following:
-
Authentication and authorization are enabled, including a built-in
elasticsuperuser account. - Certificates and keys for TLS are generated for the transport and HTTP layer, and TLS is enabled and configured with these keys and certificates.
-
Authentication and authorization are enabled, including a built-in
-
Copy the terminal output from the install command to a local file. In particular, you’ll need the password for the built-in
elasticsuperuser account. The output also contains the commands to enable Elasticsearch to run as a service, which you’ll use in the next step. -
Run the following two commands to enable Elasticsearch to run as a service using
systemd. This enables Elasticsearch to start automatically when the host system reboots. You can find details about this and the following steps in Running Elasticsearch withsystemd.sudo systemctl daemon-reload sudo systemctl enable elasticsearch.service
Step 2: Configure the first Elasticsearch node for connectivityedit
Before moving ahead to configure additional Elasticsearch nodes, you’ll need to update the Elasticsearch configuration on this first node so that other hosts are able to connect to it. This is done by updating the settings in the elasticsearch.yml file. For details about all available settings refer to Configuring Elasticsearch.
-
In a terminal, run the
ifconfigcommand and copy the value for the host inet IP address (for example,10.128.0.84). You’ll need this value later. -
Open the Elasticsearch configuration file in a text editor, such as
vim:sudo vim /etc/elasticsearch/elasticsearch.yml
-
In a multi-node Elasticsearch cluster, all of the Elasticsearch instances need to have the same name.
In the configuration file, uncomment the line
#cluster.name: my-applicationand give the Elasticsearch instance any name that you’d like:cluster.name: elasticsearch-demo
-
By default, Elasticsearch runs on
localhost. In order for Elasticsearch instances on other nodes to be able to join the cluster, you’ll need to set up Elasticsearch to run on a routable, external IP address.Uncomment the line
#network.host: 192.168.0.1and replace the default address with the value that you copied from theifconfigcommand output. For example:network.host: 10.128.0.84
-
Elasticsearch needs to be enabled to listen for connections from other, external hosts.
Uncomment the line
#transport.host: 0.0.0.0. The0.0.0.0setting enables Elasticsearch to listen for connections on all available network interfaces. Note that in a production environment you might want to restrict this by setting this value to match the value set fornetwork.host.transport.host: 0.0.0.0
You can find details about the
network.hostandtransport.hostsettings in the Elasticsearch Networking documentation. - Save your changes and close the editor.
Step 3: Start Elasticsearchedit
-
Now, it’s time to start the Elasticsearch service:
sudo systemctl start elasticsearch.service
If you need to, you can stop the service by running
sudo systemctl stop elasticsearch.service. -
Make sure that Elasticsearch is running properly.
sudo curl --cacert /etc/elasticsearch/certs/http_ca.crt -u elastic:$ELASTIC_PASSWORD https://localhost:9200
In the command, replace
$ELASTIC_PASSWORDwith theelasticsuperuser password that you copied from the install command output.If all is well, the command returns a response like this:
{ "name" : "Cp9oae6", "cluster_name" : "elasticsearch", "cluster_uuid" : "AT69_C_DTp-1qgIJlatQqA", "version" : { "number" : "{version_qualified}", "build_type" : "{build_type}", "build_hash" : "f27399d", "build_flavor" : "default", "build_date" : "2016-03-30T09:51:41.449Z", "build_snapshot" : false, "lucene_version" : "{lucene_version}", "minimum_wire_compatibility_version" : "1.2.3", "minimum_index_compatibility_version" : "1.2.3" }, "tagline" : "You Know, for Search" } -
Finally, check the status of Elasticsearch:
sudo systemctl status elasticsearch
As with the previous
curlcommand, the output should confirm that Elasticsearch started successfully. Typeqto exit from thestatuscommand results.
Step 4: Set up a second Elasticsearch nodeedit
To set up a second Elasticsearch node, the initial steps are similar to those that you followed for Step 1: Set up the first Elasticsearch node.
- Log in to the host where you’d like to set up your second Elasticsearch instance.
-
Create a working directory for the installation package:
mkdir elastic-install-files
-
Change into the new directory:
cd elastic-install-files
-
Download the Elasticsearch RPM and checksum file:
wget https://artifacts.elastic.co/downloads/elasticsearch/elasticsearch-8.13.2-x86_64.rpm wget https://artifacts.elastic.co/downloads/elasticsearch/elasticsearch-8.13.2-x86_64.rpm.sha512
-
Check the SHA of the downloaded RPM:
shasum -a 512 -c elasticsearch-8.13.2-x86_64.rpm.sha512
-
Run the Elasticsearch install command:
sudo rpm --install elasticsearch-8.13.2-x86_64.rpm
Unlike the setup for the first Elasticsearch node, in this case you don’t need to copy the output of the install command, since these settings will be updated in a later step.
-
Enable Elasticsearch to run as a service:
sudo systemctl daemon-reload
sudo systemctl enable elasticsearch.service
Don’t start the Elasticsearch service yet! There are a few more configuration steps to do before restarting.
-
To enable this second Elasticsearch node to connect to the first, you need to configure an enrollment token.
Be sure to run all of these configuration steps before starting the Elasticsearch service.
You can find additional details about these steps in Reconfigure a node to join an existing cluster and also in Enroll nodes in an existing cluster.
Return to your terminal shell on the first Elasticsearch node and generate a node enrollment token:
sudo /usr/share/elasticsearch/bin/elasticsearch-create-enrollment-token -s node
-
Copy the generated enrollment token from the command output.
Note the following tips about enrollment tokens:
-
An enrollment token has a lifespan of 30 minutes. In case the
elasticsearch-reconfigure-nodecommand returns anInvalid enrollment tokenerror, try generating a new token. - Be sure not to confuse an Elasticsearch enrollment token (for enrolling Elasticsearch nodes in an existing cluster) with a Kibana enrollment token (to enroll your Kibana instance with Elasticsearch, as described in the next section). These two tokens are not interchangeable.
-
An enrollment token has a lifespan of 30 minutes. In case the
-
In the terminal shell for your second Elasticsearch node, pass the enrollment token as a parameter to the
elasticsearch-reconfigure-nodetool:sudo /usr/share/elasticsearch/bin/elasticsearch-reconfigure-node --enrollment-token <enrollment-token>
In the command, replace
<enrollment-tokenwith theelasticgenerated token that you copied. -
Answer the
Do you want to continueprompt withyes(y). The new Elasticsearch node will be reconfigured. -
In a terminal, run
ifconfigand copy the value for the host inet IP address. You’ll need this value later. -
Open the second Elasticsearch instance configuration file in a text editor:
sudo vim /etc/elasticsearch/elasticsearch.yml
Notice that, as a result of having run the
elasticsearch-reconfigure-nodetool, certain settings have been updated. For example:-
The
transport.host: 0.0.0.0setting is already uncommented. -
The
discovery_seed.hostssetting has the value that you added fornetwork_hoston the first Elasticsearch node. As you add each new Elasticsearch node to the cluster, thediscovery_seed.hostssetting will contain an array of the IP addresses and port numbers to connect to each Elasticsearch node that was previously added to the cluster.
-
The
-
In the configuration file, uncomment the line
#cluster.name: my-applicationand set it to match the name you specified for the first Elasticsearch node:cluster.name: elasticsearch-demo
-
As with the first Elasticsearch node, you’ll need to set up Elasticsearch to run on a routable, external IP address. Uncomment the line
#network.host: 92.168.0.1and replace the default address with the value that you copied. For example:network.host: 10.128.0.132
- Save your changes and close the editor.
-
Start Elasticsearch on the second node:
sudo systemctl start elasticsearch.service
-
Optionally, to view the progress as the second Elasticsearch node starts up and connects to the first Elasticsearch node, open a new terminal into the second node and
tailthe Elasticsearch log file:sudo tail -f /var/log/elasticsearch/elasticsearch-demo.log
Notice in the log file some helpful diagnostics, such as:
-
Security is enabled -
Profiling is enabled -
using discovery type [multi-node] -
intialized -
starting...After a minute or so, the log should show a message like:
[<hostname2>] master node changed {previous [], current [<hostname1>...]}Here,
hostname1is your first Elasticsearch instance node, andhostname2is your second Elasticsearch instance node.The message indicates that the second Elasticsearch node has successfully contacted the initial Elasticsearch node and joined the cluster.
-
-
As a final check, run the following
curlrequest on the new node to confirm that Elasticsearch is still running properly and viewable at the new node’slocalhostIP address. Note that you need to replace$ELASTIC_PASSWORDwith the sameelasticsuperuser password that you used on the first Elasticsearch node.sudo curl --cacert /etc/elasticsearch/certs/http_ca.crt -u elastic:$ELASTIC_PASSWORD https://localhost:9200
{
  "name" : "Cp9oae6",
  "cluster_name" : "elasticsearch",
  "cluster_uuid" : "AT69_C_DTp-1qgIJlatQqA",
  "version" : {
    "number" : "{version_qualified}",
    "build_type" : "{build_type}",
    "build_hash" : "f27399d",
    "build_flavor" : "default",
    "build_date" : "2016-03-30T09:51:41.449Z",
    "build_snapshot" : false,
    "lucene_version" : "{lucene_version}",
    "minimum_wire_compatibility_version" : "1.2.3",
    "minimum_index_compatibility_version" : "1.2.3"
  },
  "tagline" : "You Know, for Search"
}
Step 5: Set up additional Elasticsearch nodesedit
To set up your next Elasticsearch node, follow exactly the same steps as you did previously in Step 4: Set up a second Elasticsearch node. The process is identical for each additional Elasticsearch node that you would like to add to the cluster. As a recommended best practice, create a new enrollment token for each new node that you add.
Step 6: Install Kibanaedit
As with Elasticsearch, you can use RPM to install Kibana on another host. You can find details about all of the following steps in the section Install Kibana with RPM.
-
Log in to the host where you’d like to install Kibana and create a working directory for the installation package:
mkdir kibana-install-files
-
Change into the new directory:
cd kibana-install-files
-
Download the Kibana RPM and checksum file from the Elastic website.
wget https://artifacts.elastic.co/downloads/kibana/kibana-8.13.2-x86_64.rpm
wget https://artifacts.elastic.co/downloads/kibana/kibana-8.13.2-x86_64.rpm.sha512
-
Confirm the validity of the downloaded package by checking the SHA of the downloaded RPM against the published checksum:
shasum -a 512 -c kibana-8.13.2-x86_64.rpm.sha512
The command should return:
kibana-{version}-x86_64.rpm: OK. -
Run the Kibana install command:
sudo rpm --install kibana-8.13.2-x86_64.rpm
-
As with each additional Elasticsearch node that you added, to enable this Kibana instance to connect to the first Elasticsearch node, you need to configure an enrollment token.
Return to your terminal shell into the first Elasticsearch node.
-
Run the
elasticsearch-create-enrollment-tokencommand with the-s kibanaoption to generate a Kibana enrollment token:sudo /usr/share/elasticsearch/bin/elasticsearch-create-enrollment-token -s kibana
- Copy the generated enrollment token from the command output.
-
Back on the Kibana host, run the following two commands to enable Kibana to run as a service using
systemd, enabling Kibana to start automatically when the host system reboots.sudo systemctl daemon-reload sudo systemctl enable kibana.service
-
Before starting the Kibana service there’s one configuration change to make, to set Kibana to run on the Elasticsearch host IP address. This is done by updating the settings in the
kibana.ymlfile. For details about all available settings refer to Configure Kibana. -
In a terminal, run the
ifconfigcommand and copy the value for the host inet IP address. -
Open the Kibana configuration file for editing:
sudo vim /etc/kibana/kibana.yml
-
Uncomment the line
#server.host: localhostand replace the default address with the inet value that you copied from theifconfigcommand. For example:server.host: 10.128.0.28
- Save your changes and close the editor.
-
Start the Kibana service:
sudo systemctl start kibana.service
If you need to, you can stop the service by running
sudo systemctl stop kibana.service. -
Run the
statuscommand to get details about the Kibana service.sudo systemctl status kibana
-
In the
statuscommand output, a URL is shown with:- A host address to access Kibana
-
A six digit verification code
For example:
Kibana has not been configured.
Go to http://10.128.0.28:5601/?code=<code> to get started.
Make a note of the verification code.
-
Open a web browser to the external IP address of the Kibana host machine, for example:
http://<kibana-host-address>:5601.It can take a minute or two for Kibana to start up, so refresh the page if you don’t see a prompt right away.
- When Kibana starts you’re prompted to provide an enrollment token. Paste in the Kibana enrollment token that you generated earlier.
- Click Configure Elastic.
-
If you’re prompted to provide a verification code, copy and paste in the six digit code that was returned by the
statuscommand. Then, wait for the setup to complete. -
When you see the Welcome to Elastic page, provide the
elasticas the username and provide the password that you copied in Step 1, from theinstallcommand output when you set up your first Elasticsearch node. - Click Log in.
Kibana is now fully set up and communicating with your Elasticsearch cluster!
IMPORTANT: Stop here if you intend to configure SSL certificates.
For simplicity, in this tutorial we’re setting up all of the Elastic Stack components without configuring security certificates. You can proceed to configure Fleet, Elastic Agent, and then confirm that your system data appears in Kibana.
However, in a production environment, before going further to install Fleet Server and Elastic Agent it’s recommended to update your security settings to use trusted CA-signed certificates as described in Tutorial 2: Securing a self-managed Elastic Stack.
After new security certificates are configured any Elastic Agents would need to be reinstalled. If you’re currently setting up a production environment, we recommend that you jump directly to Tutorial 2, which includes steps to secure the Elastic Stack using certificates and then to set up Fleet and Elastic Agent with those certificates already in place.
Step 7: Install Fleet Serveredit
Now that Kibana is up and running, you can install Fleet Server, which will manage the Elastic Agent that you’ll set up in a later step. If you need more detail about these steps, refer to Deploy on-premises and self-managed in the Fleet and Elastic Agent Guide.
- Log in to the host where you’d like to set up Fleet Server.
-
Create a working directory for the installation package:
mkdir fleet-install-files
-
Change into the new directory:
cd fleet-install-files
-
In the terminal, run
ifconfigand copy the value for the host inet IP address (for example,10.128.0.84). You’ll need this value later. - Back to your web browser, open the Kibana menu and go to Management → Fleet. Fleet opens with a message that you need to add a Fleet Server.
- Click Add Fleet Server. The Add a Fleet Server flyout opens.
- In the flyout, select the Quick Start tab.
-
Specify a name for your Fleet Server host, for example
Fleet Server. -
Specify the host URL where Elastic Agents will reach Fleet Server, for example:
http://10.128.0.203:8220. This is the inet value that you copied from theifconfigoutput.Be sure to include the port number. Port
8220is the default used by Fleet Server in an on-premises environment. Refer to Default port assignments in the on-premises Fleet Server install documentation for a list of port assignments. - Click Generate Fleet Server policy. A policy is created that contains all of the configuration settings for the Fleet Server instance.
-
On the Install Fleet Server to a centralized host step, for this example we select the Linux Tar tab, but you can instead select the tab appropriate to the host operating system where you’re setting up Fleet Server.
Note that TAR/ZIP packages are recommended over RPM/DEB system packages, since only the former support upgrading Fleet Server using Fleet.
-
Copy the generated commands and then run them one-by-one in the terminal on your Fleet Server host.
These commands will, respectively:
- Download the Fleet Server package from the Elastic Artifact Registry.
- Unpack the package archive.
- Change into the directory containing the install binaries.
-
Install Fleet Server.
If you’d like to learn about the install command options, refer to
elastic-agent installin the Elastic Agent command reference.
-
At the prompt, enter
Yto install Elastic Agent and run it as a service. Wait for the installation to complete. - In the Kibana Add a Fleet Server flyout, wait for confirmation that Fleet Server has connected.
- For now, ignore the Continue enrolling Elastic Agent option and close the flyout.
Fleet Server is now fully set up!
Step 8: Install Elastic Agentedit
Next, you’ll install Elastic Agent on another host and use the System integration to monitor system logs and metrics.
- Log in to the host where you’d like to set up Elastic Agent.
-
Create a working directory for the installation package:
mkdir agent-install-files
-
Change into the new directory:
cd agent-install-files
- Open Kibana and go to Management → Fleet.
- On the Agents tab, you should see your new Fleet Server policy running with a healthy status.
- Open the Settings tab.
- Reopen the Agents tab and select Add agent. The Add agent flyout opens.
-
In the flyout, choose a policy name, for example
Demo Agent Policy. - Leave Collect system logs and metrics enabled. This will add the System integration to the Elastic Agent policy.
- Click Create policy.
- For the Enroll in Fleet? step, leave Enroll in Fleet selected.
-
On the Install Elastic Agent on your host step, for this example we select the Linux Tar tab, but you can instead select the tab appropriate to the host operating system where you’re setting up Fleet Server.
As with Fleet Server, note that TAR/ZIP packages are recommended over RPM/DEB system packages, since only the former support upgrading Elastic Agent using Fleet.
- Copy the generated commands.
-
In the
sudo ./elastic-agent installcommand, make two changes:-
For the
--urlparameter, check that the port number is set to8220(used for on-premises Fleet Server). -
Append an
--insecureflag at the end.If you want to set up secure communications using SSL certificates, refer to Tutorial 2: Securing a self-managed Elastic Stack.
The result should be like the following:
sudo ./elastic-agent install --url=https://10.128.0.203:8220 --enrollment-token=VWCobFhKd0JuUnppVYQxX0VKV5E6UmU3BGk0ck9RM2HzbWEmcS4Bc1YUUM==
-
For the
-
Run the commands one-by-one in the terminal on your Elastic Agent host. The commands will, respectively:
- Download the Elastic Agent package from the Elastic Artifact Registry.
- Unpack the package archive.
- Change into the directory containing the install binaries.
- Install Elastic Agent.
-
At the prompt, enter
Yto install Elastic Agent and run it as a service. Wait for the installation to complete.If everything goes well, the install will complete successfully:
Elastic Agent has been successfully installed.
- In the Kibana Add agent flyout, wait for confirmation that Elastic Agent has connected.
- Close the flyout.
Your new Elastic Agent is now installed an enrolled with Fleet Server.
Step 9: View your system dataedit
Now that all of the components have been installed, it’s time to view your system data.
View your system log data:
- Open the Kibana menu and go to Analytics → Dashboard.
-
In the query field, search for
Logs System. -
Select the
[Logs System] Syslog dashboardlink. The Kibana Dashboard opens with visualizations of Syslog events, hostnames and processes, and more.
View your system metrics data:
- Open the Kibana menu and return to Analytics → Dashboard.
-
In the query field, search for
Metrics System. -
Select the
[Metrics System] Host overviewlink. The Kibana Dashboard opens with visualizations of host metrics including CPU usage, memory usage, running processes, and others.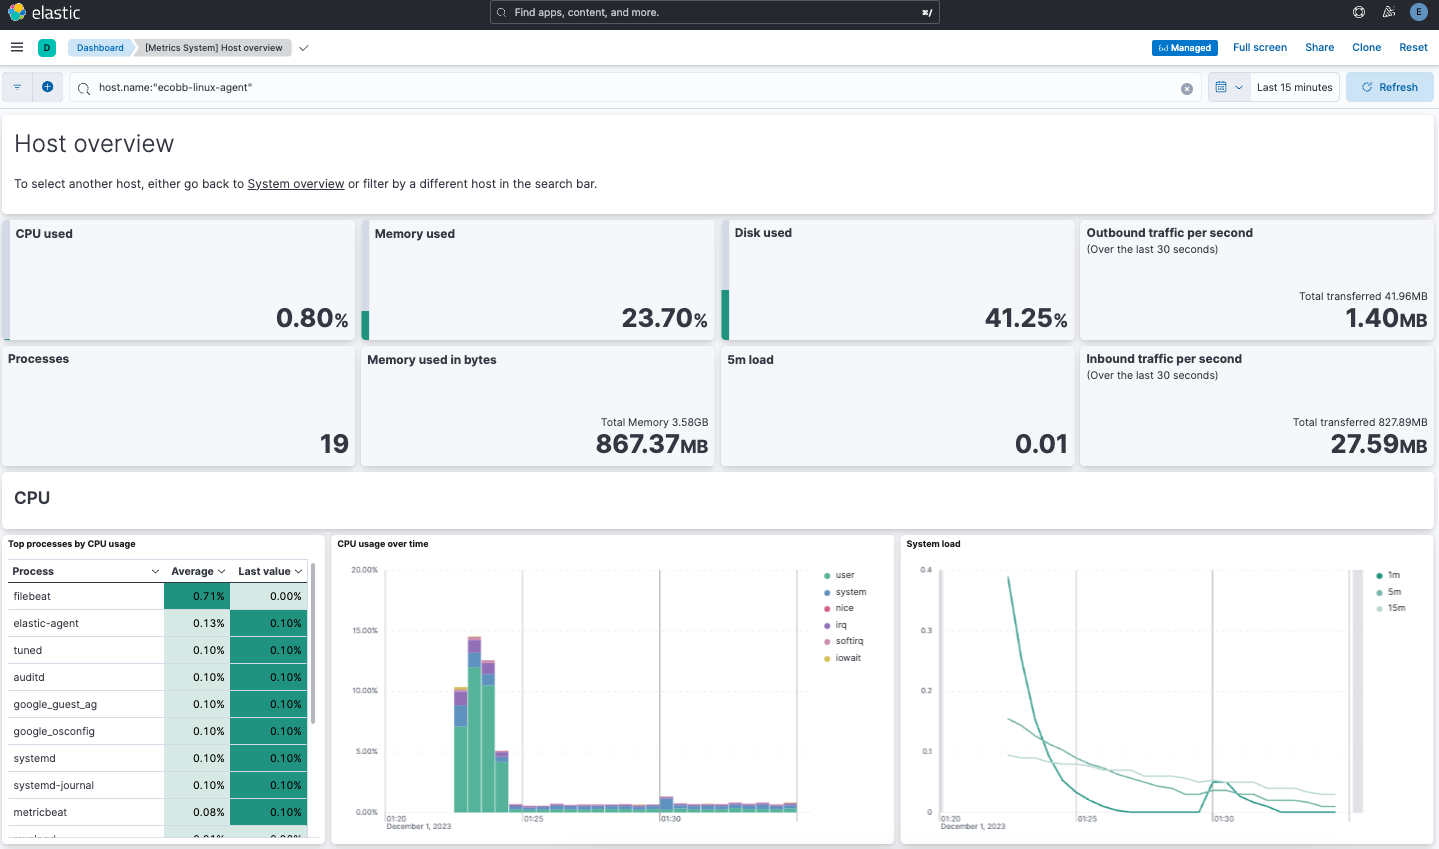
Congratulations! You’ve successfully set up a three node Elasticsearch cluster, with Kibana, Fleet Server, and Elastic Agent.
Next stepsedit
Now that you’ve successfully configured an on-premises Elastic Stack, you can learn how to configure the Elastic Stack in a production environment using trusted CA-signed certificates. Refer to Tutorial 2: Securing a self-managed Elastic Stack to learn more.
You can also start using your newly set up Elastic Stack right away:
- Do you have data ready to ingest? Learn how to add data to Elasticsearch.
- Use Elastic Observability to unify your logs, infrastructure metrics, uptime, and application performance data.
- Want to protect your endpoints from security threats? Try Elastic Security. Adding endpoint protection is just another integration that you add to the agent policy!