Filter dashboard data with controls
editFilter dashboard data with controls
editControls are interactive panels you add to your dashboards to filter and display only the data you want to explore.
There are two types of controls:
-
Options list — Adds a dropdown that allows you to filter the data with one or more options that you select.
For example, if you are using the [Logs] Web Traffic dashboard from the sample web logs data, you can add an options list for the
machine.os.keywordfield that allows you to display only the logs generated fromosxandiosoperating systems.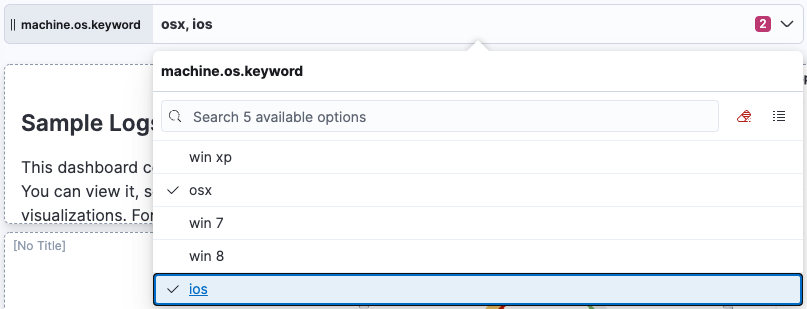
-
Range slider — Adds a slider that allows you to filter the data within a specified range of values.
For example, if you are using the [Logs] Web Traffic dashboard from the sample web logs data, you can add a range slider for the
hour_of_dayfield that allows you to display only the log data from 9:00AM to 5:00PM.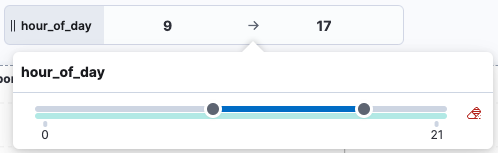
Create and add controls
editTo add interactive filters, create controls, then add them to your dashboard.
-
Open or create a new dashboard.
- If you are adding a Control to an existing dashboard, click Edit, click Controls in the dashboard toolbar, then select Add control.
- If you are adding a Control to a new dashboard, click Controls in the dashboard toolbar, then select Add control.
- From the Data view dropdown, select the data view with the field you want to appear in the Control.
-
In the Field list, select the field with the documents you want to filter.
The Control type is automatically applied for the field you selected.
- In the Label field, enter a clear and self-explanatory label.
-
Select the control width:
- To specify the control size, select the Minimum width.
- To expand the width of the control to fit the available space on the dashboard, select Expand width to fit available space.
-
If you are creating an Options list, specify the options.
- To allow users to select multiple options, select Allow multiple selections in dropdown.
- To populate the entire list of options, even when the Options list takes longer to populate than expected, select Run past timeout.
- Click Save and close.
Filter the data with Options lists
editFilter the data with one or more options that you select.
- Open the Options list dropdown.
-
Select the options for the data you want to display on the dashboard.
The dashboard displays only the data for the options you selected.
-
To clear the selection, click
 .
.
-
To display only the options you selected in the dropdown, click
 .
.
Filter the data with Range sliders
editFilter the data within a specified range of values.
- On the Range slider, click a value.
-
Move the sliders to specify the values you want to display.
The dashboard displays only the data for the range of values you specified.
-
To clear the specified values, click .
Configure the controls settings
edit- In the dashboard toolbar, click Controls, then select Settings.
-
On the Control settings flyout, configure the settings:
- Label position — Specifies where the label appears on the control.
- Validate user selections — When selected, any selected option that results in no data is ignored.
- Chain controls — When selected, any selected options in one control narrows the available options in the next control.
- To remove all controls from the dashboard, click Delete all.
- Click Save and close.
Edit controls
editChange the settings for a control.
-
Hover over the control you want to edit, then click
 .
.
- On the Edit control flyout, change the options, then click Save and close.
Remove controls
editRemove controls from your dashboard.
-
Hover over the control you want to remove, then click
 .
.
- On the Delete control? window, click Delete.