Leverage document-level security from connectors in Search Applications
editLeverage document-level security from connectors in Search Applicationsedit
This guide explains how to ensure document-level security (DLS) for documents ingested by Elastic connectors, when building a search application.
In this example we will:
- Set up the SharePoint Online connector to ingest data from SharePoint Online
- Set up a Search Application using the Elasticsearch index created by the SharePoint Online connector
- Create Elasticsearch API keys with DLS and workflow restrictions to query your Search Application
- Build a search experience where authenticated users can search over the data ingested by connectors
Set up connector to sync data with access controledit
You can run SharePoint Online connector in Elastic Cloud (native) or on a self-managed deployment (connector client). Refer to SharePoint Online connector to learn how to set up the SharePoint Online connector and enable DLS.
To run the connector client, you’ll need to run the connectors service in addition to your Elastic deployment. Refer to Connector clients (self-managed) for details on how to set up a connector client and run the connectors service separately.
This guide assumes you already have an Elastic deployment, that satisfies the prerequisites for running the connectors service. If you don’t have an Elastic deployment, sign up for a free Elastic Cloud trial.
We use the SharePoint Online connector in this concrete example. Refer to document level security for a list of connectors that support DLS.
Elasticsearch indices overviewedit
When the SharePoint Online connector is set up and you’ve started syncing content, the connector will create two separate Elasticsearch indices:
- A content index that holds the searchable data in SharePoint Online. We’ll use this index to create our search application.
-
An access control index that includes access control data for each user that has access to SharePoint Online.
It will be named
.search-acl-filter-<your index name>, where<your index name>is the index name you chose. For example, an index namedsearch-sharepointwould have the ACL filter index.search-acl-filter-search-sharepoint. We’ll use this index to create Elasticsearch API keys that control access to the content index.
Create a Search Applicationedit
To build our search experience for our SharePoint Online data, we need to create a Search Application.
Follow these steps to create a Search Application in the Kibana UI:
- Navigate to Search > Search Applications.
- Select Create.
- Name the Search Application.
- Select the index used by the SharePoint Online connector.
- Select Create.
Alternatively, you can use the Put Search Application API.
Create Elasticsearch API keysedit
Next we need to create Elasticsearch API keys to restrict queries to the search application. These restrictions will ensure that users can only query documents they have access to. To create this API key, we will leverage information in the access control index created by the connector.
The access control index will contain documents similar to this example:
{
  "_index": ".search-acl-filter-search-sharepoint",
  "_id": "john@example.co",
  "_version": 1,
  "_seq_no": 0,
  "_primary_term": 1,
  "found": true,
  "_source": {
    "identity": {
      "email": "john@example.co",
      "access_control": [
        "john@example.co",
        "Engineering Members"
      ]
    },
    "query": {
      "template": {
        "params": {
          "access_control": [
            "john@example.co",
            "Engineering Members"
            ]
        },
        "source": """
        {
          "bool": {
            "should": [
              {
                "bool": {
                  "must_not": {
                    "exists": {
                      "field": "_allow_access_control"
                    }
                  }
                }
              },
              {
                "terms": {
                  "_allow_access_control.enum": {{#toJson}}access_control{{/toJson}}
                }
              }
            ]
          }
        }
        """
      }
    }
  }
}
This document contains the Elasticsearch query that describes which documents the user john@example.com has access to.
The access control information is stored in the access_control field.
In this case the user has access only to documents that contain "john@example.co" or "Engineering Members" in the _allow_access_control field.
The query field contains the DLS query we will use to create an Elasticsearch API key.
That key will ensure queries are restricted to the documents john@example.com has access to.
To create the API key, we will use the Create API Key API. The API call will look like this:
POST /_security/api_key
{
  "name": "john-api-key",
  "expiration": "1d",
  "role_descriptors": {
    "sharepoint-online-role": {
      "index": [
        {
          "names": [
            "sharepoint-search-application"
          ],
          "privileges": [
            "read"
          ],
          "query": {
            "template": {
              "params": {
                "access_control": [
                  "john@example.co",
                  "Engineering Members"
                  ]
              },
              "source": """
              {
                "bool": {
                  "should": [
                    {
                      "bool": {
                        "must_not": {
                          "exists": {
                            "field": "_allow_access_control"
                          }
                        }
                      }
                    },
                    {
                      "terms": {
                        "_allow_access_control.enum": {{#toJson}}access_control{{/toJson}}
                      }
                    }
                  ]
                }
              }
              """
            }
          }
        }
      ],
      "restriction": {
        "workflows": [
          "search_application_query"
        ]
      }
    }
  }
}
The response will look like this:
{
  "id": "0rCD3i-MjKsw4g9BpRIBa",
  "name": "john-api-key",
  "expiration": 1687881715555,
  "api_key": "zTxre9L6TcmRIgd2NgLCRg",
  "encoded": "Qk05dy1JZ0JhRDNyNGpLQ3MwUmk6elRzdGU5QjZUY21SSWdkMldnQ1RMZw=="
}
The api_key field contains the API key that can be used to query the Search Application with the appropriate DLS restrictions.
Querying multiple indicesedit
This section describes how to generate an API key to query a search application that contains multiple indices with documents ingested by connectors with DLS.
A user might have multiple identities that define which documents they are allowed to read. In this case we want to create a single Elasticsearch API key that can be used to query only the documents this user has access to.
Let’s assume we want to create an API key that combines the following user identities:
GET .search-acl-filter-source1
{
  "_id": "example.user@example.com",
  "identity": {
      "username": "example username",
      "email": "example.user@example.com"
   },
   "query": {
        "template": {
            "params": {
                "access_control": [
                    "example.user@example.com",
                    "source1-user-group"]
            }
        },
        "source": "..."
    }
}
GET .search-acl-filter-source2
{
  "_id": "example.user@example.com",
  "identity": {
      "username": "example username",
      "email": "example.user@example.com"
   },
   "query": {
        "template": {
            "params": {
                "access_control": [
                    "example.user@example.com",
                    "source2-user-group"]
            }
        },
        "source": "..."
    }
}
.search-acl-filter-source1 and .search-acl-filter-source2 define the access control identities for source1 and source2.
The following script exemplifies how to generate the Elasticsearch API key that combines multiple user identities:
require("dotenv").config();
const axios = require("axios");

// Elasticsearch URL and creds retrieved from environment variables
const ELASTICSEARCH_URL = process.env.ELASTICSEARCH_URL;
const ELASTICSEARCH_USER = process.env.ELASTICSEARCH_USER;
const ELASTICSEARCH_PASSWORD = process.env.ELASTICSEARCH_PASSWORD;

const config = {
  auth: {
    username: ELASTICSEARCH_USER,
    password: ELASTICSEARCH_PASSWORD,
  },
  headers: {
    "Content-Type": "application/json",
  },
};

async function createApiKey({
  searchApplication,
  userId,
  indices = "",
  metadata,
  expiration = "1d"
}) {
  try {
    const indices = indices.split(",");

    let combinedQuery = { bool: { should: [] } };

    for (const index of indices) {
      const aclsIndex = `.search-acl-filter-${index}`;
      const response = await axios.get(
        `${ELASTICSEARCH_URL}/${aclsIndex}/_doc/${userId}`,
        config
      );
      combinedQuery.bool.should.push({
        bool: {
          must: [
            {
              term: {
                "_index": index,
              },
            },
            response.data._source.query.source,
          ],
        },
      });
    }

    if (!metadata || Object.keys(metadata).length === 0) {
      metadata = { created_by: "create-api-key" };
    }

    const apiKeyBody = {
      name: userId,
      expiration,
      role_descriptors: {
        [`${searchApplication}-role`]: {
          index: [
            {
              names: [searchApplication],
              privileges: ["read"],
              query: combinedQuery,
            },
          ],
          restriction: {
            workflows: ["search_application_query"],
          },
        },
      },
      metadata,
    };

    const apiKeyResponse = await axios.post(
      `${ELASTICSEARCH_URL}/_security/api_key`,
      apiKeyBody,
      config
    );

    console.log(apiKeyResponse.data);
    return apiKeyResponse.data.encoded;
  } catch (error) {
    console.log(error)
  }
}

// example usage:
createApiKey({
  searchApplication: "my-search-app",
  userId: "example.user@example.com",
  indices: "source1,source2",
  expiration: "1d",
  metadata: {
    application: "my-search-app",
    namespace: "dev",
    foo: "bar",
  },
}).then((encodedKey) => console.log(encodedKey));
The example combines multiple identities into a single role descriptor. This is because an Elasticsearch API key can use role restrictions only if it has a single role descriptor.
Implementation in your frontend applicationedit
If you’re building a frontend application, use the encoded field to pass the API key to the frontend.
Your app can then use the API key to query the search application.
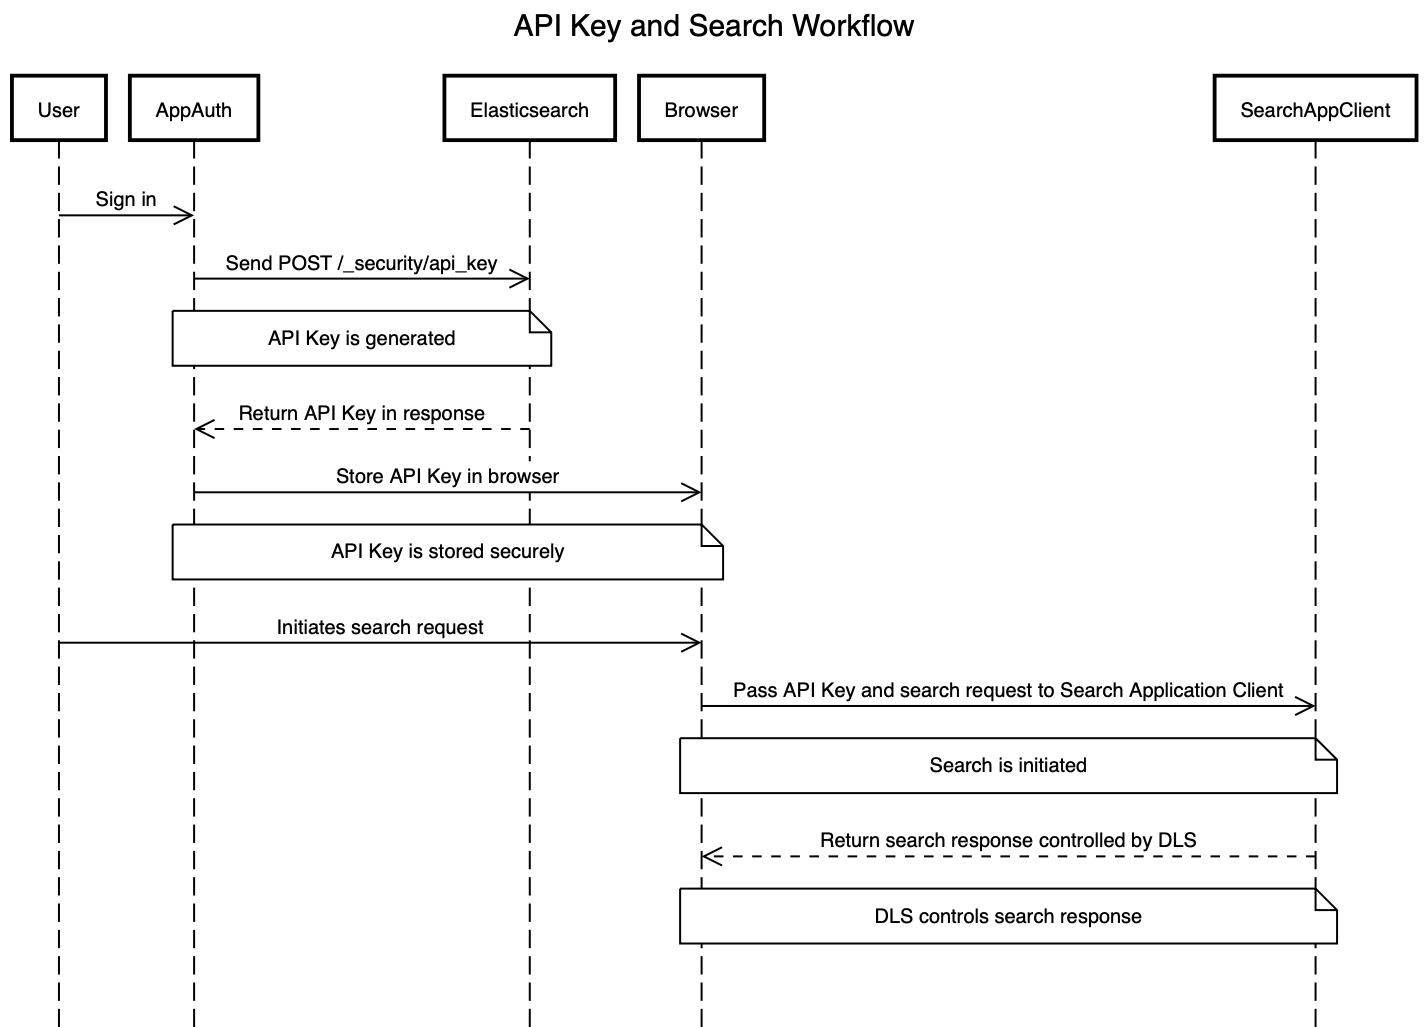
The workflow will look something like this:
- User signs in to your application.
- Your application generates an Elasticsearch API key using the Create API Key API.
-
The
encodedfield is returned to the frontend application. -
When the user searches for documents, the frontend application passes the
encodedfield to your search application’s_searchendpoint. For example, you might use the Search Application client to make the actual queries using the API key:const client = SearchApplicationClient(applicationName, endpoint, apiKey, params);
Here’s what this workflow looks like in a sequence diagram:
When creating an Elasticsearch API key for query Search Applications, you must include the search_application_query restriction. This will ensure the API key can only access the Search Application Search API.
We recommend always setting an expiration time when creating an Elasticsearch API key. When expiration is not set, the Elasticsearch API will never expire.
Workflow guidanceedit
We recommend relying on the connector access control sync to automate and keep documents in sync with changes to the original content source’s user permissions.
In this workflow you will need to handle the generation of the Elasticsearch API key in the backend of your application, in response to browser sign ins.
Once the key is generated, the backend will also need to return that key to the client (browser) to be used in subsequent search requests to your search application.
The API key can be invalidated using the Invalidate API Key API. Additionally, if the user’s permission changes, you’ll need to update or recreate the Elasticsearch API key.
Next stepsedit
Learn how to use the Search Application client to query your Search Application. See Search Applications client.