Get started with Next.jsedit
The Elastic APM Node.js agent can be used to trace the Next.js server (next
start or next dev) that runs your application without the need for code
changes to your app. The APM transactions for incoming HTTP requests to the
server will be named for the pages
and API endpoints in your
application, as well as for internal routes used by Next.js. Errors in code run
on the server will be reported for viewing in the Kibana APM app.
Note that the Node.js APM agent can only instrument server-side code. To monitor the client-side parts of a Next.js application, see the Elastic RUM agent.
[preview]
This functionality is in technical preview and may be changed or removed in a future release. Elastic will work to fix any issues, but features in technical preview are not subject to the support SLA of official GA features.
This Next.js instrumentation is a technical preview while we
solicit feedback from Next.js users. Currently next versions >=12.0.0
<13.3.0 are supported. If you are a Next.js user, please help us provide a
better Next.js observability experience with your feedback on our
Discuss forum.
Prerequisitesedit
You need an APM Server to send APM data to. Follow the APM Quick start if you have not set one up yet. You will need your APM server URL and an APM server secret token (or API key) for configuring the APM agent below.
You will also need a Next.js application to monitor. If you do not have an existing one to use, you can use the following to create a starter app (see Next.js Getting Started docs for more):
npx create-next-app@latest  # use the defaults
cd my-app
You can also take a look at and use this Next.js + Elastic APM example app.
Step 1: Add the APM agent dependencyedit
Add the elastic-apm-node module as a dependency to your application:
npm install elastic-apm-node --save # or 'yarn add elastic-apm-node'
Step 2: Start the APM agentedit
For the APM agent to instrument the Next.js server, it needs to be started
before the Next.js server code is loaded. The best way to do so is by using
Node’s --require option
to load the "elastic-apm-node/start-next.js" module — this will start the agent
(plus a little more for Next.js integration).
Edit the "dev" and "start" scripts in your "package.json" as follows:
{
  // ...
  "scripts": {
    "dev": "NODE_OPTIONS=--require=elastic-apm-node/start-next.js next dev",
    "build": "next build",
    "start": "NODE_OPTIONS=--require=elastic-apm-node/start-next.js next start",
    "lint": "next lint"
  },
  // ...
}
Step 3: Configure the APM agentedit
The APM agent can be configured with environment variables or with an "elastic-apm-node.js" module in the current working directory. Note that because the APM agent is being loaded before the Next.js server, the Next.js-supported ".env" files cannot be used to configure the APM agent. We will use an "elastic-apm-node.js" file here.
Create an "elastic-apm-node.js" file in the application root with the APM server URL and secret token values from the Prerequisites section above:
// elastic-apm-node.js
module.exports = {
  serverUrl: 'https://...',  // E.g. https://my-deployment-name.apm.us-west2.gcp.elastic-cloud.com
  secretToken: '...'
}
The equivalent using environment variables is:
export ELASTIC_APM_SERVER_URL='https://...'
export ELASTIC_APM_SECRET_TOKEN='...'
See the agent configuration guide for full details on supported configuration variables.
Step 4: Start your Next.js appedit
npm run dev # or 'npm run build && npm start' for the production server
Open http://localhost:3000 in your browser to load your Next.js app. If you
used the create-next-app tool above, it defines an
/api/hello API endpoint. You can provide some
artificial load by running the following in a separate terminal:
while true; do sleep 1; curl -i http://localhost:3000/api/hello; done
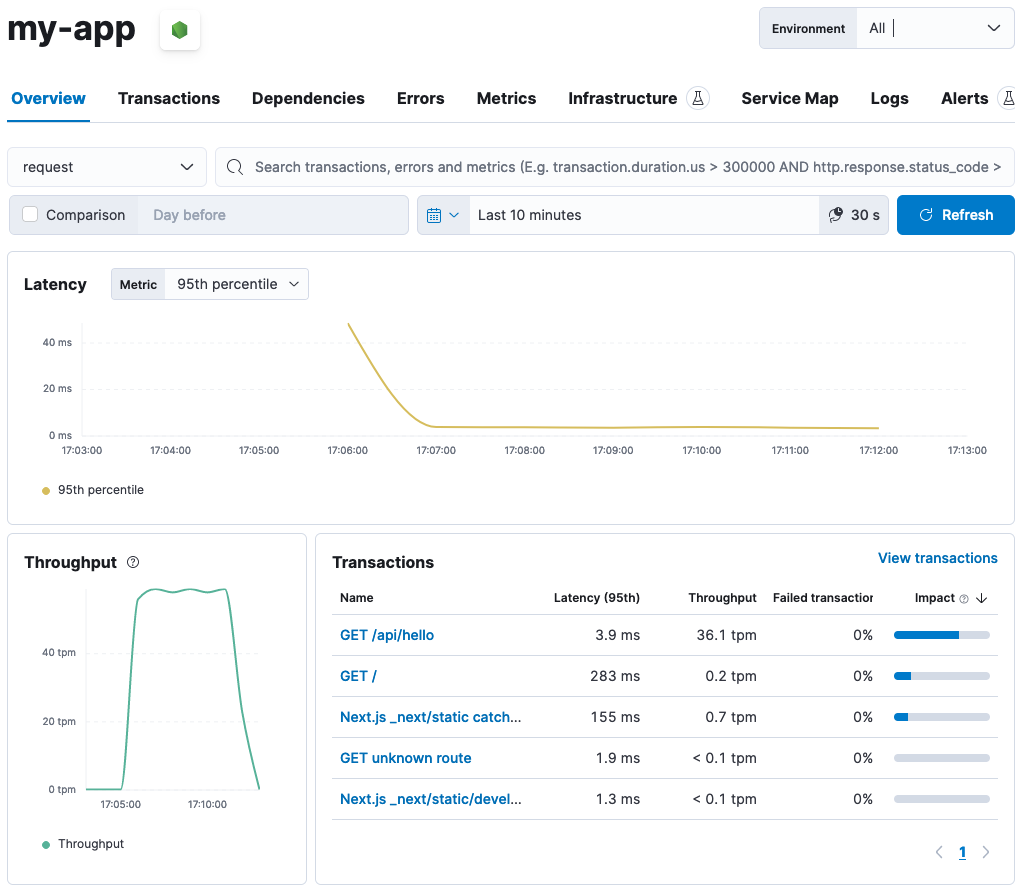
Visit your Kibana APM app and, after a few seconds, you should see a service
entry for your Next.js app. The service name will be pulled from the "name"
field in "package.json". It can be overriden with
serviceName. Here is an example:
Limitations and future workedit
This Next.js instrumentation has some limitations to be aware of.
Next.js build tooling bundles dependencies (using Webpack) for both client and
server-side code execution. The Node.js APM agent does not work when bundled.
See Bundlers and APM for details. The implication for Next.js instrumentation
is that you cannot directly import and use the APM agent in your code. That
means that using the Agent API for manual instrumentation is not currently
possible.
This instrumentation supports naming APM transactions for many internal Next.js
routes. For example, for
server-side
rendering (SSR) Next.js client code will make requests of the form GET
/next/_data/$buildId/$page.json, for which the APM agent names the transaction
Next.js _next/data route $page. However, there is a limitation with the
Next.js "public folder catchall" route. HTTP requests that resolve to files in
your "public/" directory, for example GET /favicon.ico, will result in a
transaction named GET unknown route. See Unknown routes below.
If you notice other limitations or have any suggestions, please give us feedback on our Discuss forum.
Performance monitoringedit
Elastic APM automatically measures the performance of your Next.js application. It records spans for database queries, external HTTP requests, and other slow operations that happen during requests to your Next.js app. Spans are grouped in transactions — by default one for each incoming HTTP request.
Unknown routesedit
When viewing the performance metrics of your application in Elastic APM, you might see some transactions named "unknown route". This indicates that the agent detected an incoming HTTP request to your application, but didn’t know which route in your Next.js app the HTTP request matched.
This might simply be 404 requests, which by definition don’t match any route, or it might be a symptom that the agent wasn’t installed correctly. If you see this or can’t get any meaningful metrics to show up, please follow the Troubleshooting Guide.
Filter sensitive informationedit
By default, the Node.js agent will filter common sensitive information before sending errors and metrics to the Elastic APM server.
It’s possible for you to tweak these defaults or remove any information you don’t want to send to Elastic APM:
-
By default, the Node.js agent will not log the body of HTTP requests.
To enable this,
use the
captureBodyconfig option -
By default, the Node.js agent will filter certain HTTP headers known to contain sensitive information.
To disable this,
use the
sanitizeFieldNamesconfig option - To apply custom filters, use one of the filtering functions
Compatibilityedit
See Supported technologies for details.
Troubleshootingedit
If you can’t get the Node.js agent to work as expected, please follow the troubleshooting guide.